记录我做网站的每一步
以下是初级配置
1、Wordpress
1.1、什么是 WordPress?
WordPress 是一个以PHP和MySQL为平台的自由开源的博客软件和内容管理系统。WordPress具有插件架构和模板系统。截至2018年4月,排名前1000万的网站中超过30.6%使用WordPress。WordPress是最受欢迎的网站内容管理系统。全球有大约30%的网站(7亿5000个)都是使用WordPress架设网站的。因特网上最流行的博客系统。WordPress在最著名的网络发布阶段中脱颖而出。如今,它被使用在超过7000万个站点上。
来自维基百科
搞网站的朋友都知道Wordpress这个东西,和它同一类的内容管理系统还有Typecho、hexo、织梦等。
1.2、Wordpress的优缺点
WordPress嘛,赞它的人说它功能齐全,喷它的人说它臃肿。
下面聊一聊Wordpress的优缺点。
优点
- 插件非常非常多,应有尽有。
- 主题非常多
- 功能非常完整
缺点
- 没有缓存功能,但可以通过Wp-super cache搞定
- 不支持markdown语法。也可以通过插件搞定。
ps:这里是个坑,插件有不兼容Wordpress版本的现象,这里推荐使用WP Githuber MD
好的,Wordpress就说到这,下面进入正题。
2、主题的选择
前面说过,Wordpress有非常多的主题。但问题来了,这么多主题又该如何选择??
当然是越炫酷越好啦!!(我们学生党建站的初衷不就是装X嘛)
这里要注意,有些(炫酷的)企业主题是要付费的。
注意
但大家千万不要下载所谓的破解主题,Wordpress是开源的,这就意味着,有些人可以随意窃取你的网站的密码。网站被黑只是分分钟钟的事情,切记切记!
Orfeo
墙裂推荐大家选择orfeo主题,简洁,炫酷,装逼。
它本身是免费的,但企业版要付费。
当然,Hestia本身也不错,Orfeo是Hestia的子主题。有以下特点:
- 对移动端友好
- 有良好的搜索引擎优化
- 高度定制
- 炫酷!炫酷!
下载
我们可以在 外观 → 主题 → 添加新主题 里下载。
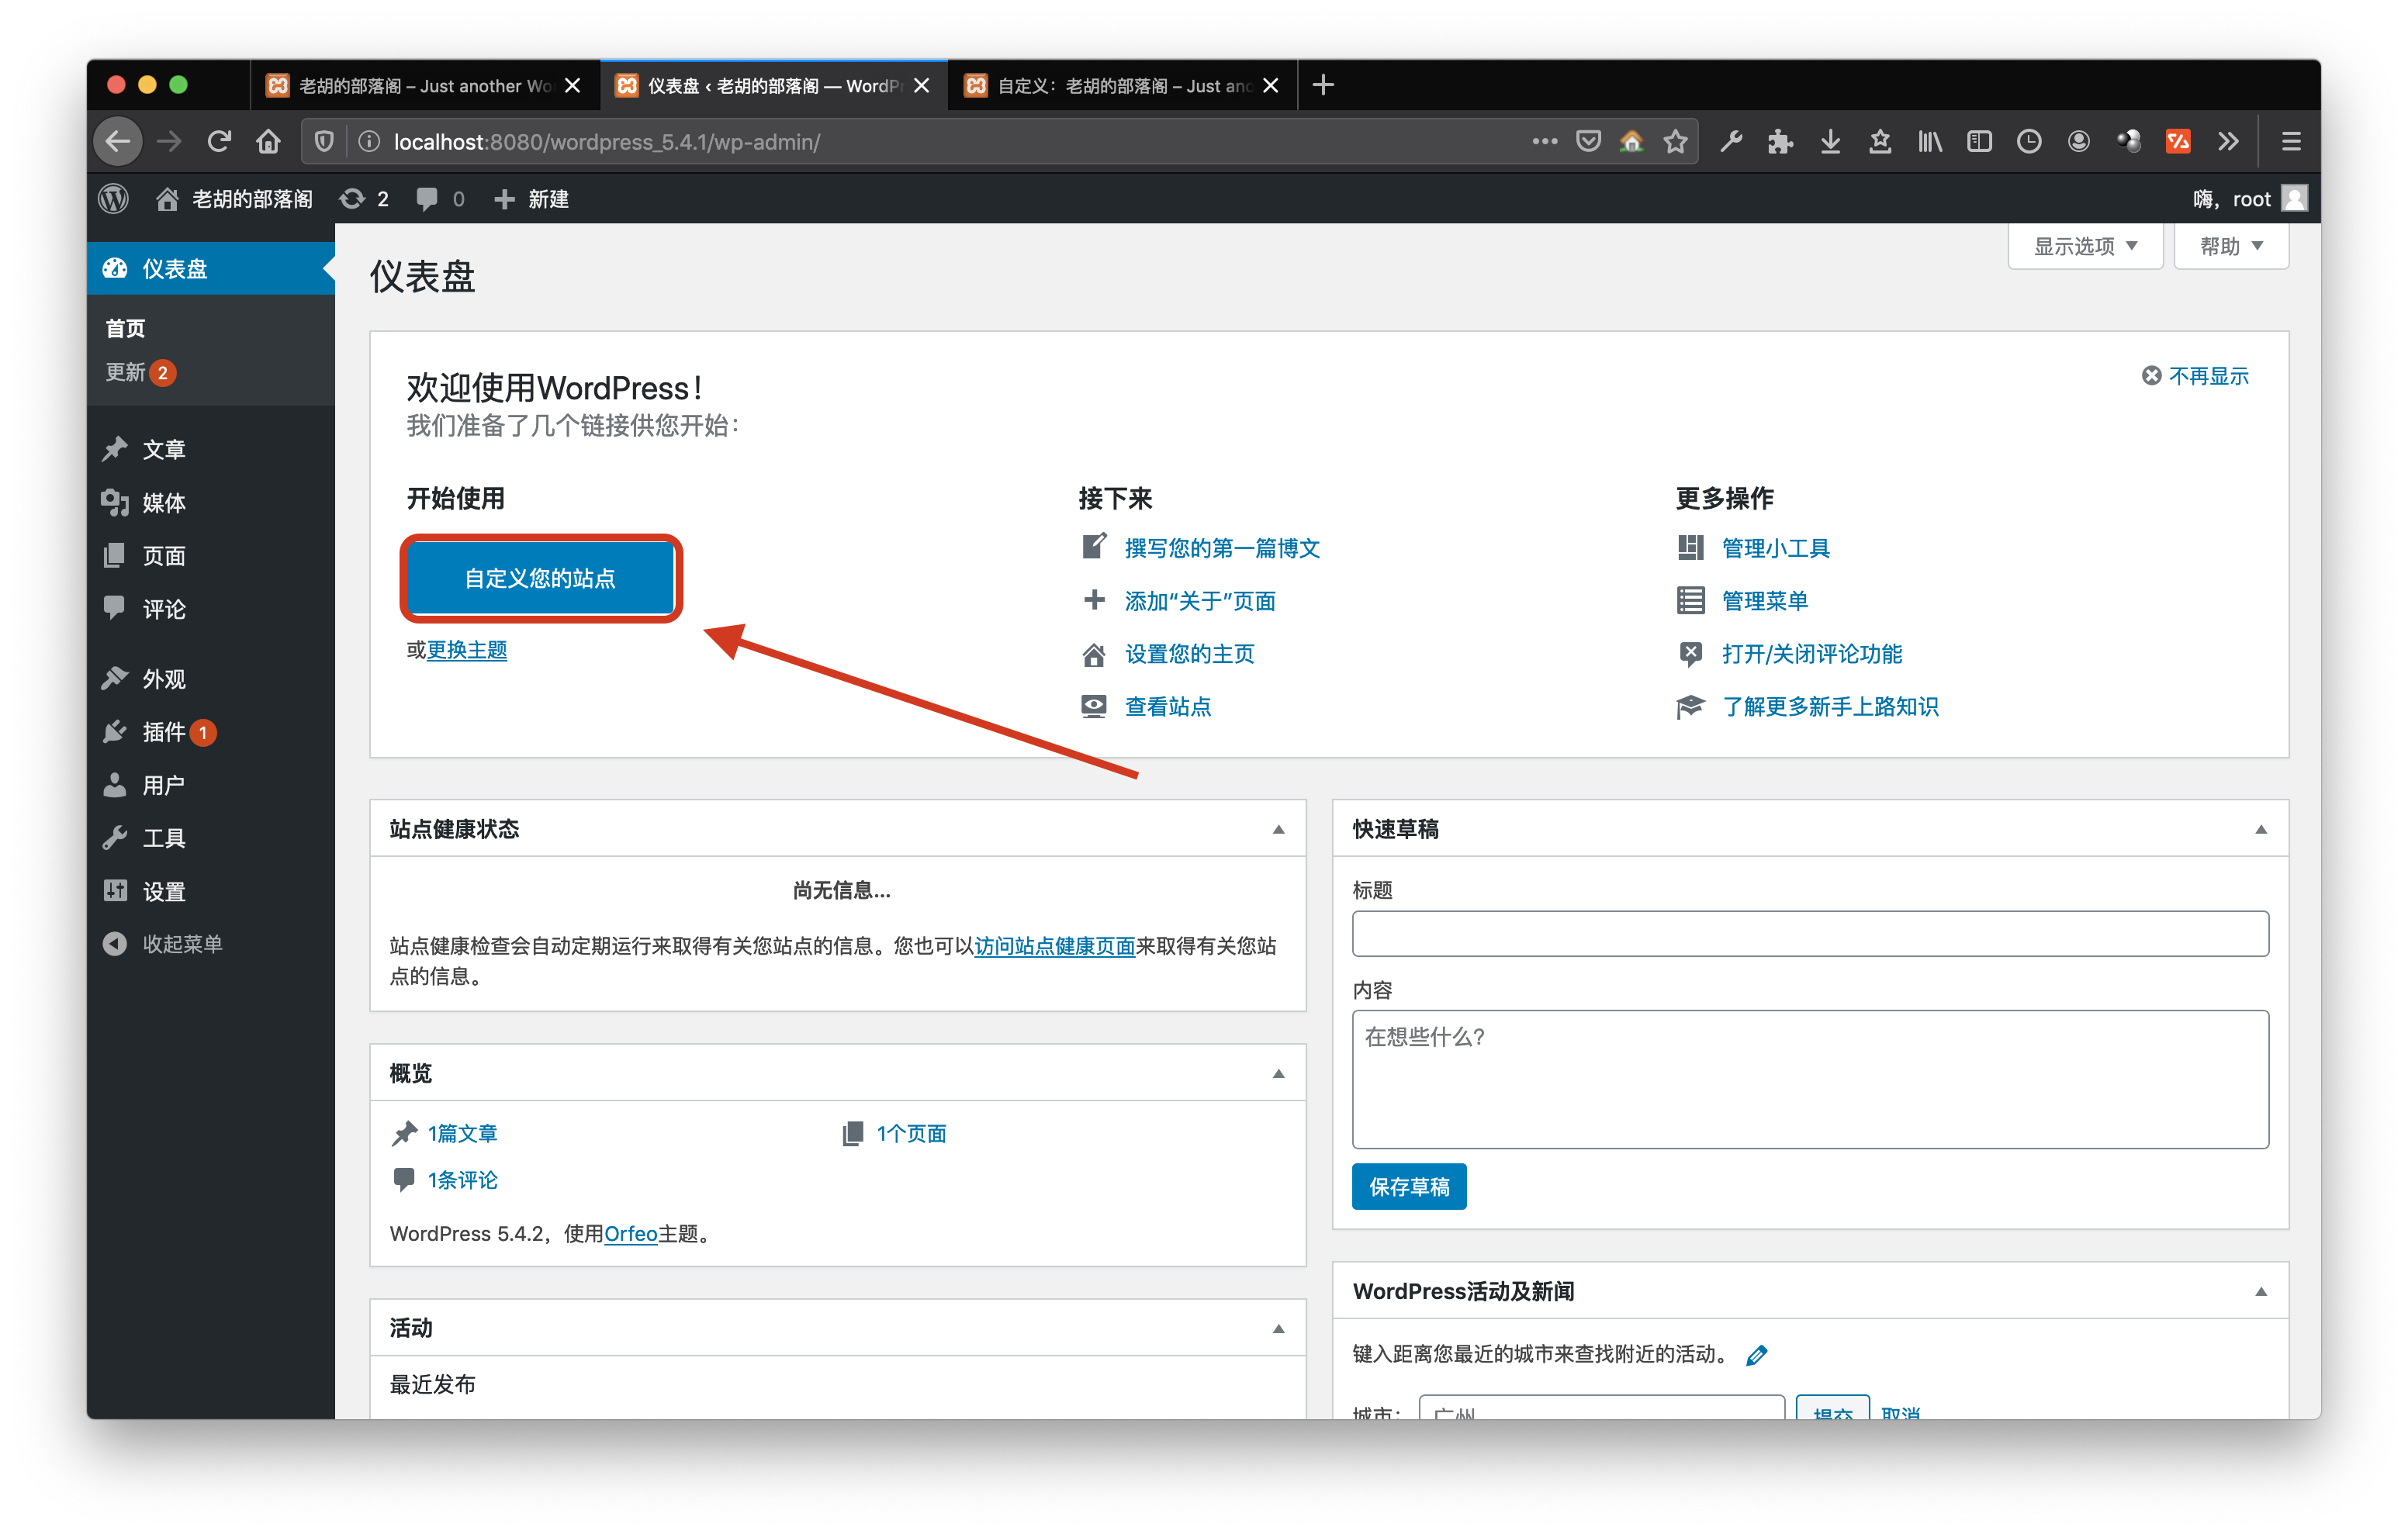
3、配置主题
一开始,我们看到的界面是这样的:
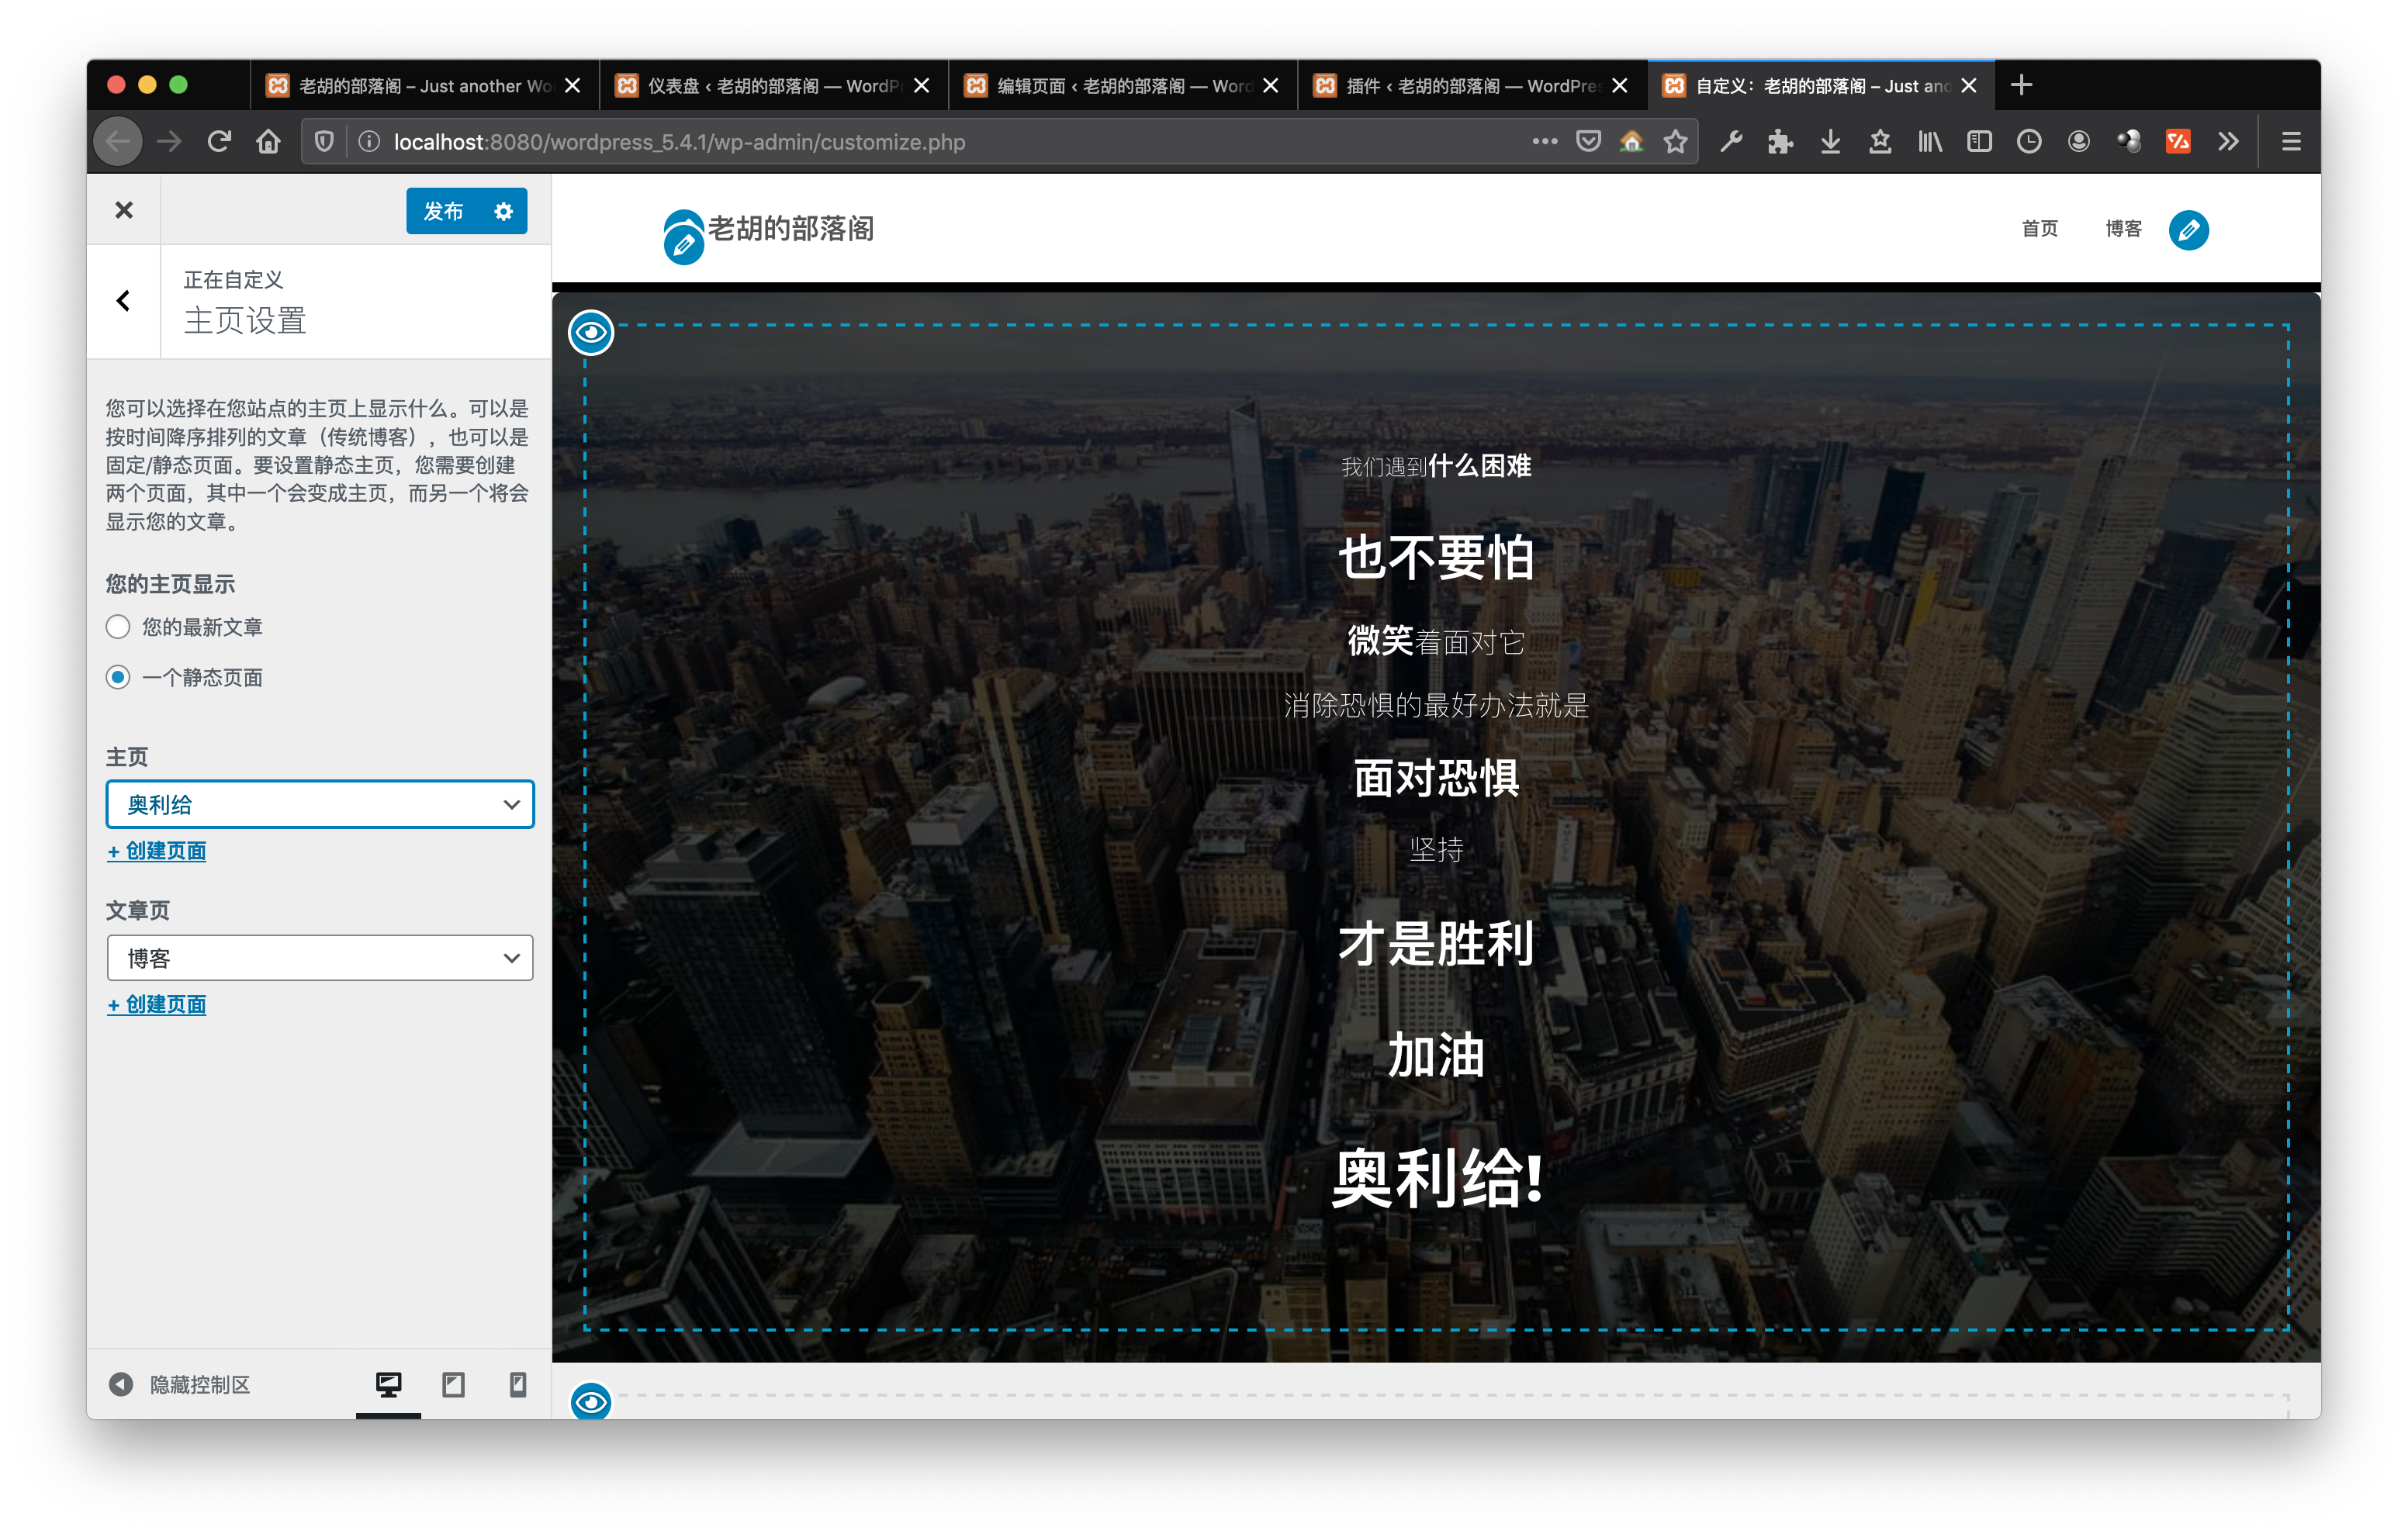
3.1、更改首页
首先,我们进入定制器。
点击首页选项:
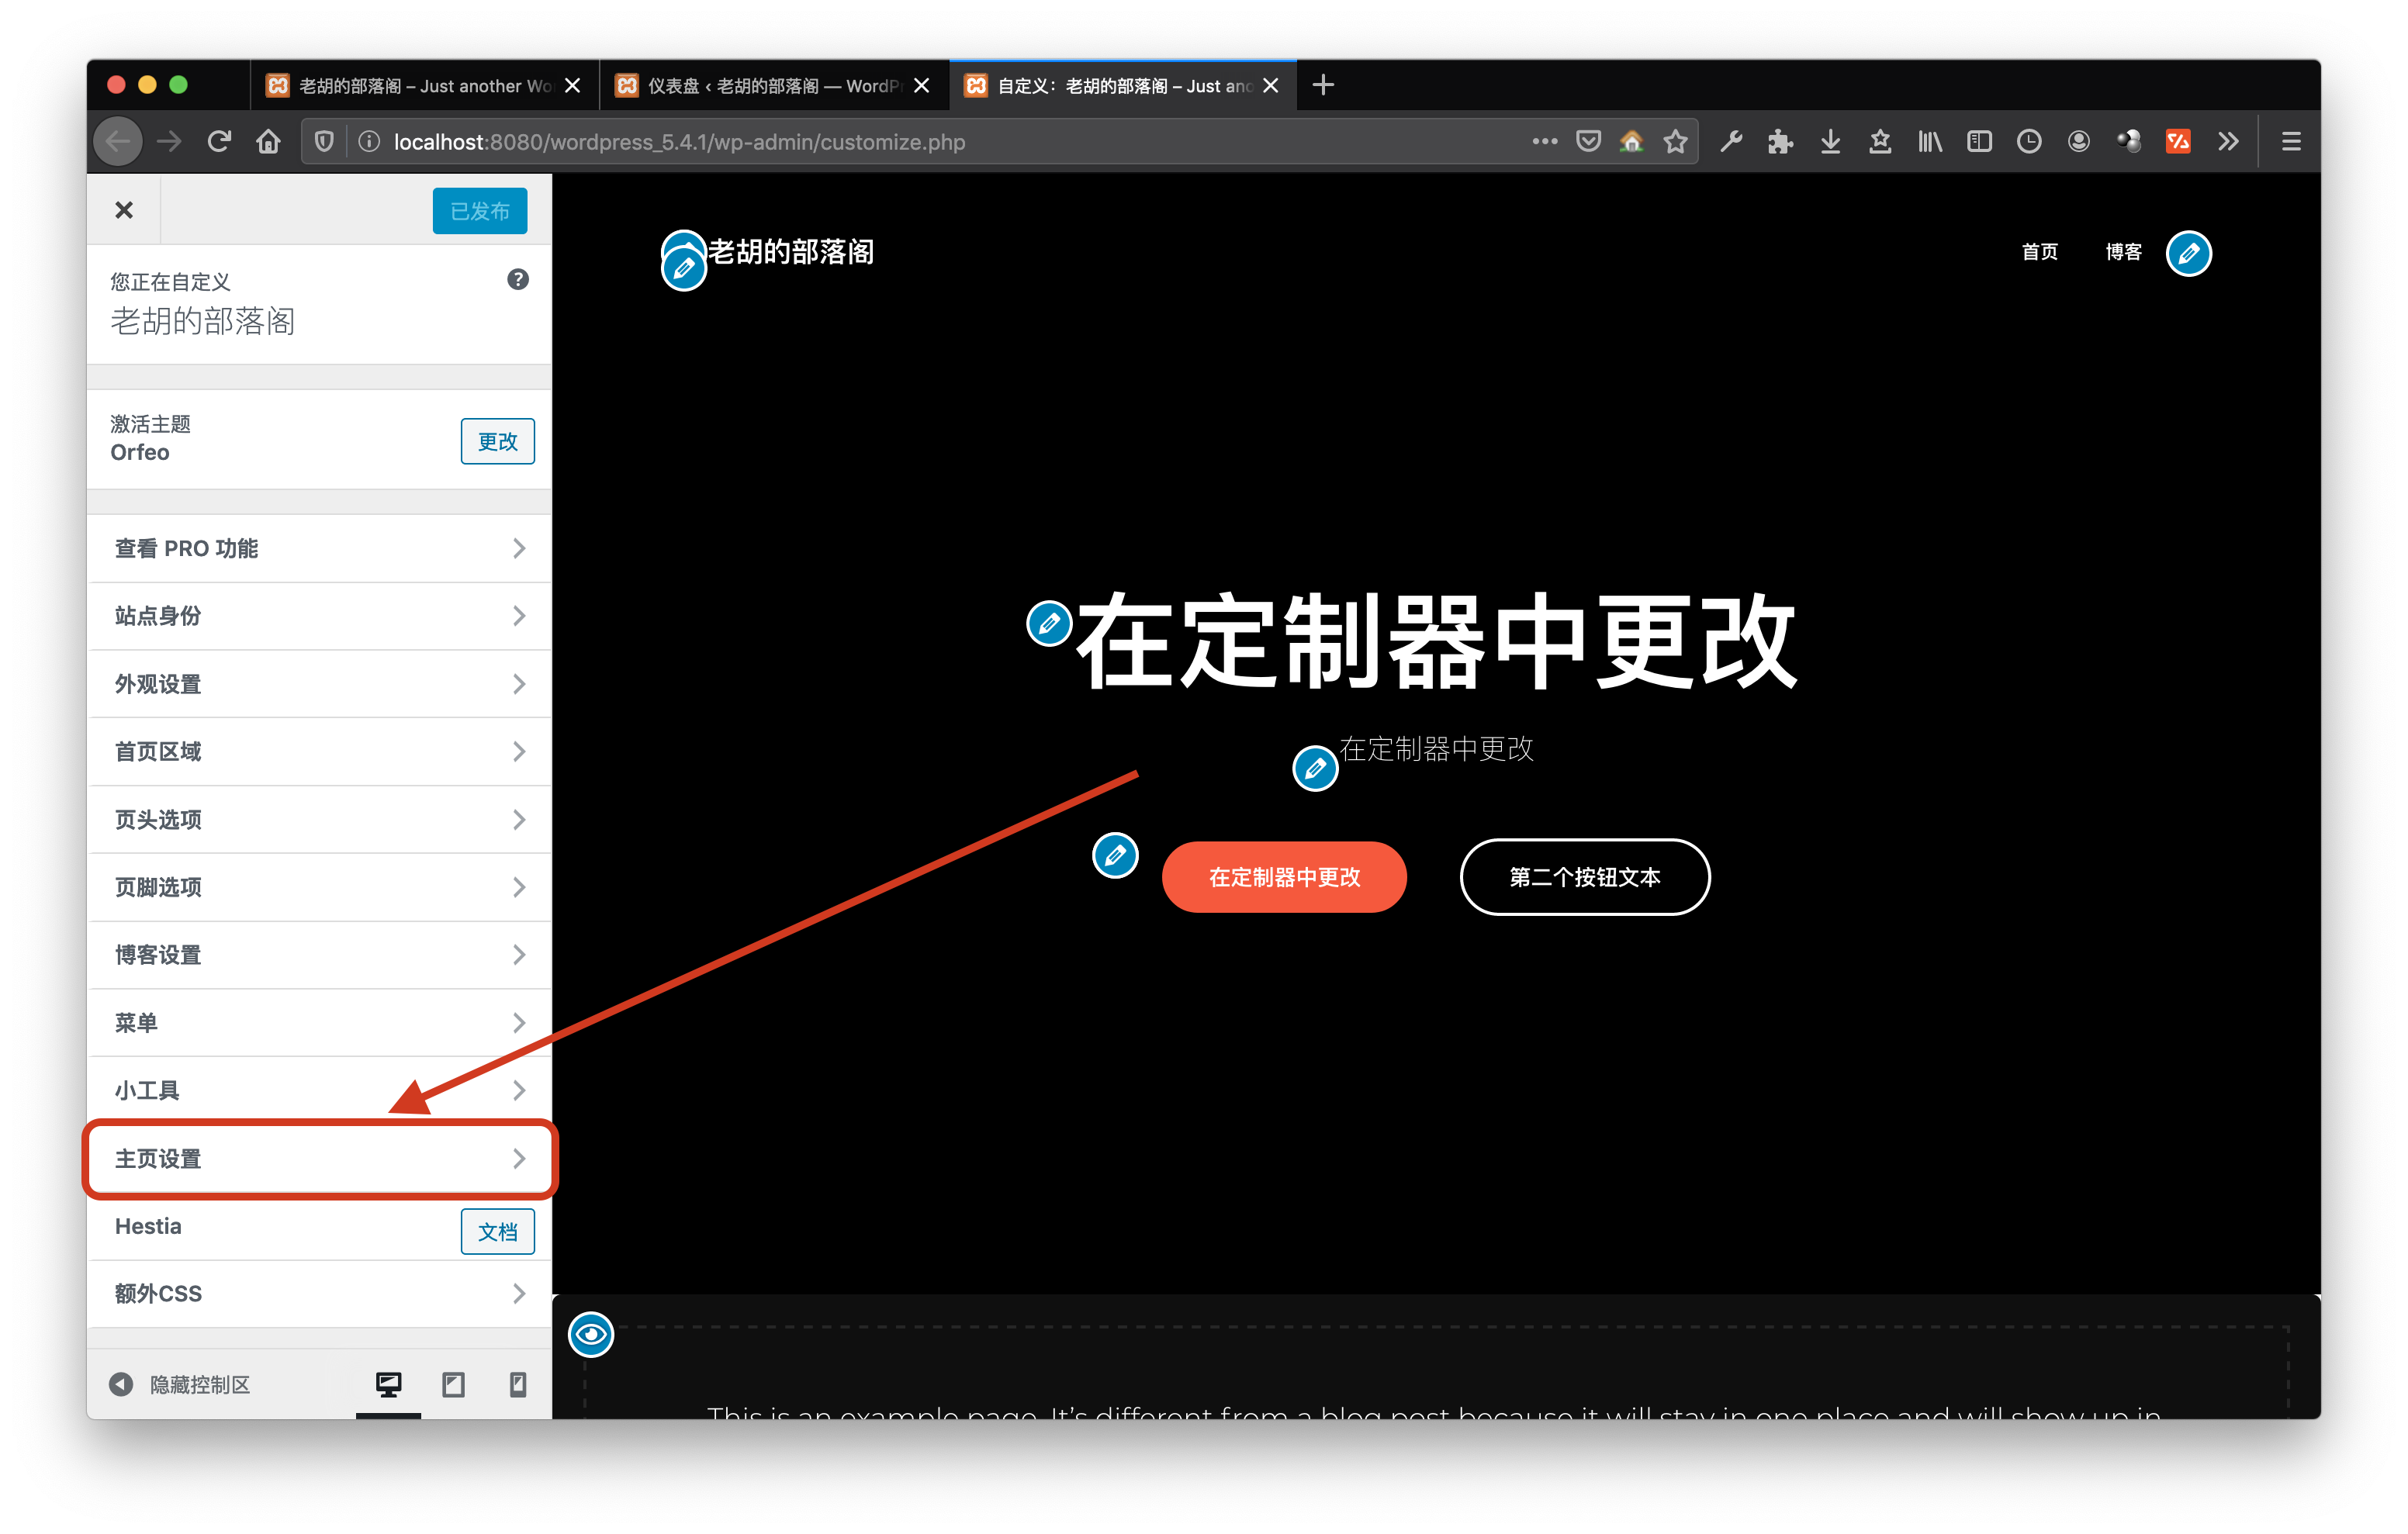
然后,我们就可以把主页改成你想要的了。
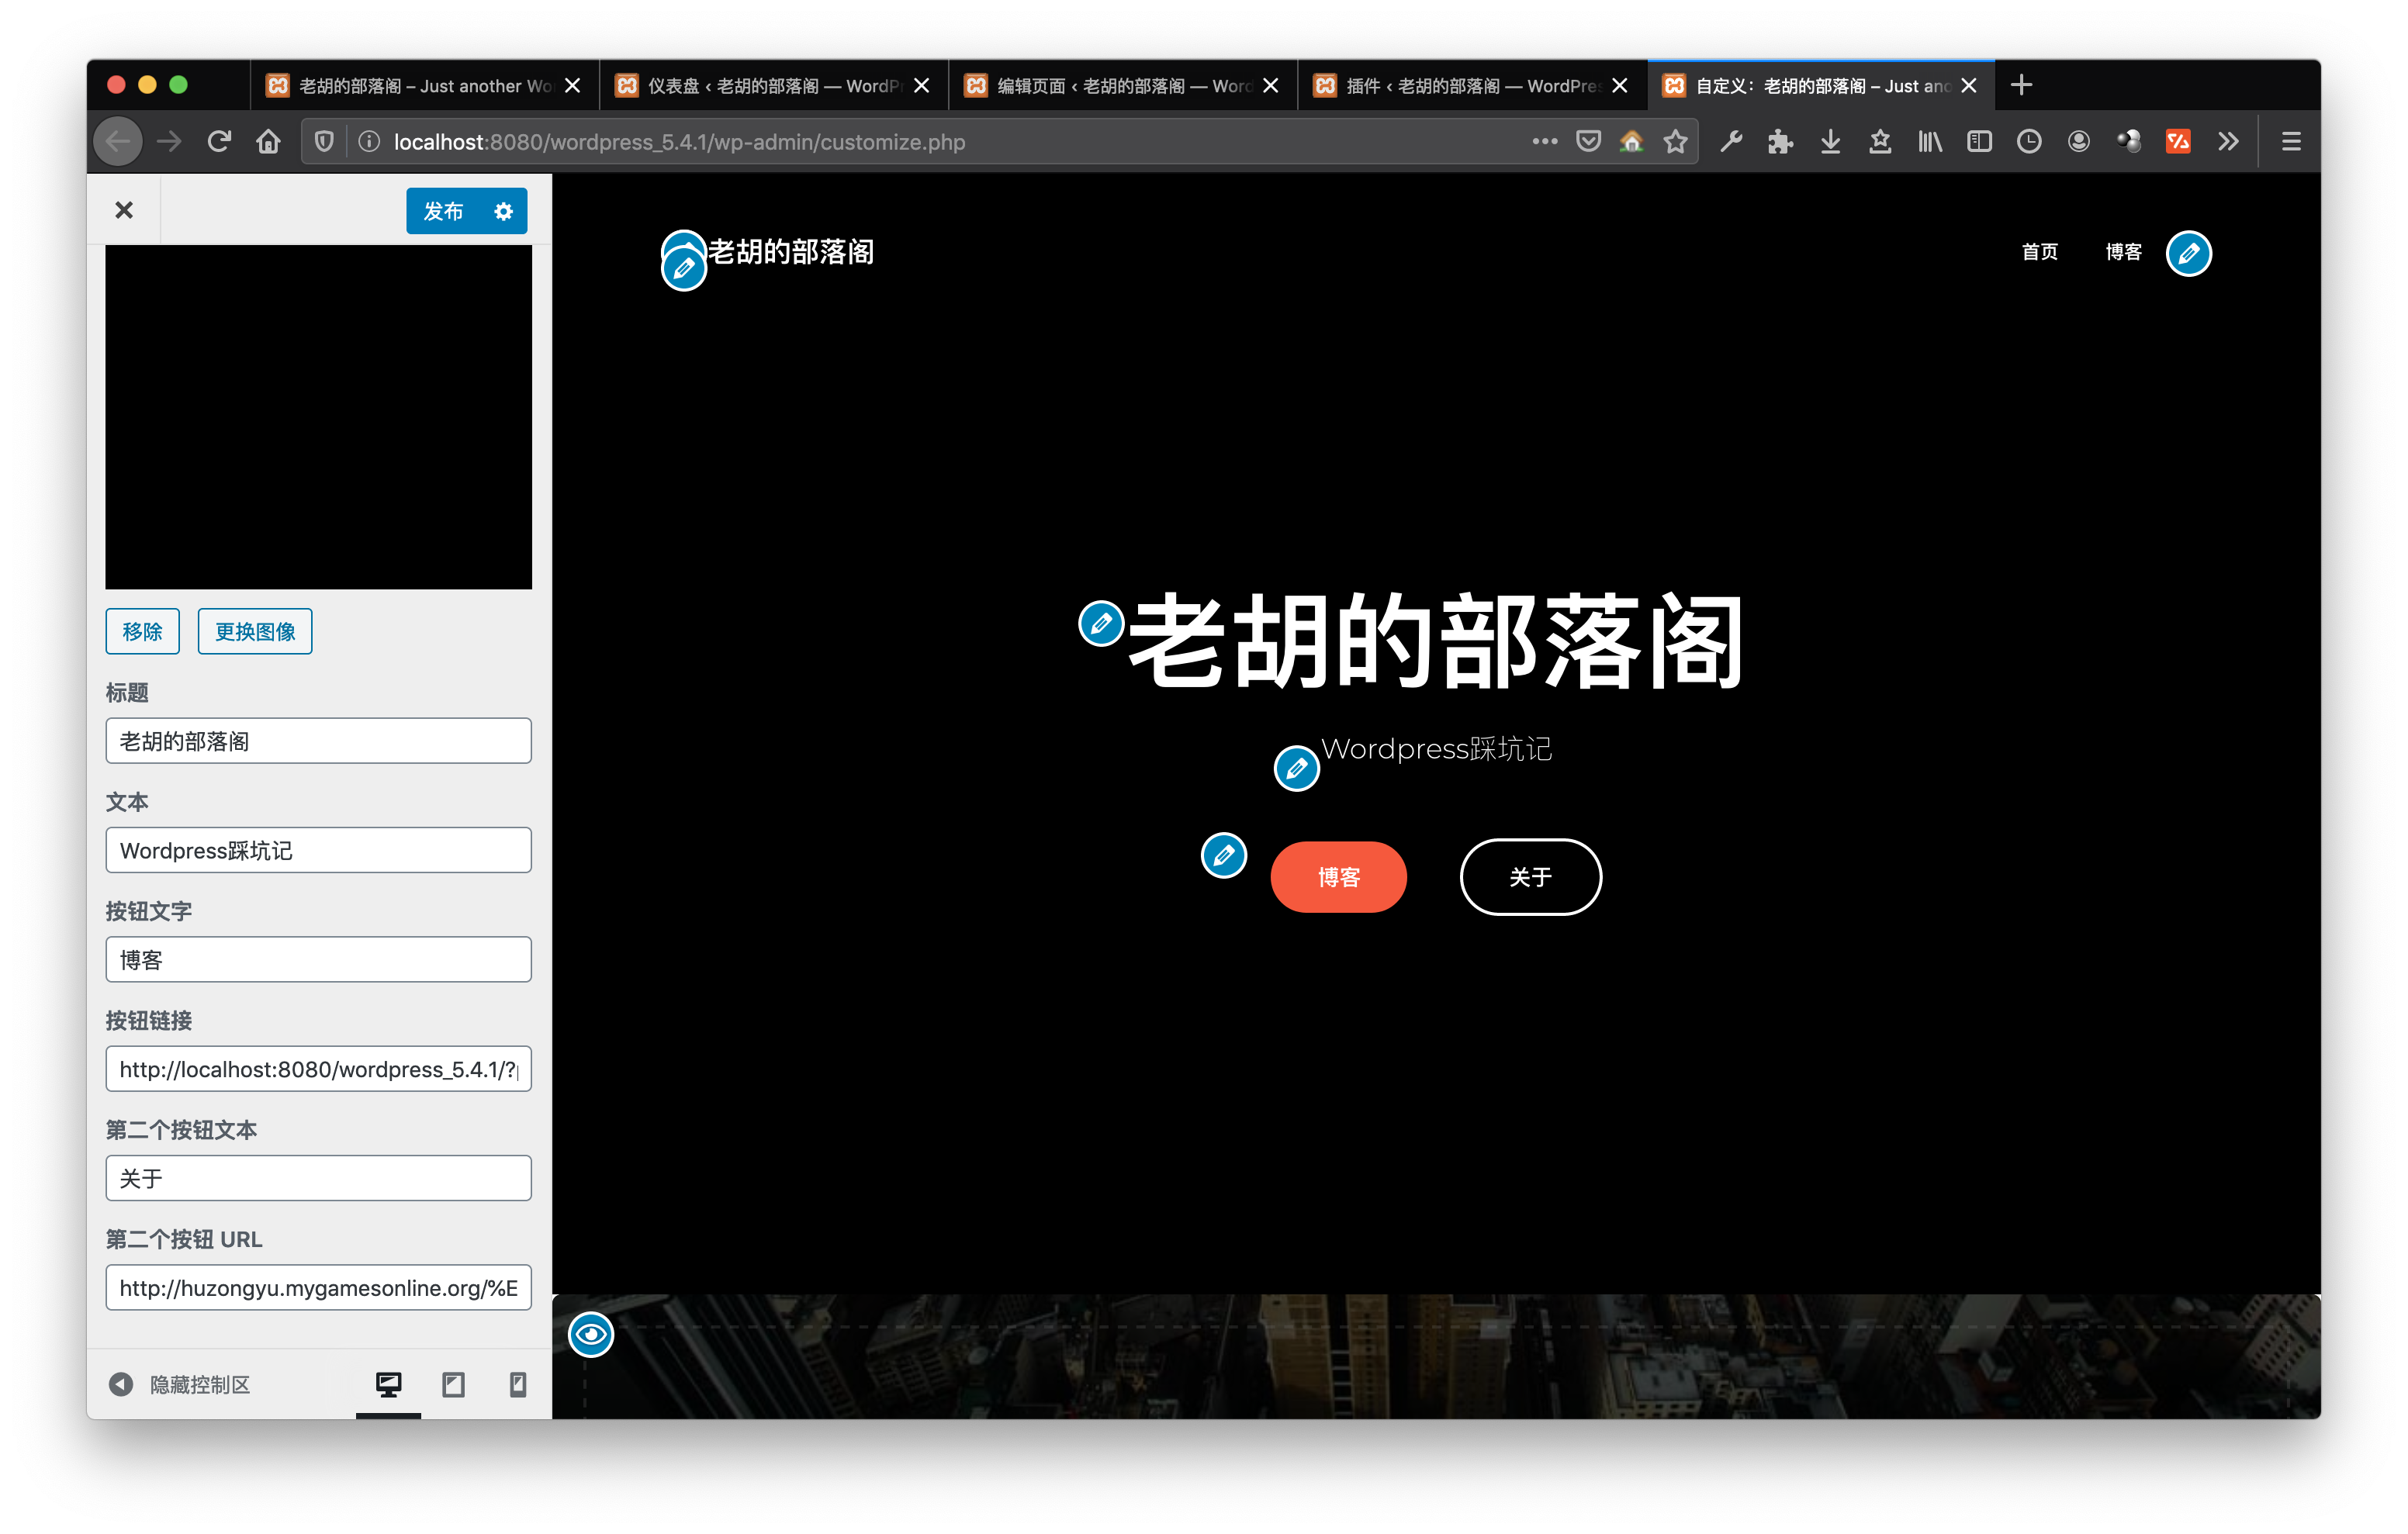
3.2、更改首页文字
在 首页选项 → 大标题区域 中更改,比如这样:
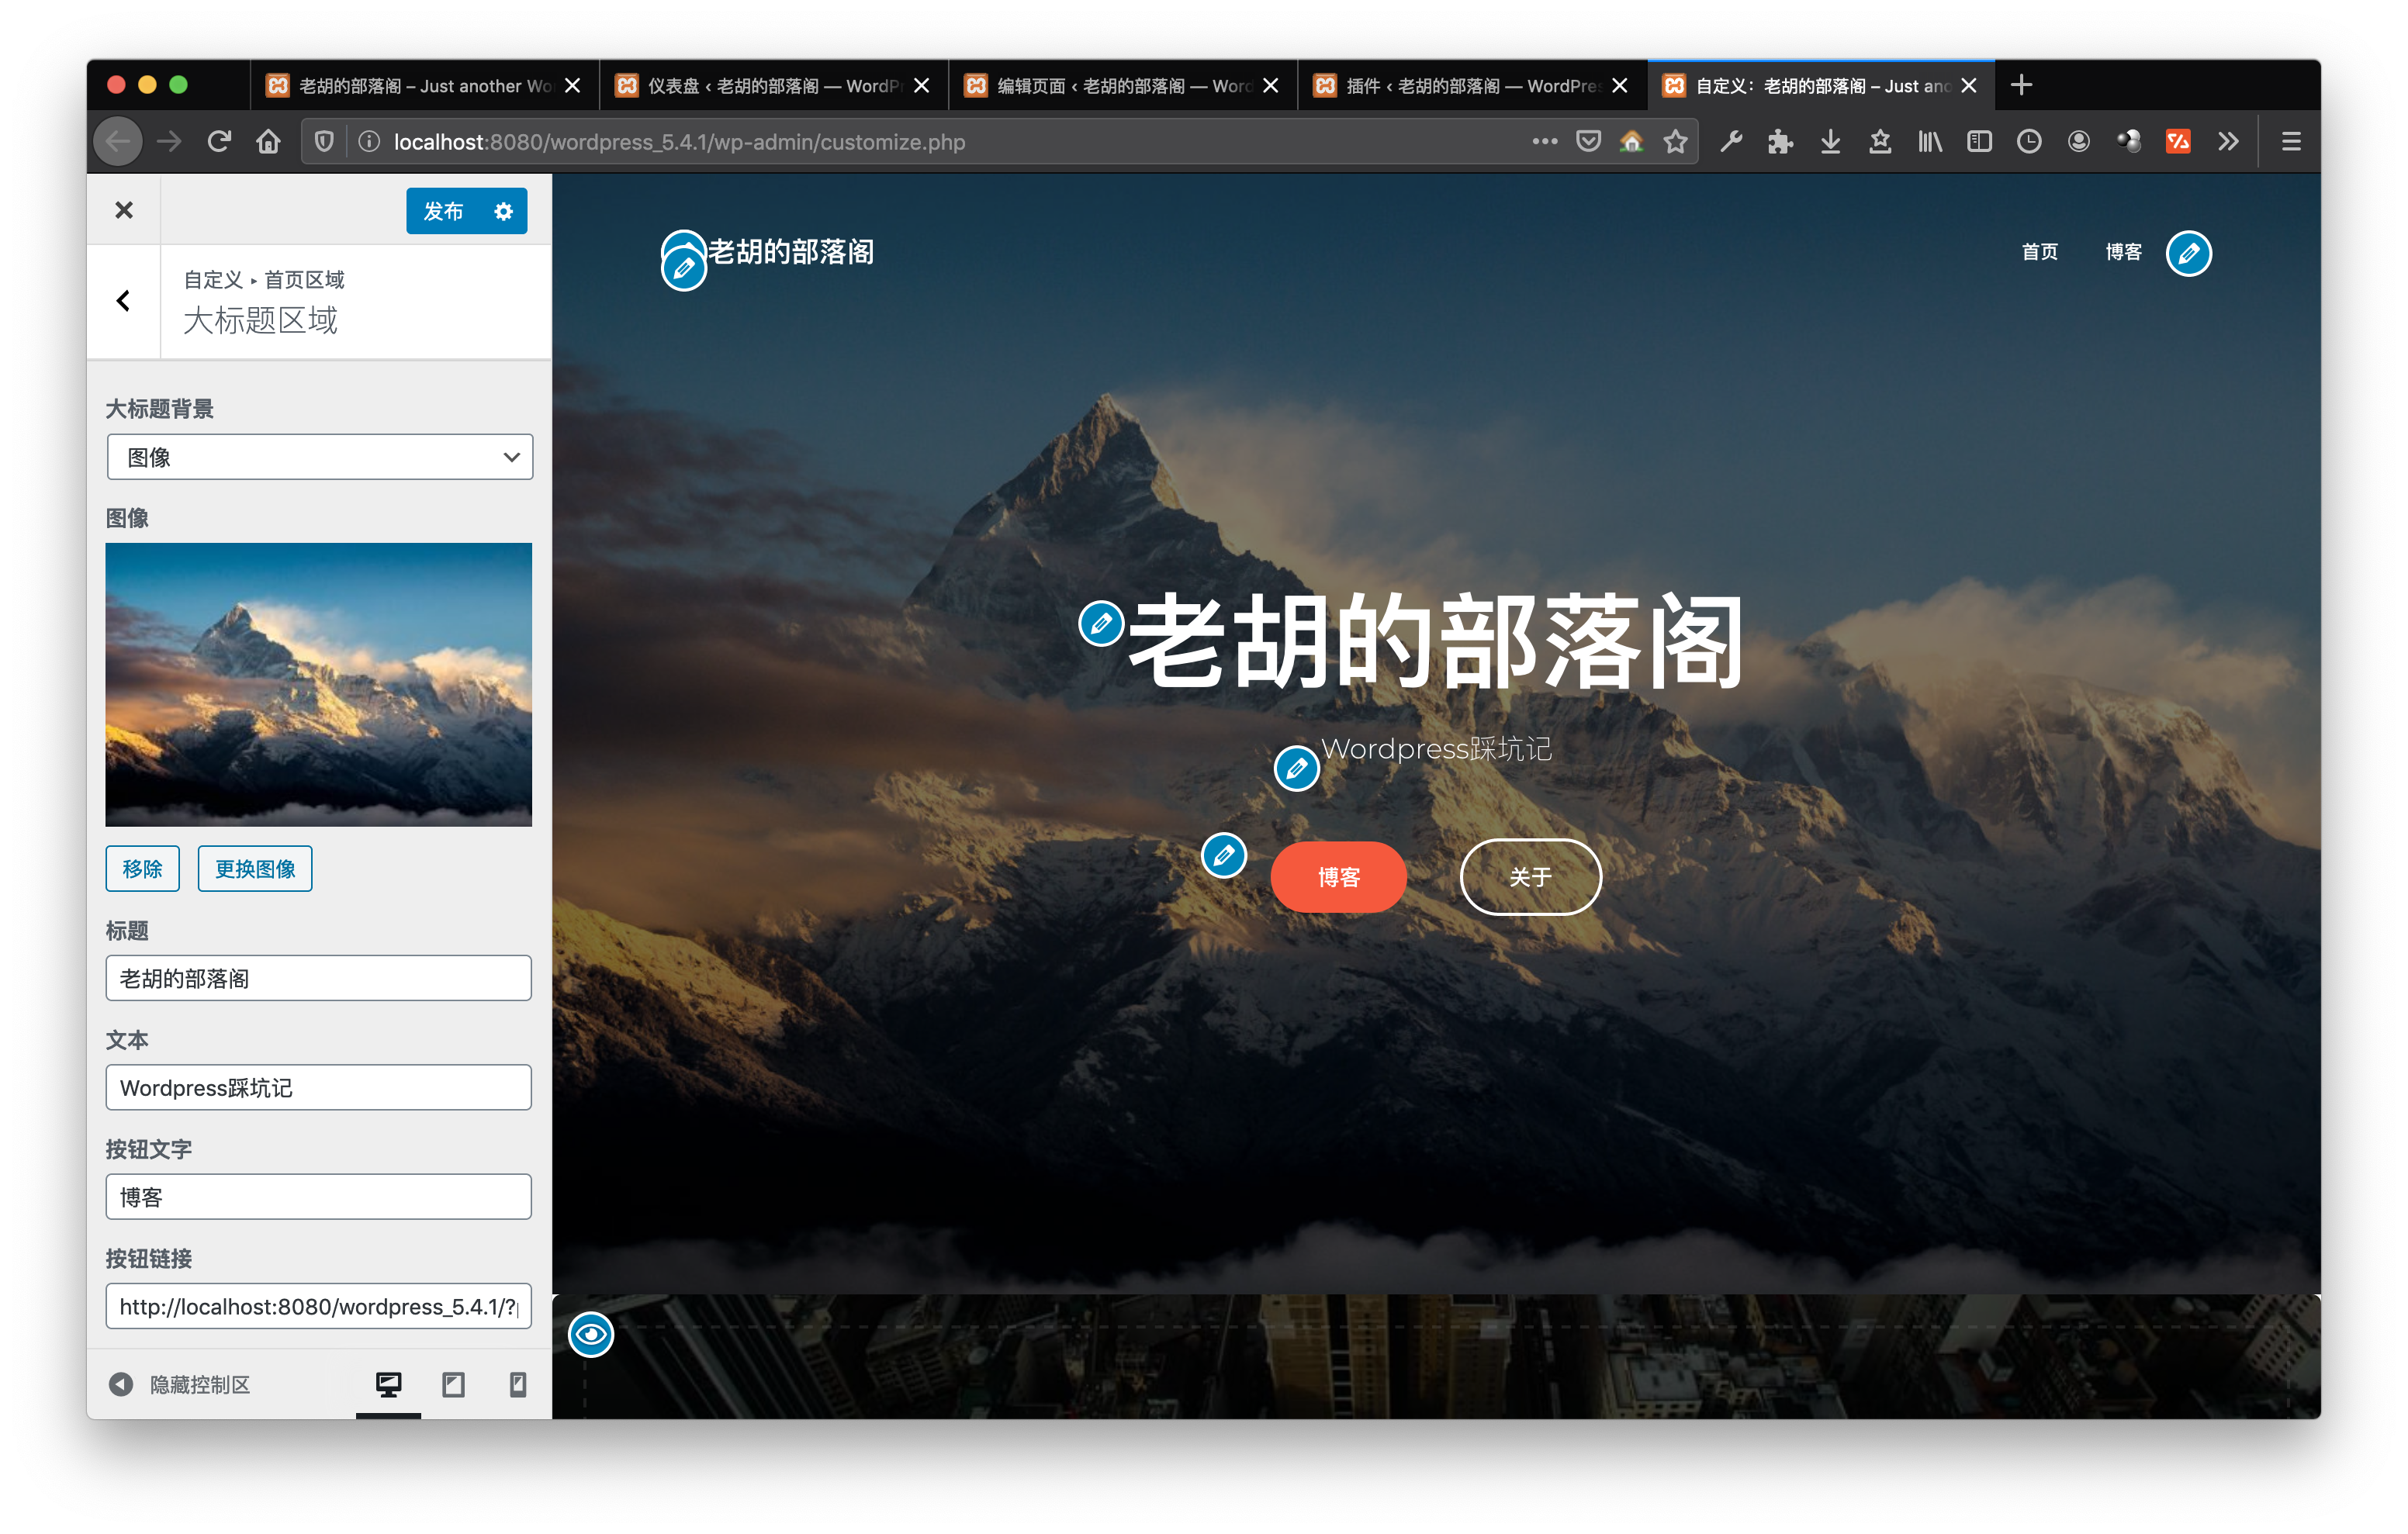
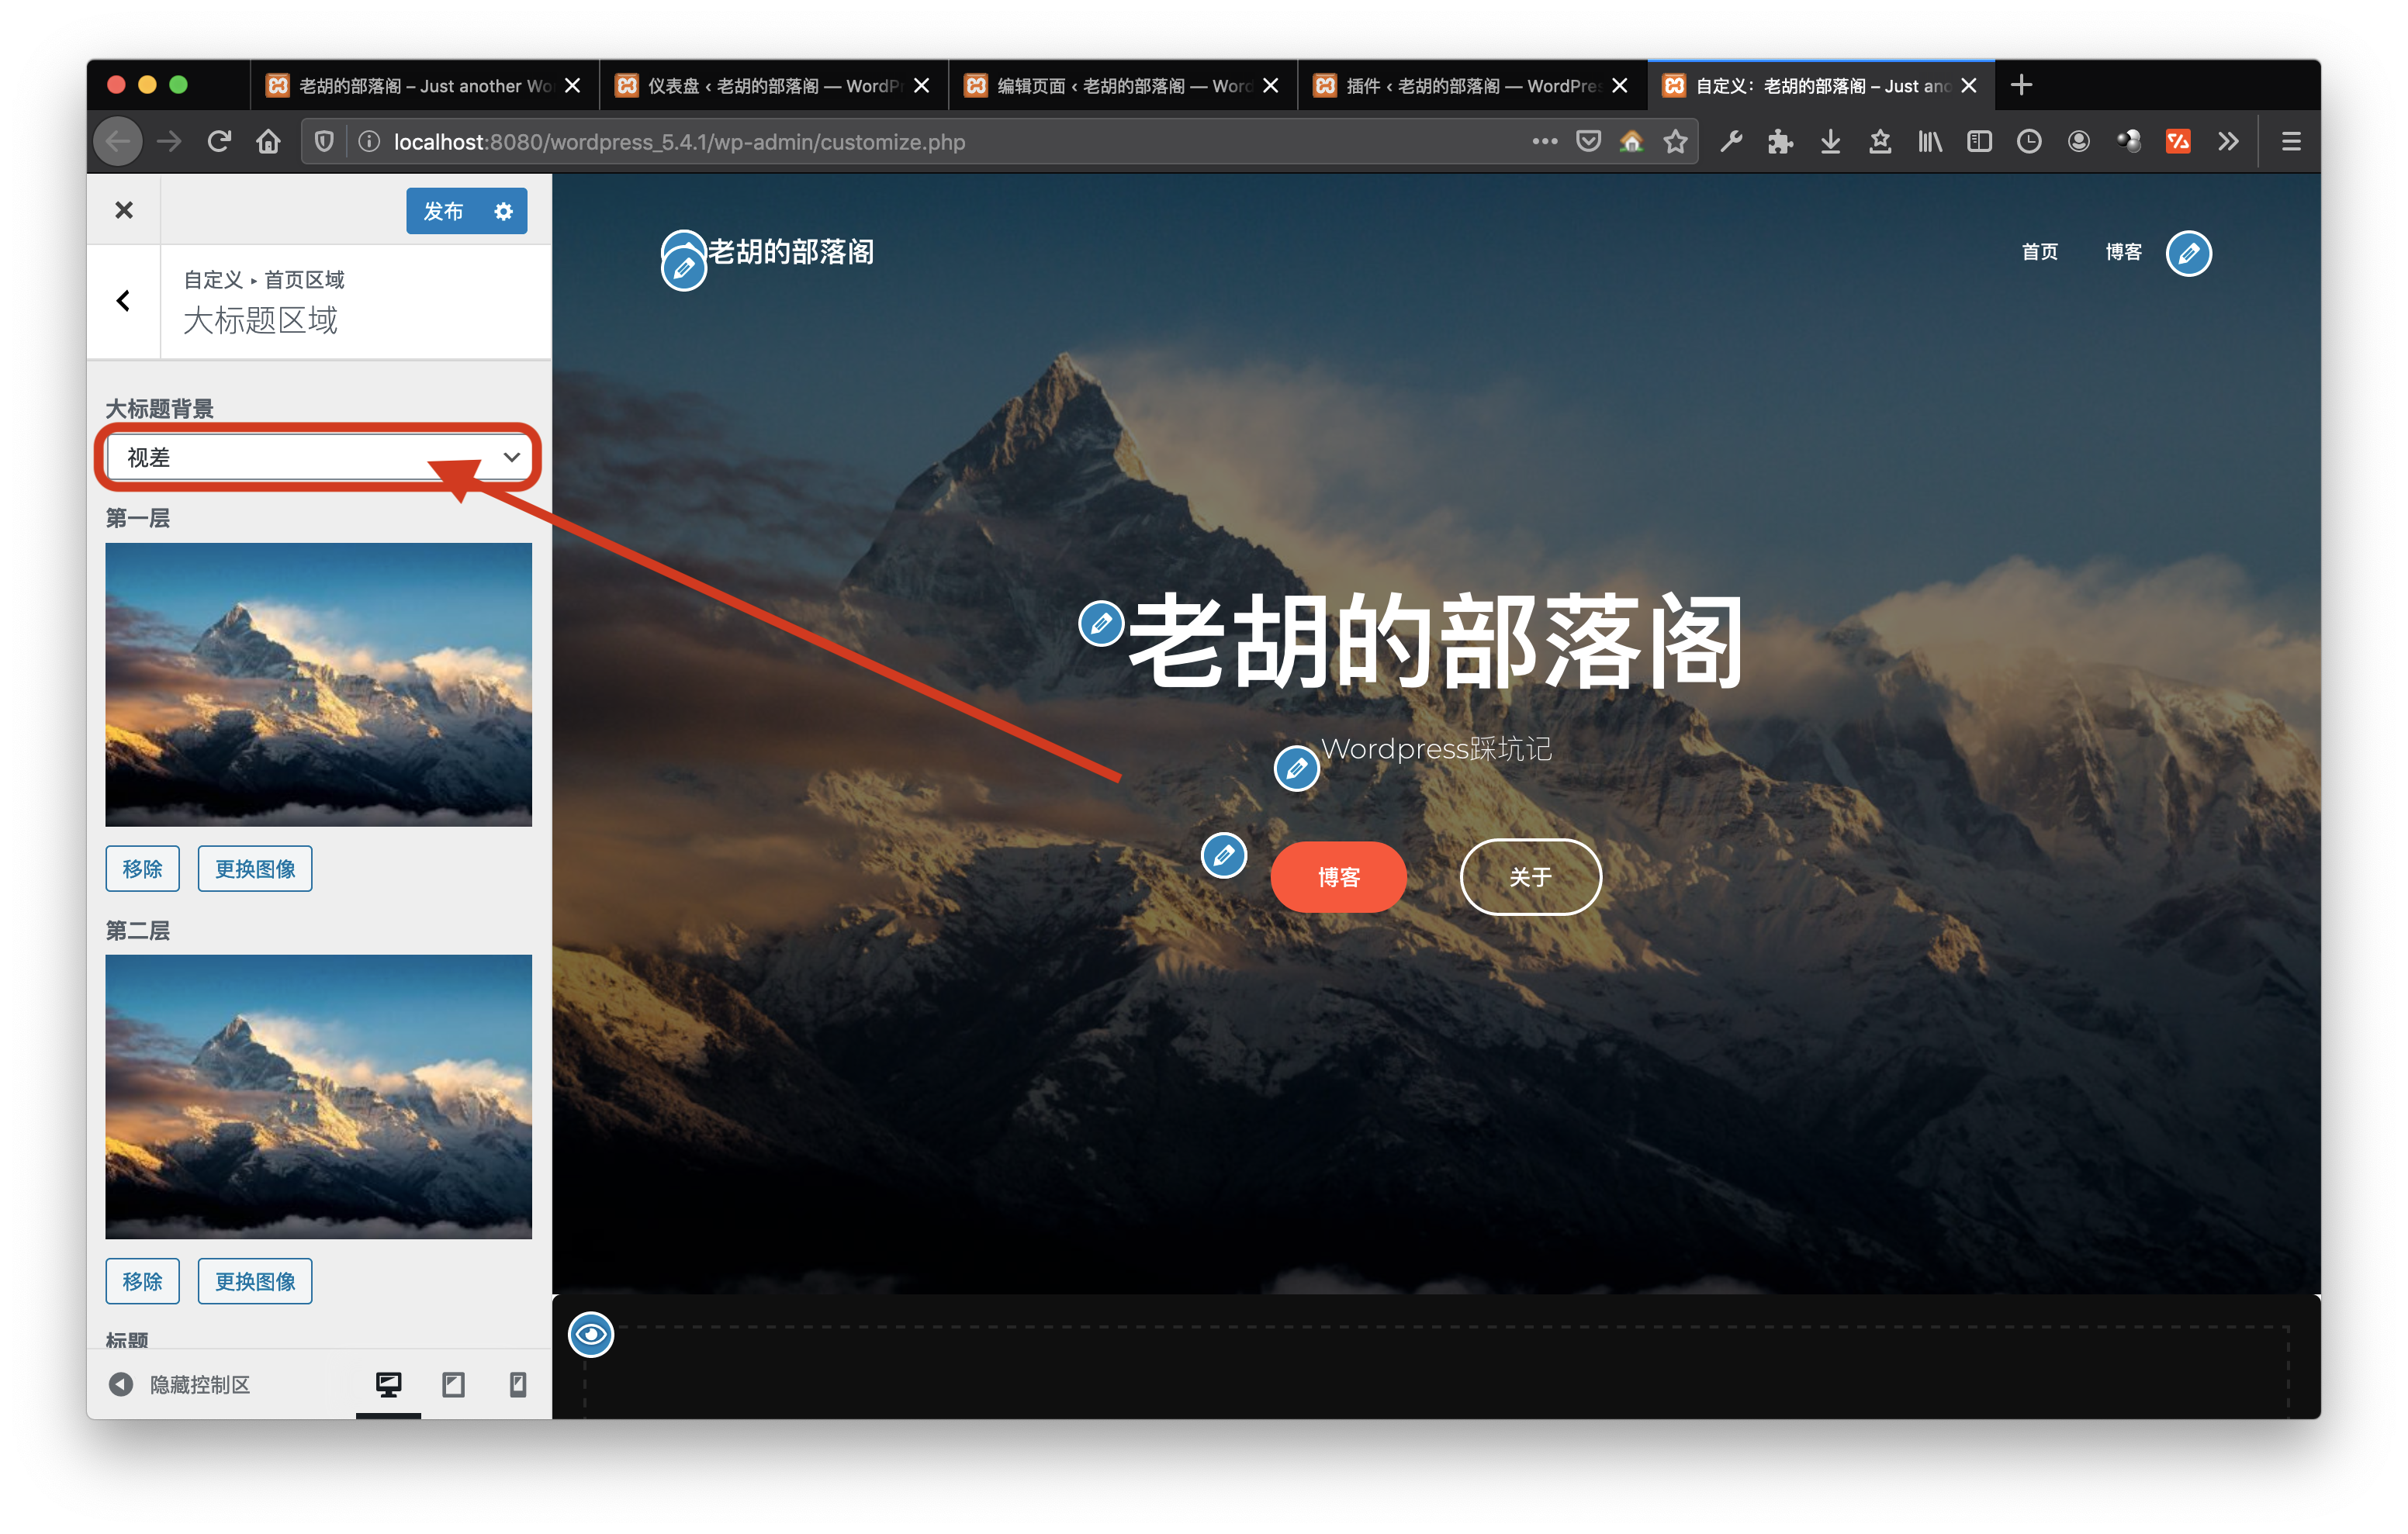
3.3、炫酷时刻——更改大标题区域的背景图像
比如,我可以改成这样:
再加上视差效果,效果参见我的网站
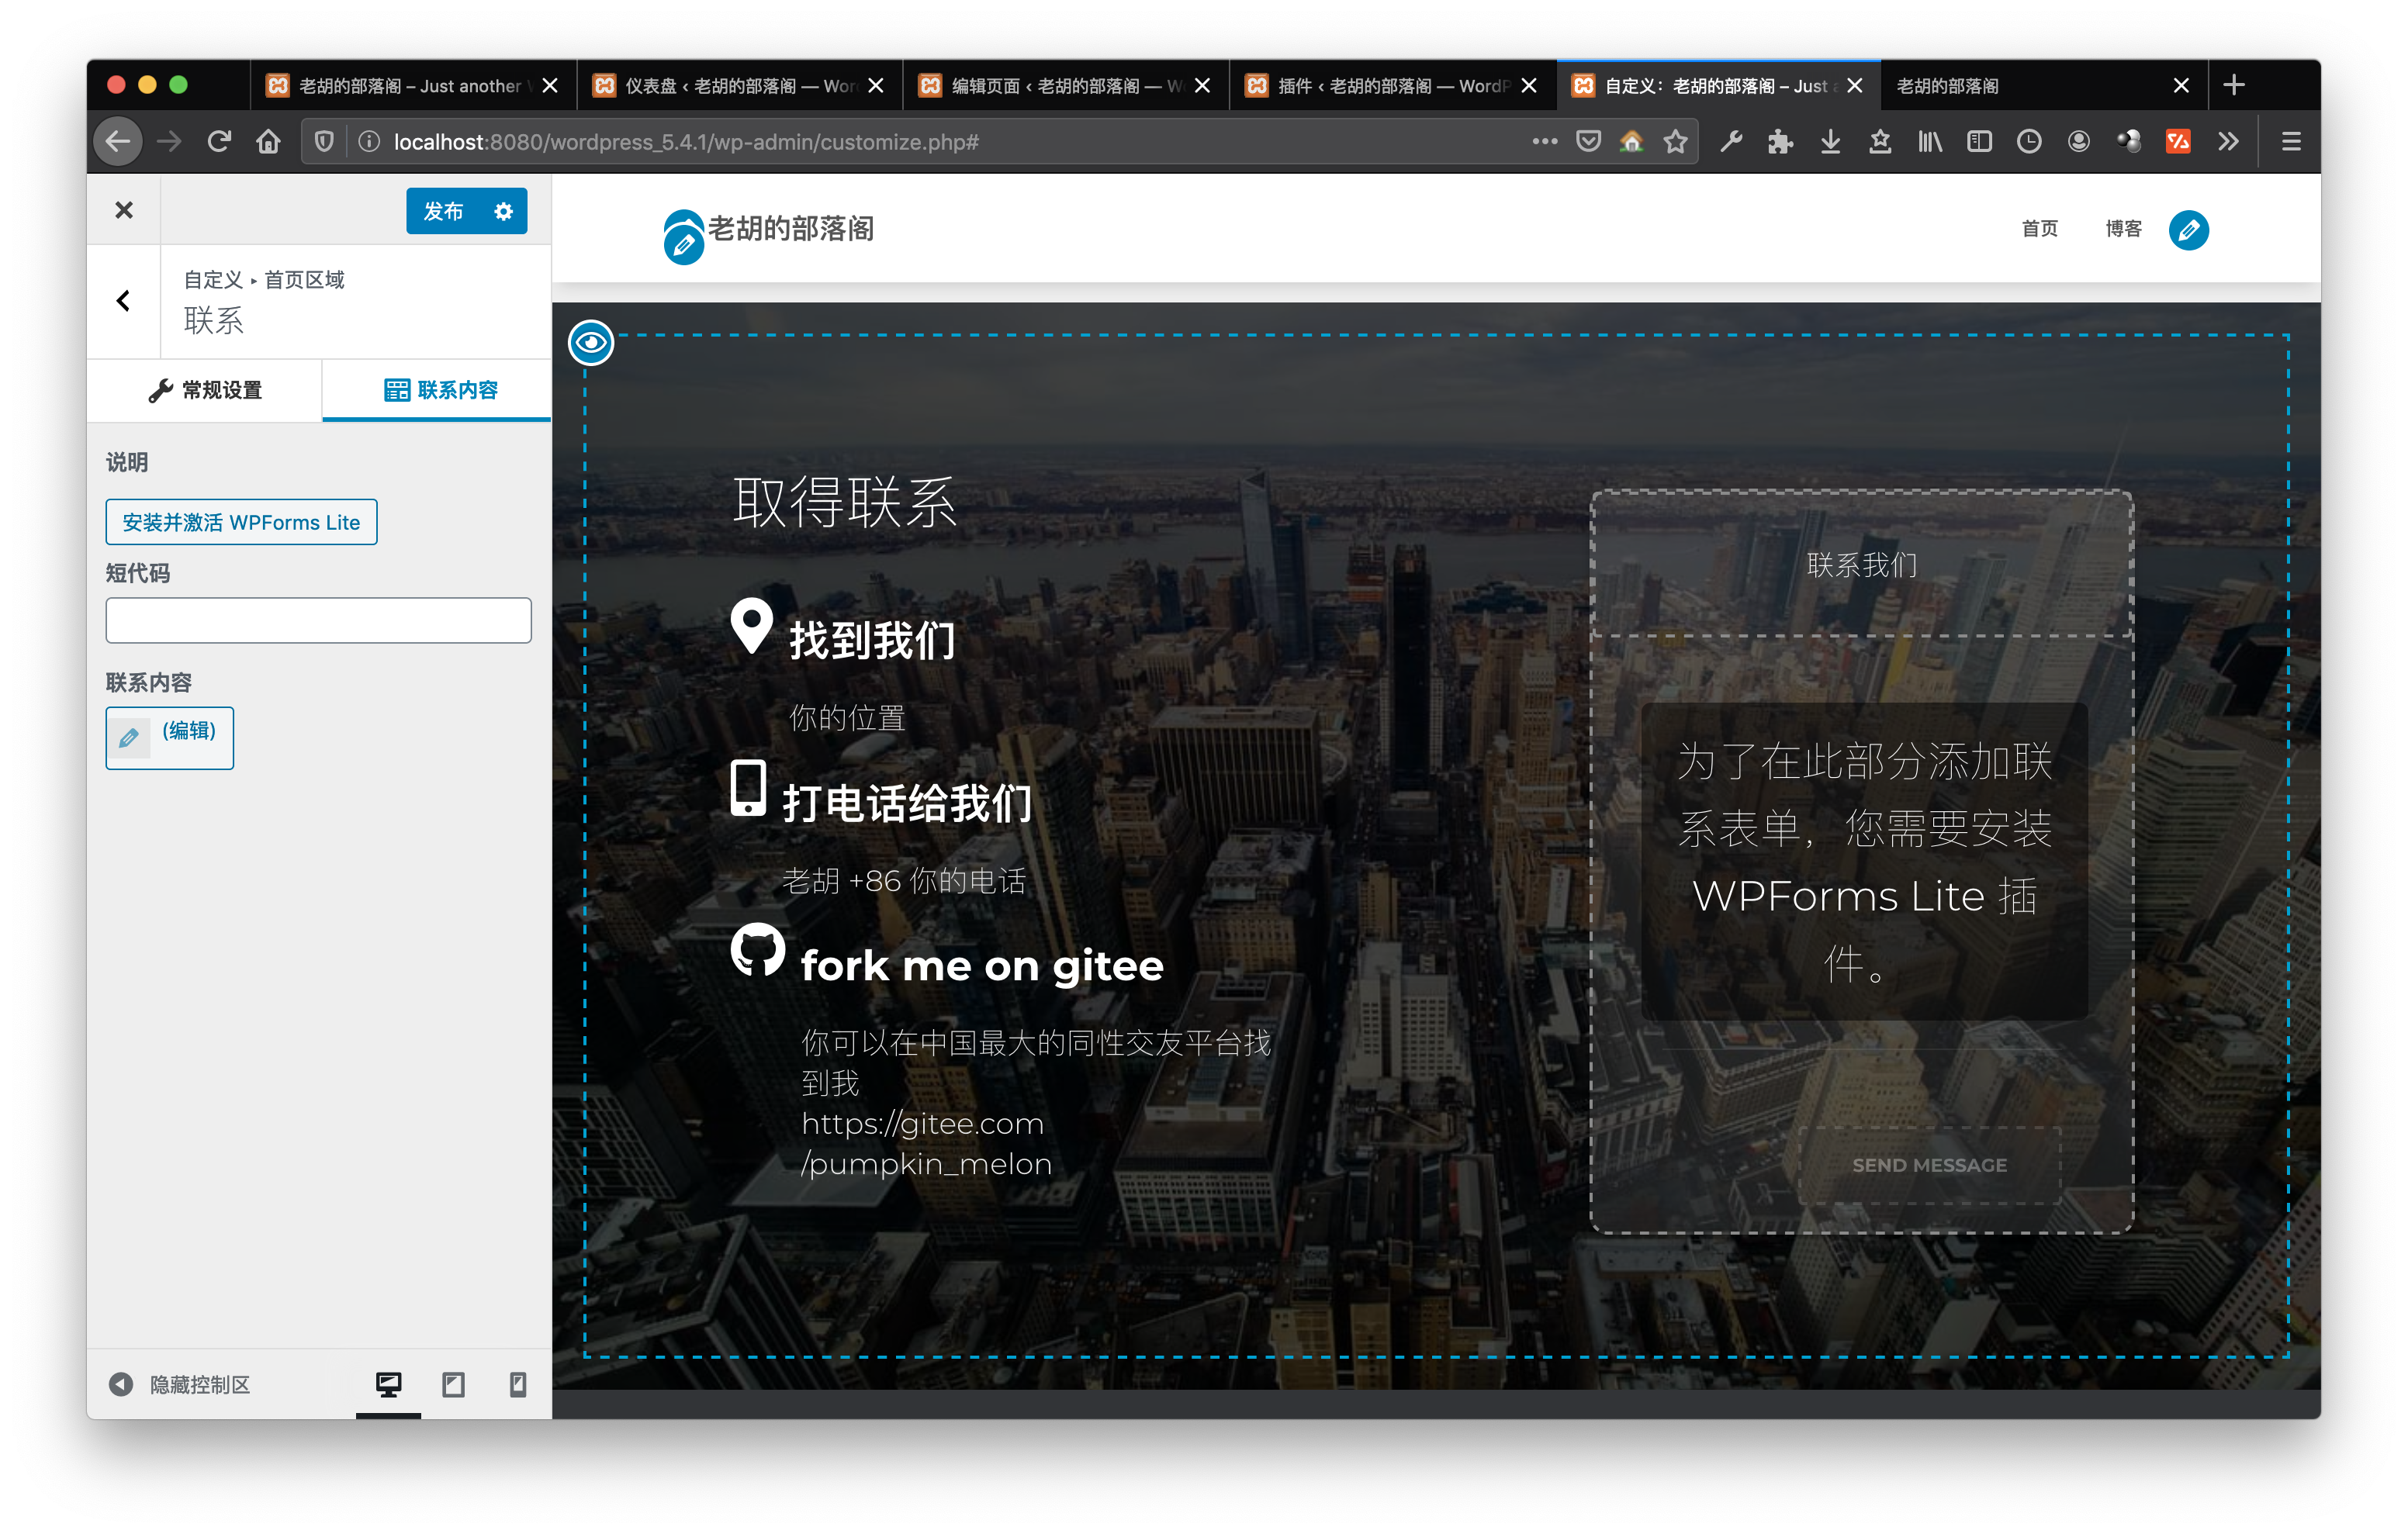
3.4、自定义首页联系
在首页选项 → 联系 → 联系内容 → 编辑
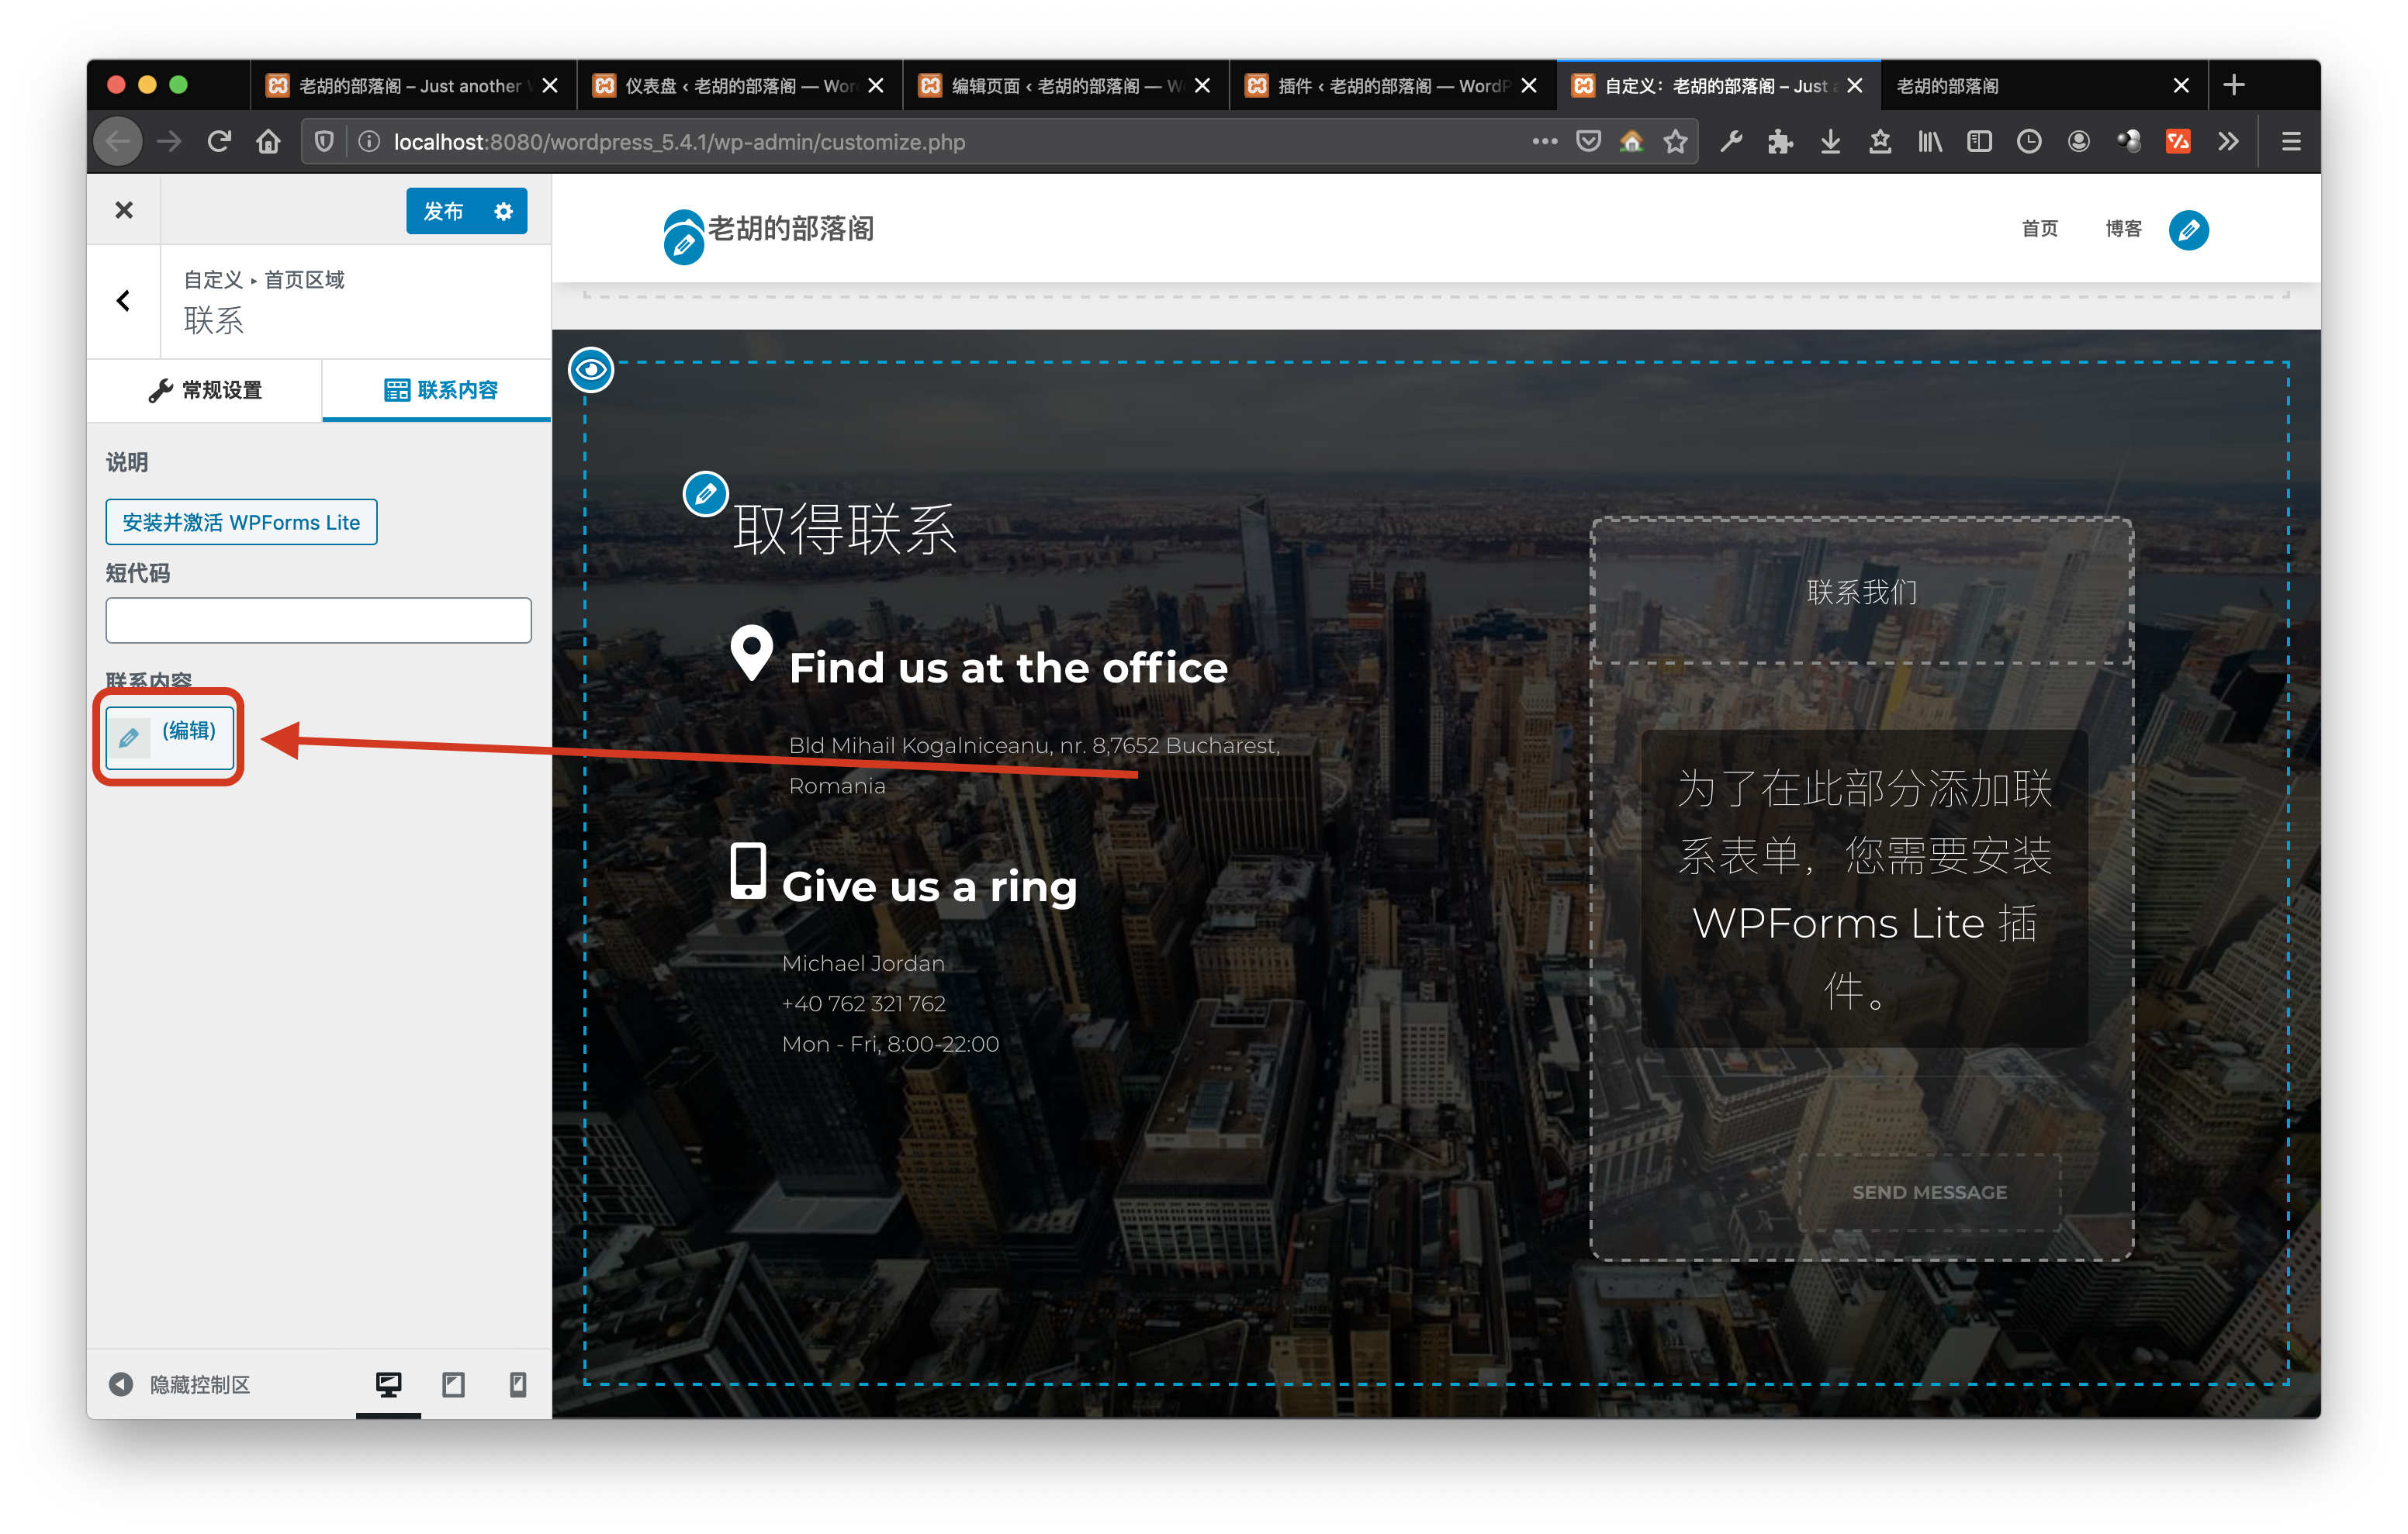
然后可以各种魔改:
<div class="hestia-info info info-horizontal">
<div class="icon icon-primary"><i class="fas fa-map-marker-alt"></i></div>
<div class="description">
<h4 class="info-title">找到我们</h4>
你的位置

</div>
</div>
<div class="hestia-info info info-horizontal">
<div class="icon icon-primary"><i class="fas fa-mobile-alt"></i></div>
<div class="description">
<h4 class="info-title">打电话给我们</h4>
老胡
+86 你的电话

</div>
</div>
<div class="hestia-info info info-horizontal">
<div class="icon icon-primary"><i class="fab fa-github"></i></div>
<div class="description">
<h4 class="info-title">fork me on gitee</h4>
你可以在中国最大的同性交友平台找到我<br>
https://gitee.com/pumpkin_melon

</div>
</div>
变成这样:
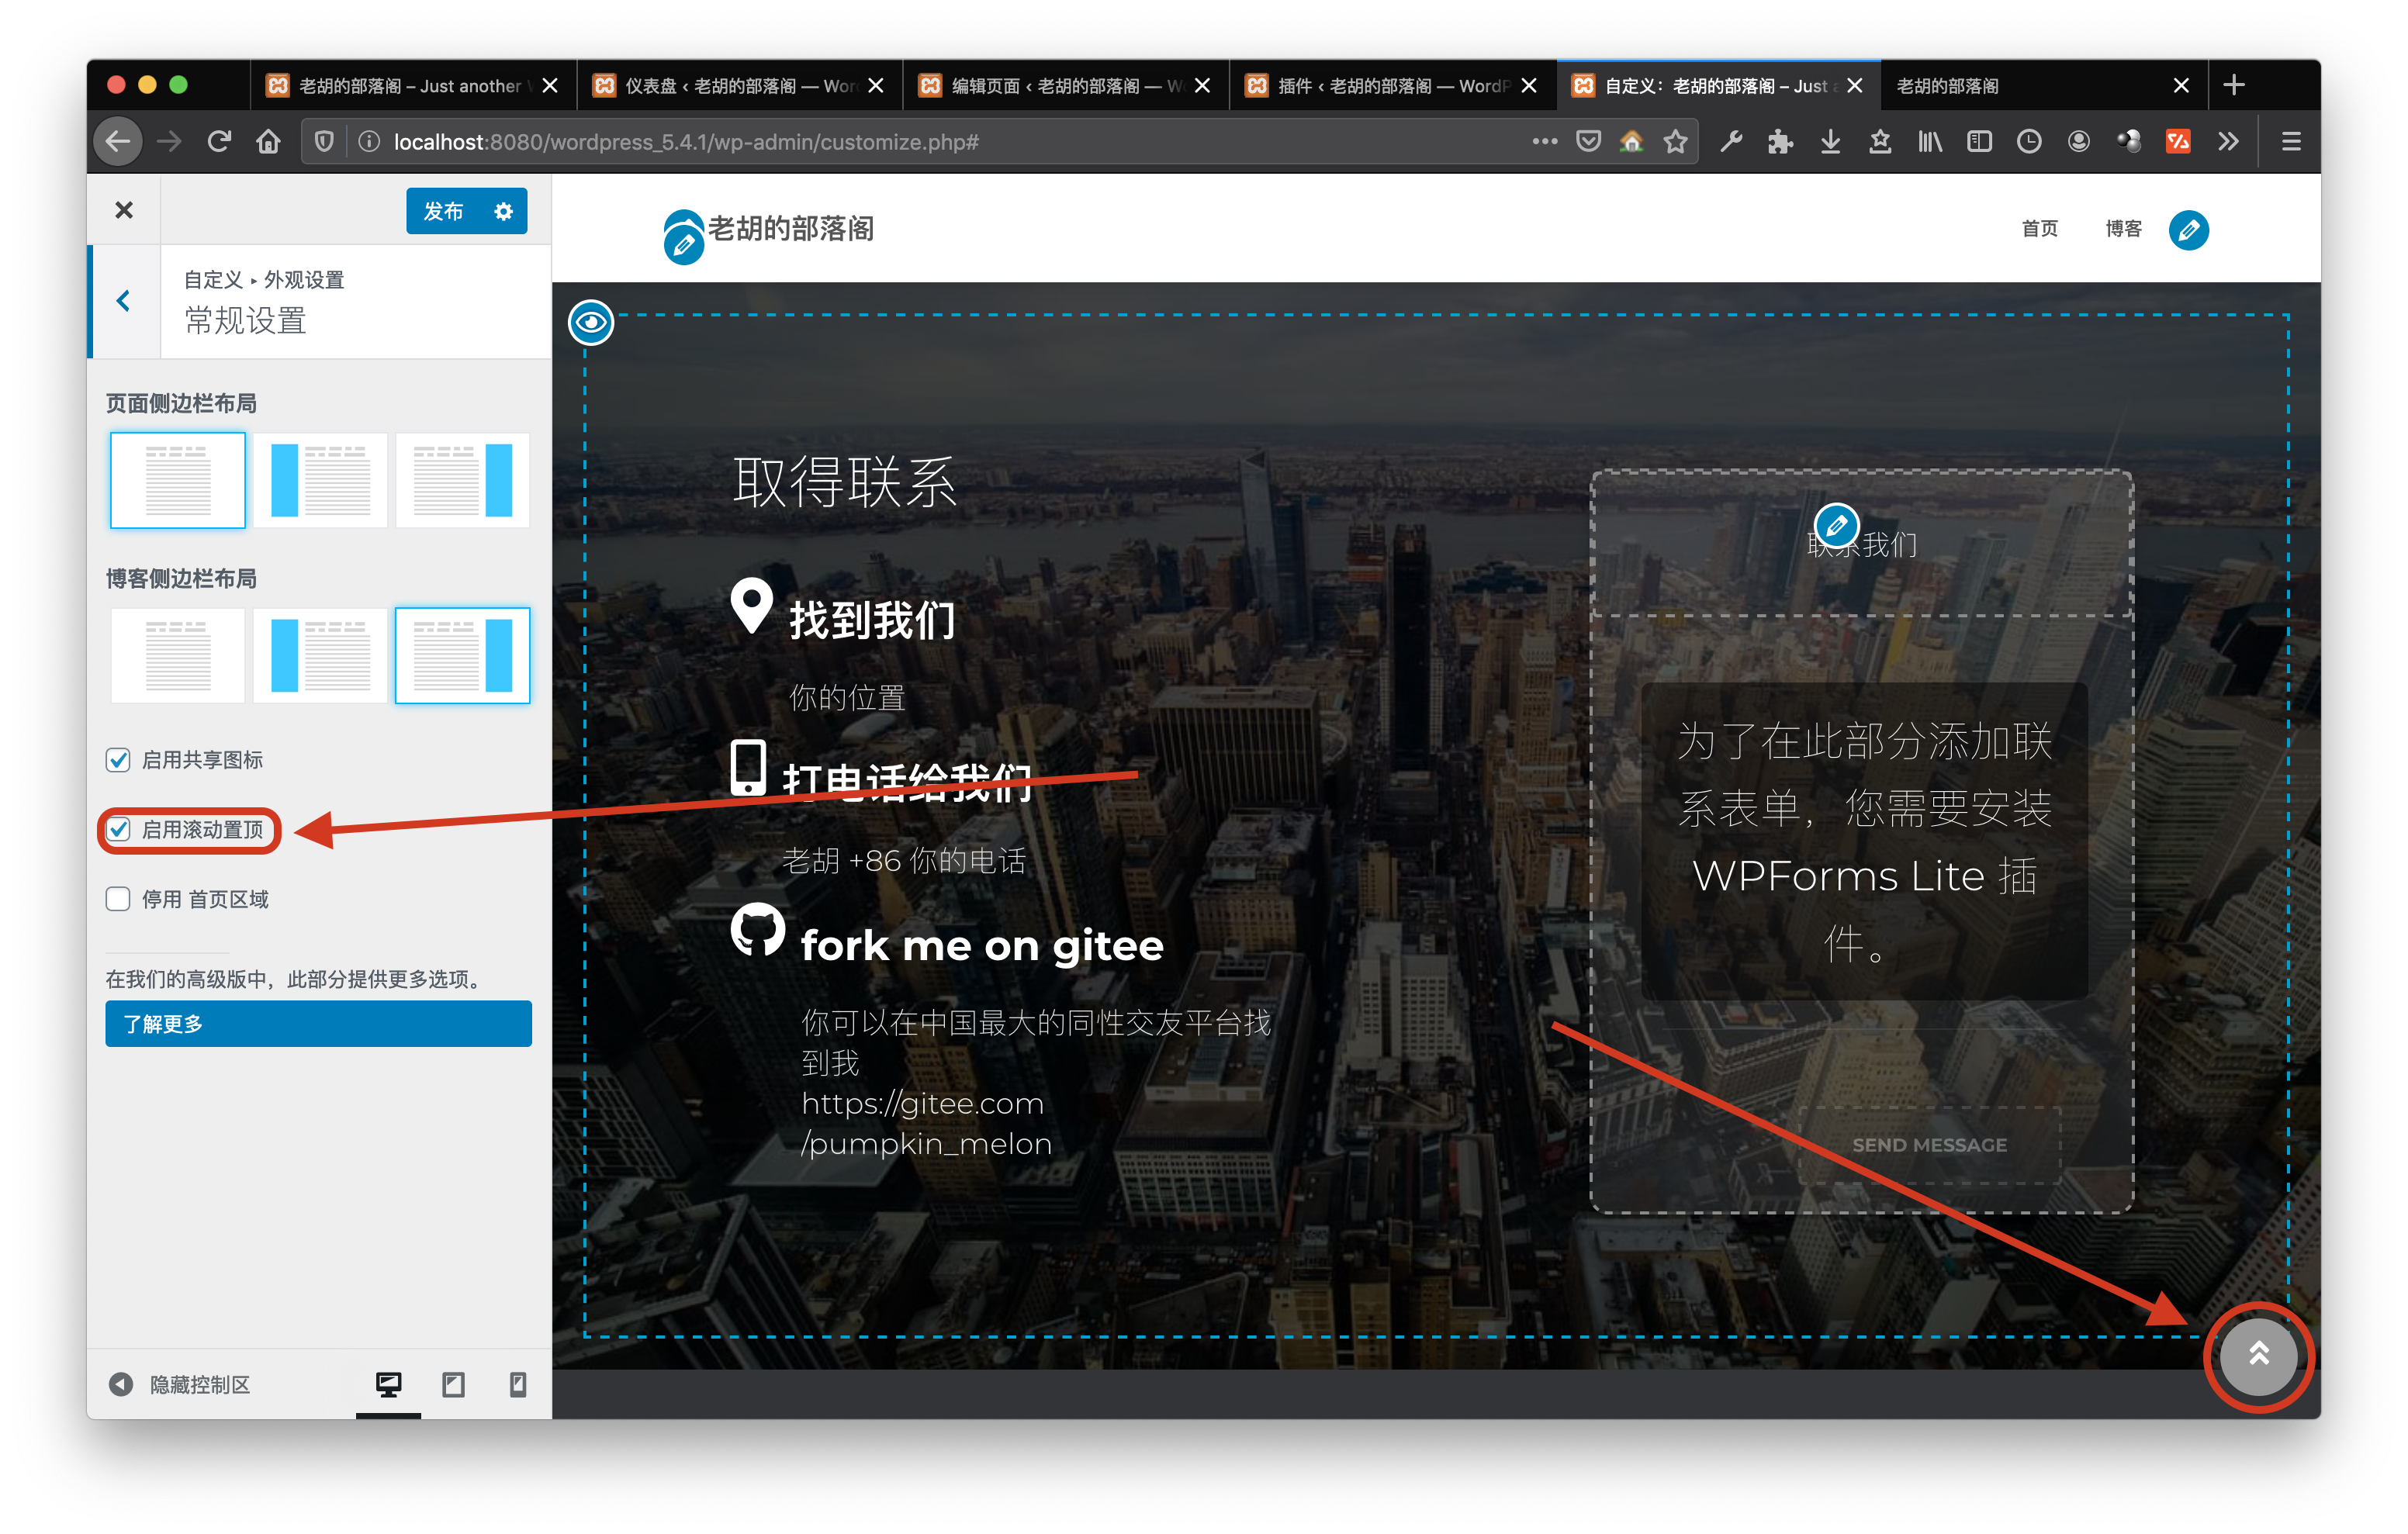
3.5、快速置顶
在 外观设置 → 常规设置 → 启用滚动置顶。
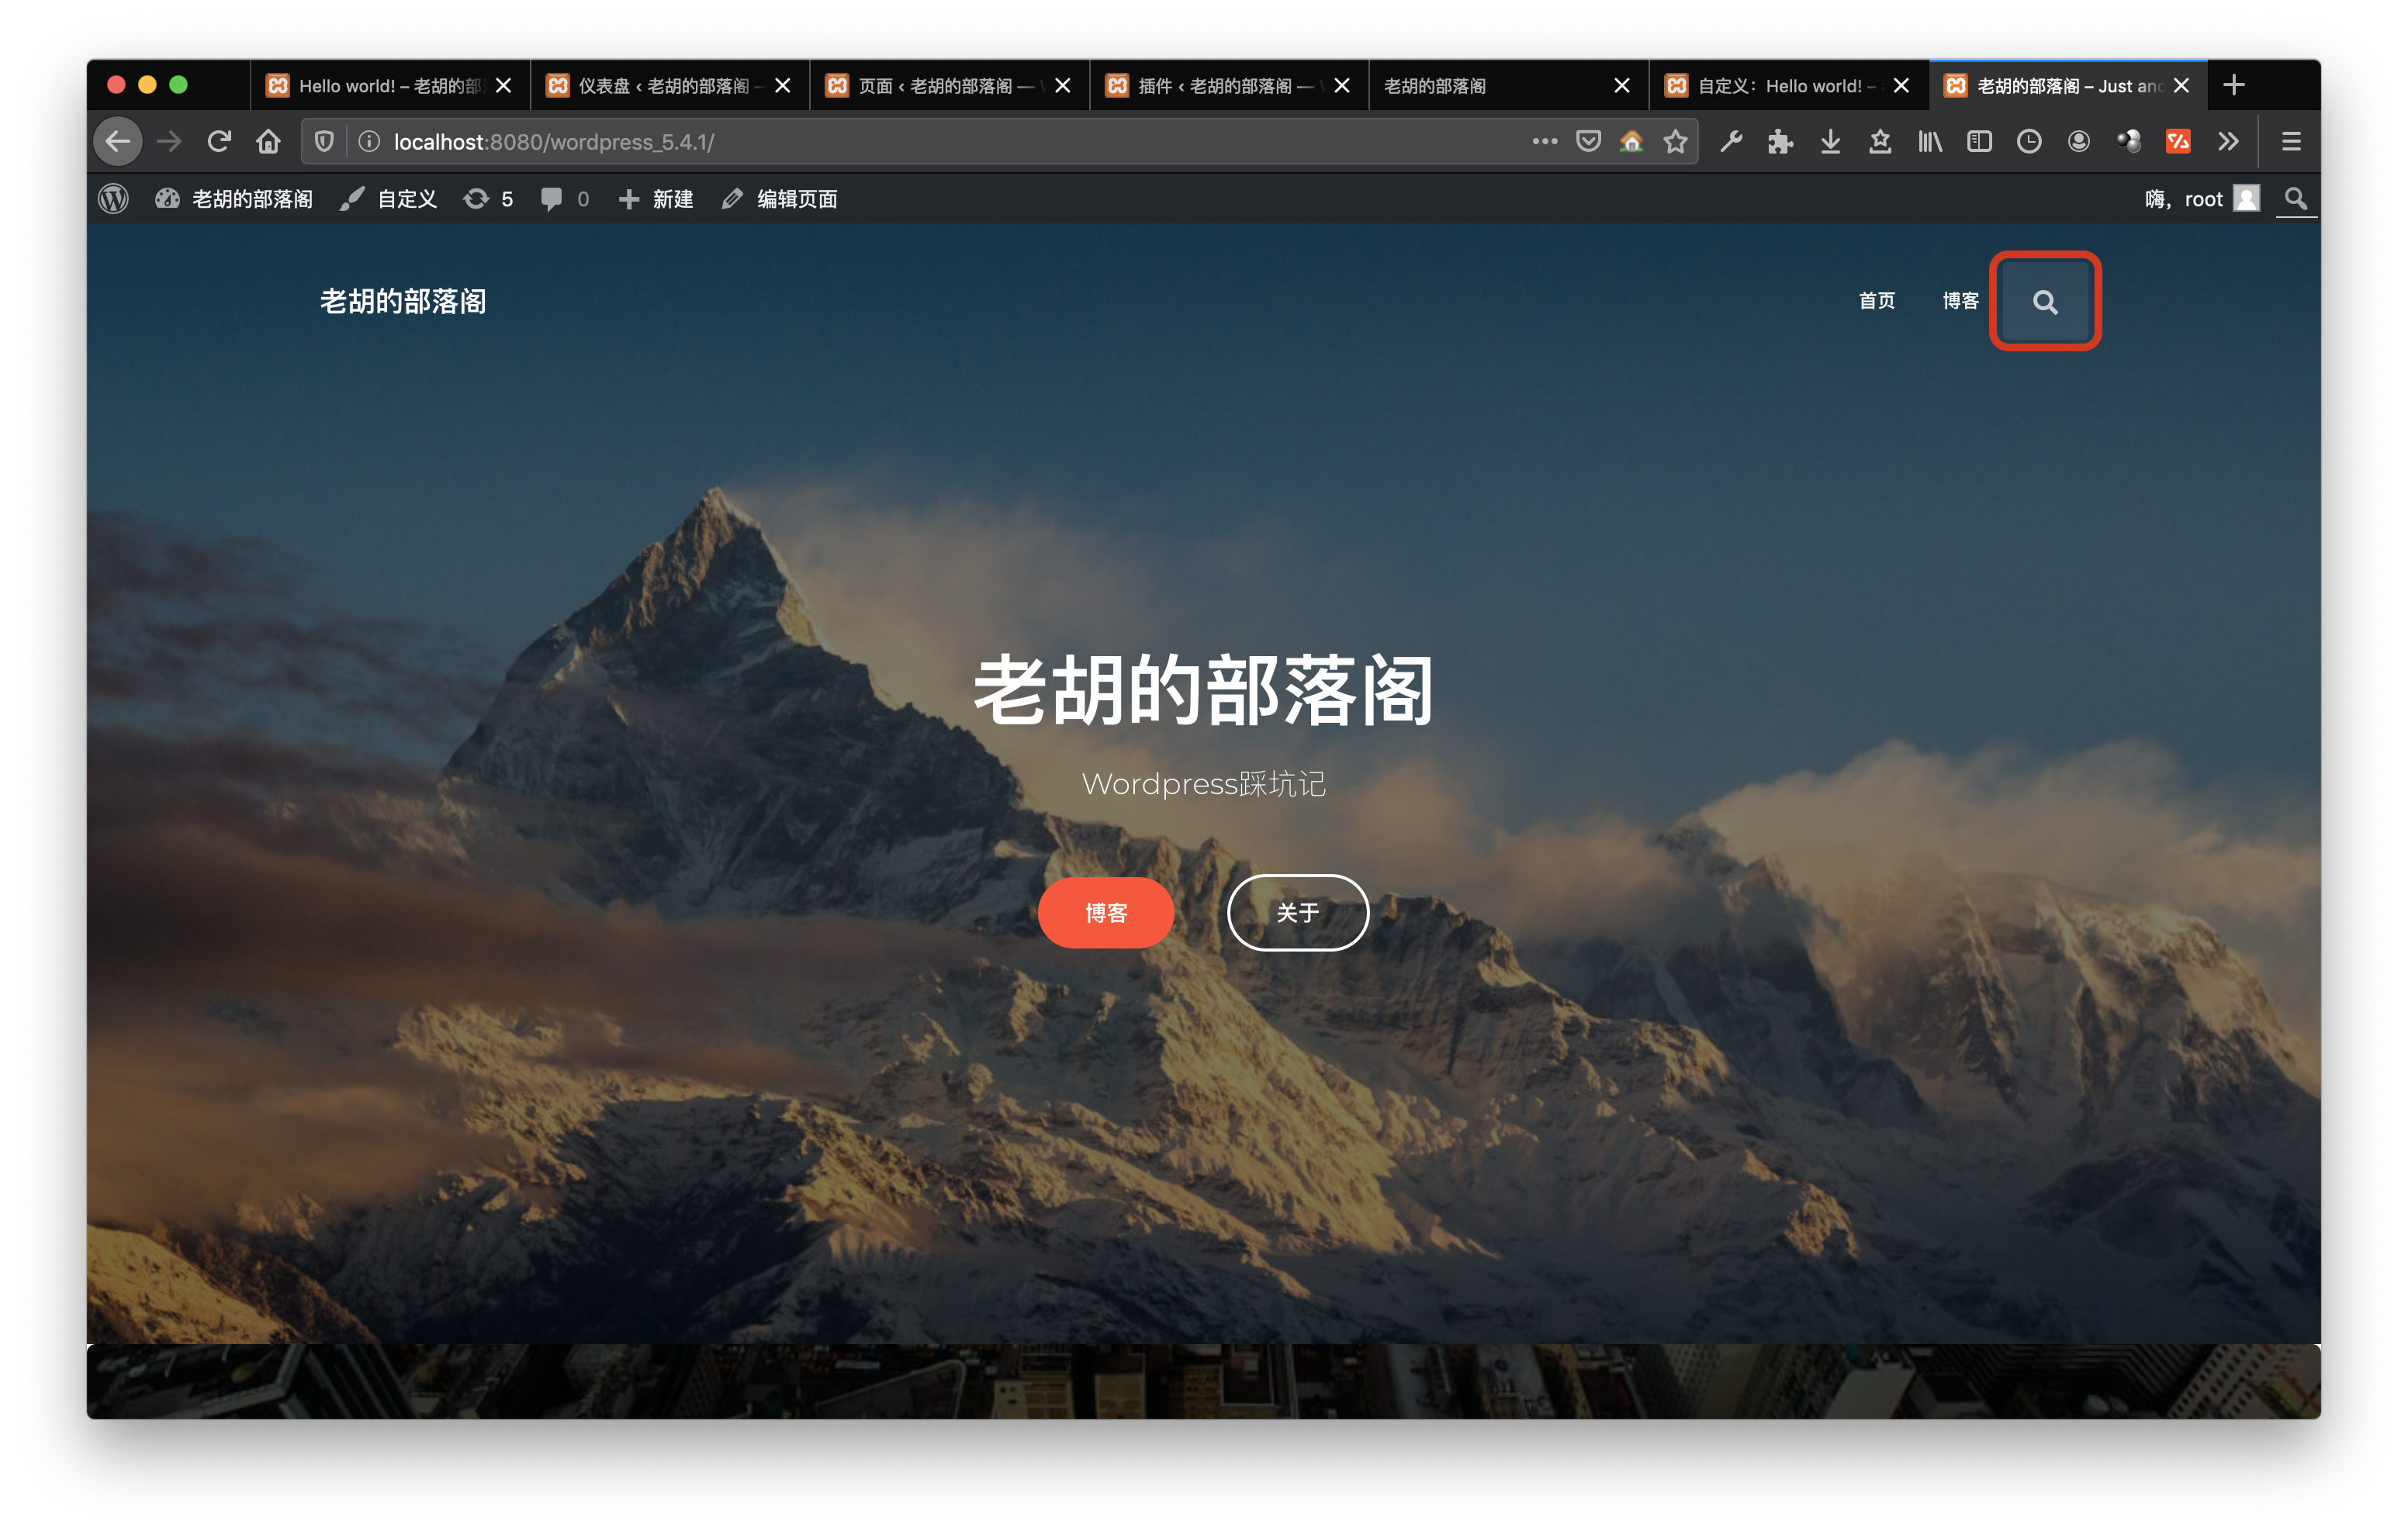
3.6、菜单栏中启用搜索
这是在 页头选项 → 导航 → ☑️ 在菜单中启用搜索
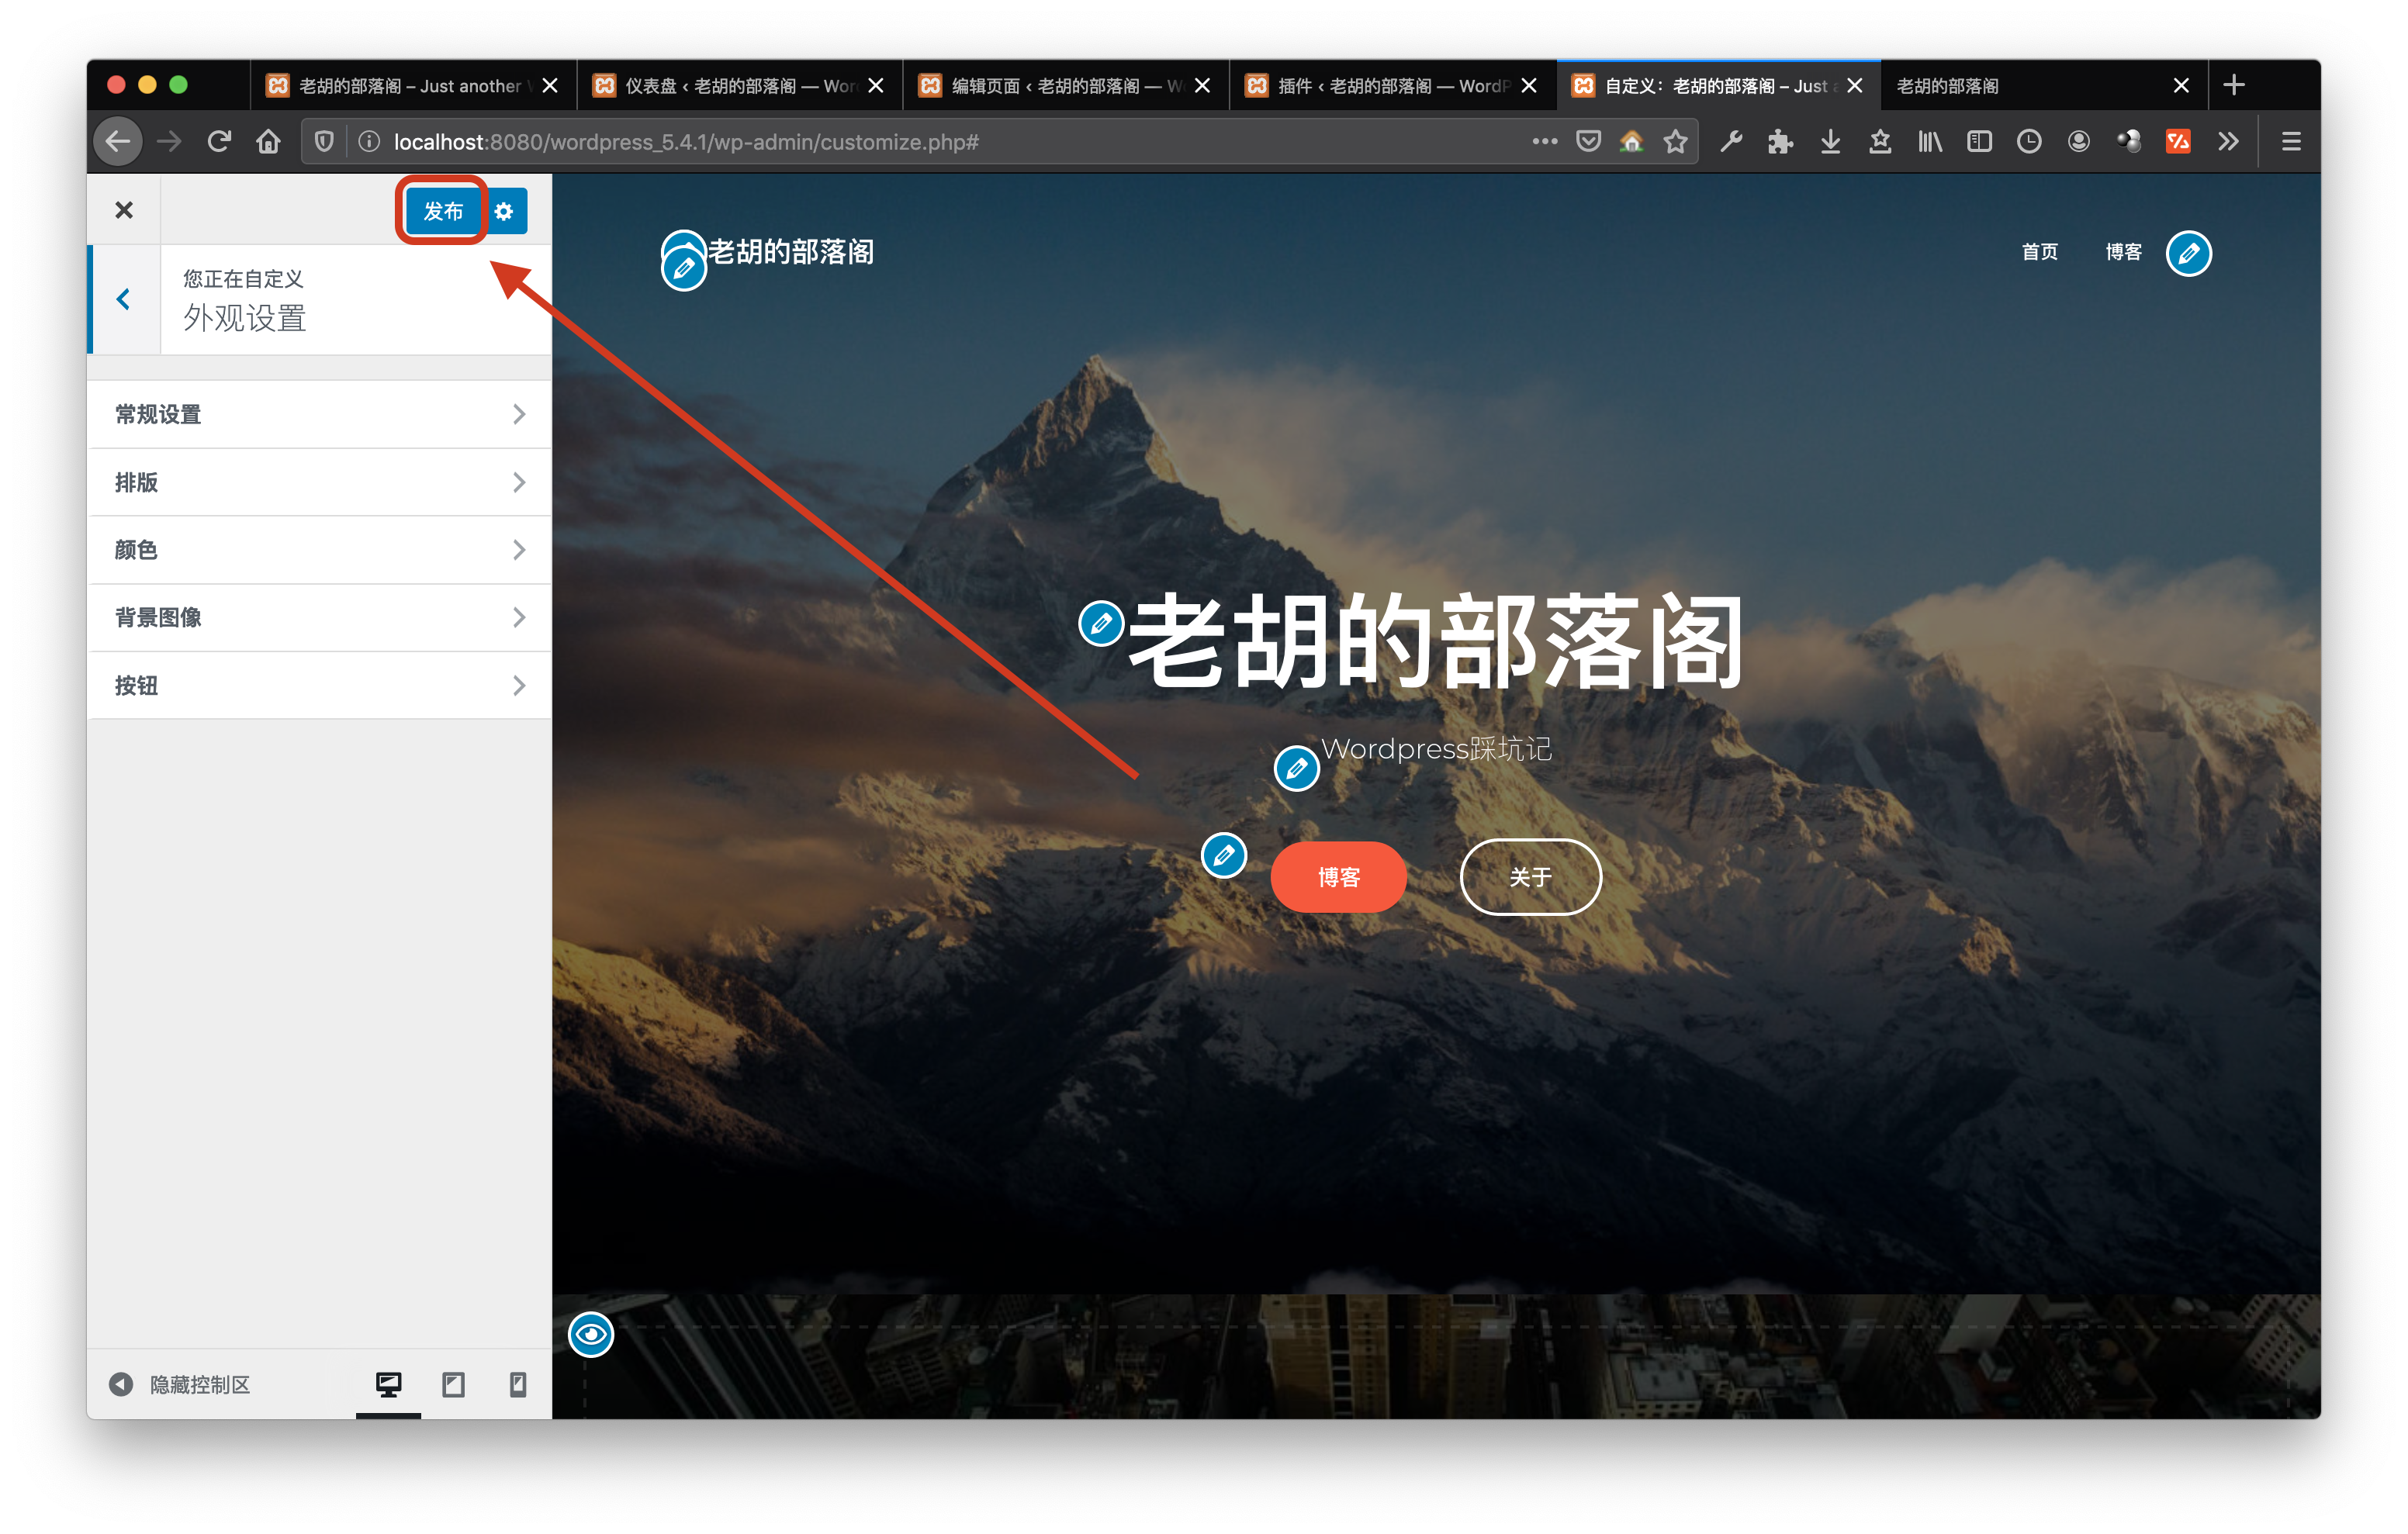
最后
不要忘了发布哦!
以下为高级配置
坐稳了,兄弟们
1、隐藏官方页脚
第一种方法
在页脚选项里,把里面的html删了即可。
第二种方法
在额外CSS中更改,输入:
/* 隐藏官方页脚 */
.copyright.pull-right {
    display: none;
}
2、添加各种特效(可选)
2.1、下载Orbit Fox插件
orbit fox插件可以提供一些Hestia主题的扩展功能,有些功能是商业网站呢必备,但我们用不到。
我们用的到的是里面的header/footer scripts选项。
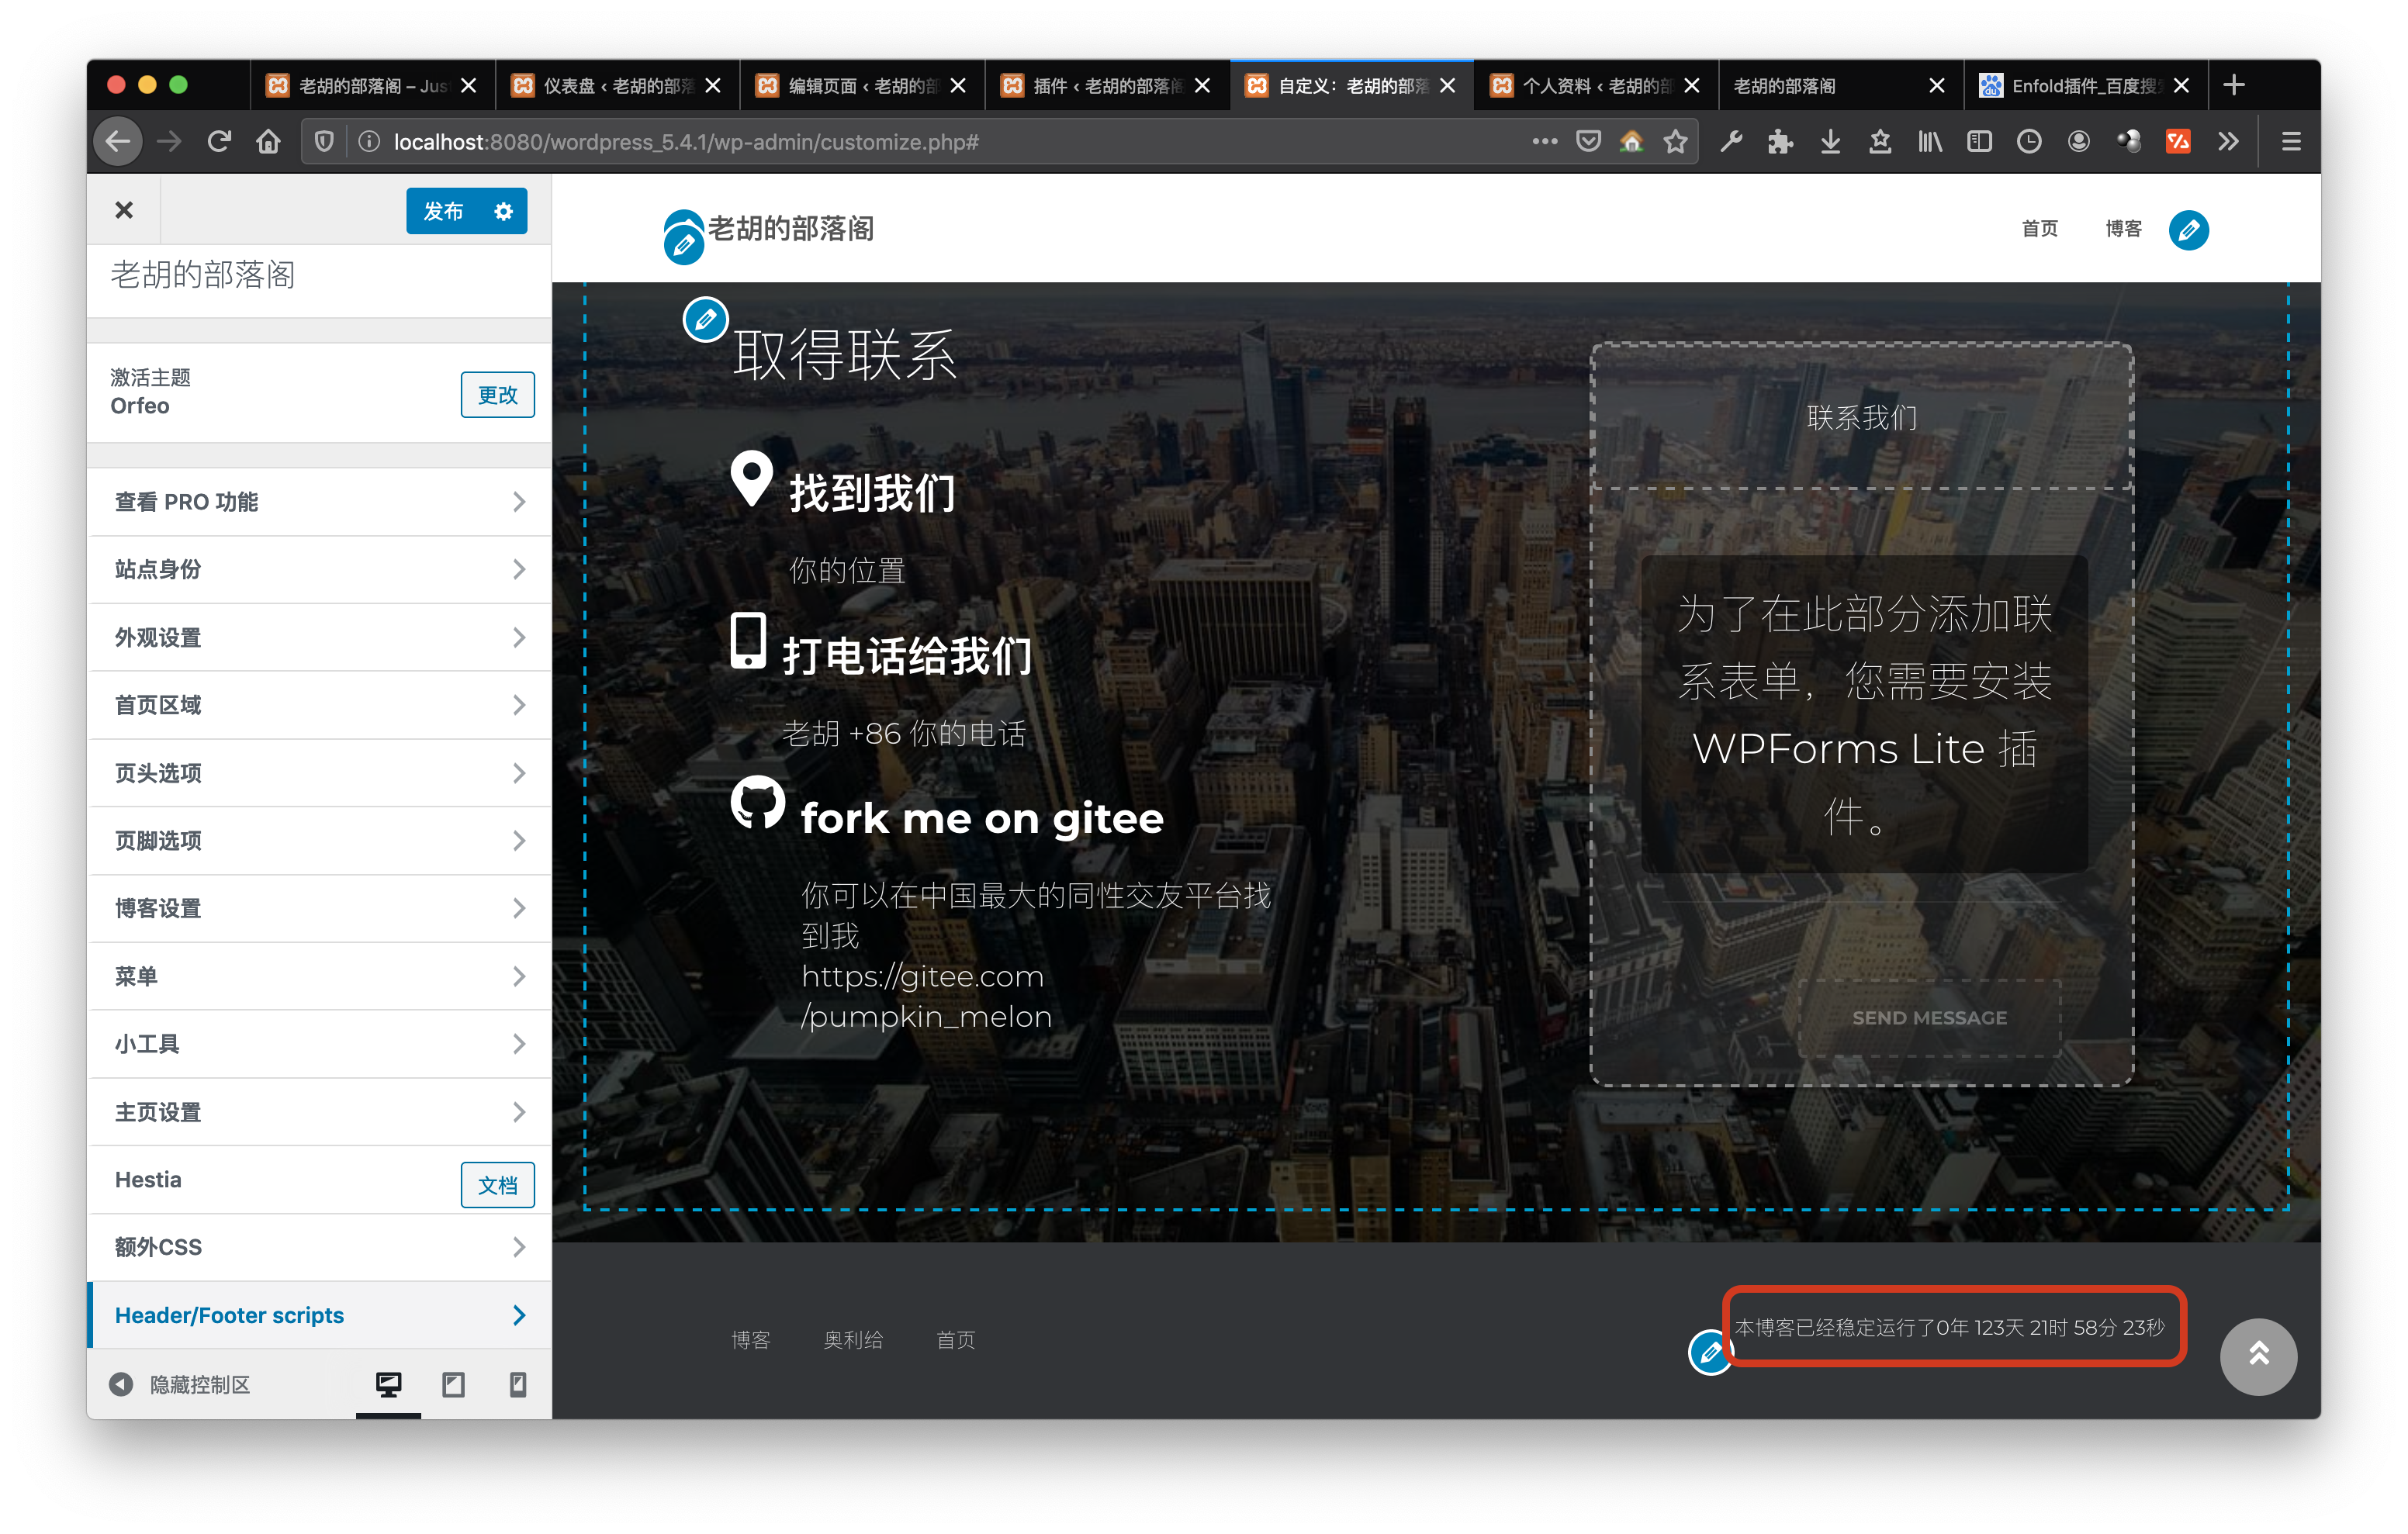
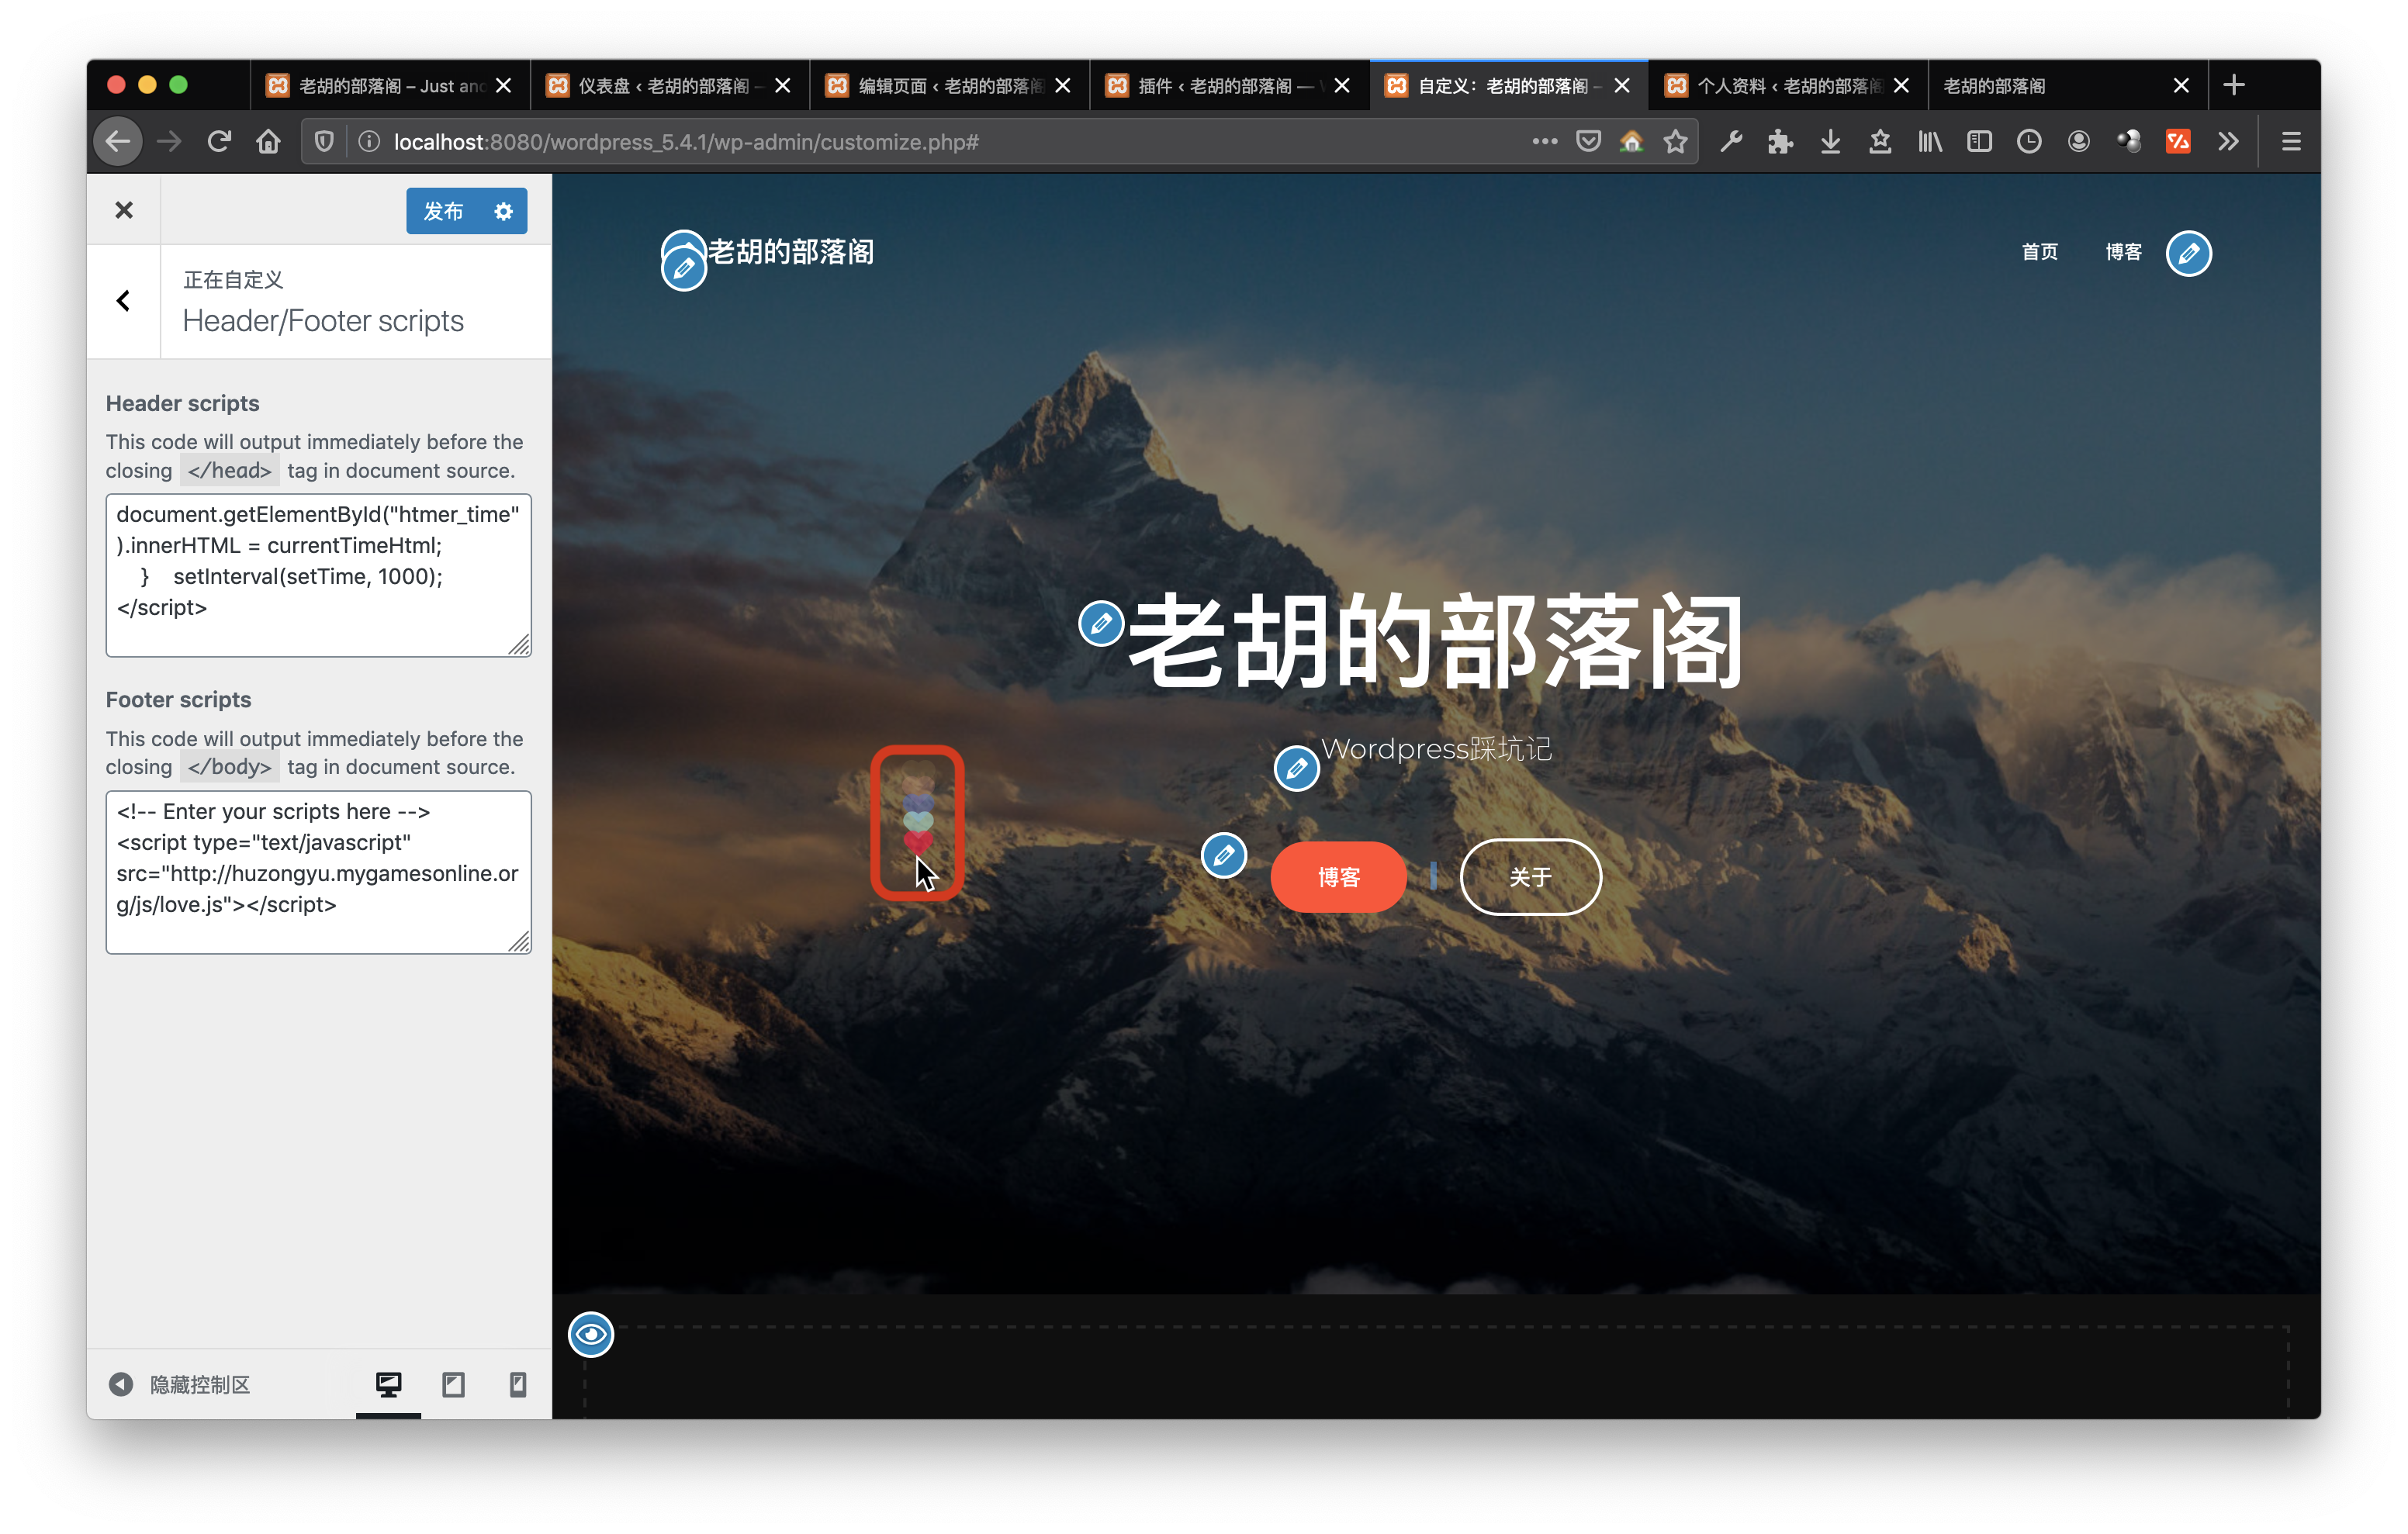
2.1、添加网站运行时间
在header/footer scripts中的Header scripts添加:
function secondToDate(second) {
if (!second) {
return 0;
}
var time = new Array(0, 0, 0, 0, 0);
if (second >= 365 * 24 * 3600) {
time[0] = parseInt(second / (365 * 24 * 3600));
second %= 365 * 24 * 3600;
}
if (second >= 24 * 3600) {
time[1] = parseInt(second / (24 * 3600));
second %= 24 * 3600;
}
if (second >= 3600) {
time[2] = parseInt(second / 3600);
second %= 3600;
}
if (second >= 60) {
time[3] = parseInt(second / 60);
second %= 60;
}
if (second > 0) {
time[4] = second;
}
return time;
}
function setTime() {
var create_time = Math.round(new Date(Date.UTC(2020, 02, 01, 01, 01, 01)).getTime() / 1000);
var timestamp = Math.round((new Date().getTime() + 8 * 60 * 60 * 1000) / 1000);
currentTime = secondToDate((timestamp - create_time));
currentTimeHtml = '本站已稳定运行了' + currentTime[0] + '年' + currentTime[1] + '天'
+ currentTime[2] + '时' + currentTime[3] + '分' + currentTime[4]
+ '秒';
document.getElementById("htmer_time").innerHTML = currentTimeHtml;
}
setInterval(setTime, 1000);
</script>
然后在 页脚选项 里引入即可:
<p id="htmer_time" style="font-size:15px">然后就可以看到效果了。
2.3、添加鼠标点击特效
2.3.1、烟花特效
在网站的任意的地方创建一个js文件,比如firework.js
(我在网站的更目录下新建了一个js的文件夹,以后js都放这。)
输入:
class Circle {
  constructor({ origin, speed, color, angle, context }) {
    this.origin = origin
    this.position = { ...this.origin }
    this.color = color
    this.speed = speed
    this.angle = angle
    this.context = context
    this.renderCount = 0
  }

  draw() {
    this.context.fillStyle = this.color
    this.context.beginPath()
    this.context.arc(this.position.x, this.position.y, 2, 0, Math.PI * 2)
    this.context.fill()
  }

  move() {
    this.position.x = (Math.sin(this.angle) * this.speed) + this.position.x
    this.position.y = (Math.cos(this.angle) * this.speed) + this.position.y + (this.renderCount * 0.3)
    this.renderCount++
  }
}

class Boom {
  constructor ({ origin, context, circleCount = 16, area }) {
    this.origin = origin
    this.context = context
    this.circleCount = circleCount
    this.area = area
    this.stop = false
    this.circles = []
  }

  randomArray(range) {
    const length = range.length
    const randomIndex = Math.floor(length * Math.random())
    return range[randomIndex]
  }

  randomColor() {
    const range = ['8', '9', 'A', 'B', 'C', 'D', 'E', 'F']
    return '#' + this.randomArray(range) + this.randomArray(range) + this.randomArray(range) + this.randomArray(range) + this.randomArray(range) + this.randomArray(range)
  }

  randomRange(start, end) {
    return (end - start) * Math.random() + start
  }

  init() {
    for(let i = 0; i < this.circleCount; i++) {
      const circle = new Circle({
        context: this.context,
        origin: this.origin,
        color: this.randomColor(),
        angle: this.randomRange(Math.PI - 1, Math.PI + 1),
        speed: this.randomRange(1, 6)
      })
      this.circles.push(circle)
    }
  }

  move() {
    this.circles.forEach((circle, index) => {
      if (circle.position.x > this.area.width || circle.position.y > this.area.height) {
        return this.circles.splice(index, 1)
      }
      circle.move()
    })
    if (this.circles.length == 0) {
      this.stop = true
    }
  }

  draw() {
    this.circles.forEach(circle => circle.draw())
  }
}

class CursorSpecialEffects {
  constructor() {
    this.computerCanvas = document.createElement('canvas')
    this.renderCanvas = document.createElement('canvas')

    this.computerContext = this.computerCanvas.getContext('2d')
    this.renderContext = this.renderCanvas.getContext('2d')

    this.globalWidth = window.innerWidth
    this.globalHeight = window.innerHeight

    this.booms = []
    this.running = false
  }

  handleMouseDown(e) {
    const boom = new Boom({
      origin: { x: e.clientX, y: e.clientY },
      context: this.computerContext,
      area: {
        width: this.globalWidth,
        height: this.globalHeight
      }
    })
    boom.init()
    this.booms.push(boom)
    this.running || this.run()
  }

  handlePageHide() {
    this.booms = []
    this.running = false
  }

  init() {
    const style = this.renderCanvas.style
    style.position = 'fixed'
    style.top = style.left = 0
    style.zIndex = '999999999999999999999999999999999999999999'
    style.pointerEvents = 'none'

    style.width = this.renderCanvas.width = this.computerCanvas.width = this.globalWidth
    style.height = this.renderCanvas.height = this.computerCanvas.height = this.globalHeight

    document.body.append(this.renderCanvas)

    window.addEventListener('mousedown', this.handleMouseDown.bind(this))
    window.addEventListener('pagehide', this.handlePageHide.bind(this))
  }

  run() {
    this.running = true
    if (this.booms.length == 0) {
      return this.running = false
    }

    requestAnimationFrame(this.run.bind(this))

    this.computerContext.clearRect(0, 0, this.globalWidth, this.globalHeight)
    this.renderContext.clearRect(0, 0, this.globalWidth, this.globalHeight)

    this.booms.forEach((boom, index) => {
      if (boom.stop) {
        return this.booms.splice(index, 1)
      }
      boom.move()
      boom.draw()
    })
    this.renderContext.drawImage(this.computerCanvas, 0, 0, this.globalWidth, this.globalHeight)
  }
}

const cursorSpecialEffects = new CursorSpecialEffects()
cursorSpecialEffects.init()保存,然后在header/footer scripts中的footer scripts里输入:
<script type="text/javascript" src="你的fireworks.js所在的绝对路径"></script>效果见我的网站
2.3.2、爱心特效
同样地,在网站的随便一个地方创建一个js文件,比如love.js
(function(window,document,undefined){
var hearts = [];
window.requestAnimationFrame = (function(){
return window.requestAnimationFrame ||
window.webkitRequestAnimationFrame ||
window.mozRequestAnimationFrame ||
window.oRequestAnimationFrame ||
window.msRequestAnimationFrame ||
function (callback){
setTimeout(callback,1000/60);
}
})();
init();
function init(){
css(".heart{width: 10px;height: 10px;position: fixed;background: #f00;transform: rotate(45deg);-webkit-transform: rotate(45deg);-moz-transform: rotate(45deg);}.heart:after,.heart:before{content: '';width: inherit;height: inherit;background: inherit;border-radius: 50%;-webkit-border-radius: 50%;-moz-border-radius: 50%;position: absolute;}.heart:after{top: -5px;}.heart:before{left: -5px;}");
attachEvent();
gameloop();
}
function gameloop(){
for(var i=0;i<hearts.length;i++){
if(hearts[i].alpha <=0){
document.body.removeChild(hearts[i].el);
hearts.splice(i,1);
continue;
}
hearts[i].y--;
hearts[i].scale += 0.004;
hearts[i].alpha -= 0.013;
hearts[i].el.style.cssText = "left:"+hearts[i].x+"px;top:"+hearts[i].y+"px;opacity:"+hearts[i].alpha+";transform:scale("+hearts[i].scale+","+hearts[i].scale+") rotate(45deg);background:"+hearts[i].color;
}
requestAnimationFrame(gameloop);
}
function attachEvent(){
var old = typeof window.onclick==="function" && window.onclick;
window.onclick = function(event){
old && old();
createHeart(event);
}
}
function createHeart(event){
var d = document.createElement("div");
d.className = "heart";
hearts.push({
el : d,
x : event.clientX - 5,
y : event.clientY - 5,
scale : 1,
alpha : 1,
color : randomColor()
});
document.body.appendChild(d);
}
function css(css){
var style = document.createElement("style");
style.type="text/css";
try{
style.appendChild(document.createTextNode(css));
}catch(ex){
style.styleSheet.cssText = css;
}
document.getElementsByTagName('head')[0].appendChild(style);
}
function randomColor(){
return "rgb("+(~~(Math.random()*255))+","+(~~(Math.random()*255))+","+(~~(Math.random()*255))+")";
}
})(window,document);保存,然后在header/footer scripts中的footer scripts里输入:
<script type="text/javascript" src="你的love.js所在的绝对路径"></script>效果如图:
2.4、添加打字特效
同样新建一个js,输入:
(function webpackUniversalModuleDefinition(root, factory) {
    if(typeof exports === 'object' && typeof module === 'object')
        module.exports = factory();
    else if(typeof define === 'function' && define.amd)
        define([], factory);
    else if(typeof exports === 'object')
        exports["POWERMODE"] = factory();
    else
        root["POWERMODE"] = factory();
})(this, function() {
return /******/ (function(modules) { // webpackBootstrap
/******/    // The module cache
/******/    var installedModules = {};

/******/    // The require function
/******/    function __webpack_require__(moduleId) {

/******/        // Check if module is in cache
/******/        if(installedModules[moduleId])
/******/            return installedModules[moduleId].exports;

/******/        // Create a new module (and put it into the cache)
/******/        var module = installedModules[moduleId] = {
/******/            exports: {},
/******/            id: moduleId,
/******/            loaded: false
/******/        };

/******/        // Execute the module function
/******/        modules[moduleId].call(module.exports, module, module.exports, __webpack_require__);

/******/        // Flag the module as loaded
/******/        module.loaded = true;

/******/        // Return the exports of the module
/******/        return module.exports;
/******/    }

/******/    // expose the modules object (__webpack_modules__)
/******/    __webpack_require__.m = modules;

/******/    // expose the module cache
/******/    __webpack_require__.c = installedModules;

/******/    // __webpack_public_path__
/******/    __webpack_require__.p = "";

/******/    // Load entry module and return exports
/******/    return __webpack_require__(0);
/******/ })
/************************************************************************/
/******/ ([
/* 0 */
/***/ (function(module, exports, __webpack_require__) {

    'use strict';

    var canvas = document.createElement('canvas');
    canvas.width = window.innerWidth;
    canvas.height = window.innerHeight;
    canvas.style.cssText = 'position:fixed;top:0;left:0;pointer-events:none;z-index:999999';
    window.addEventListener('resize', function () {
        canvas.width = window.innerWidth;
        canvas.height = window.innerHeight;
    });
    document.body.appendChild(canvas);
    var context = canvas.getContext('2d');
    var particles = [];
    var particlePointer = 0;
    var rendering = false;

    POWERMODE.shake = true;

    function getRandom(min, max) {
        return Math.random() * (max - min) + min;
    }

    function getColor(el) {
        if (POWERMODE.colorful) {
            var u = getRandom(0, 360);
            return 'hsla(' + getRandom(u - 10, u + 10) + ', 100%, ' + getRandom(50, 80) + '%, ' + 1 + ')';
        } else {
            return window.getComputedStyle(el).color;
        }
    }

    function getCaret() {
        var el = document.activeElement;
        var bcr;
        if (el.tagName === 'TEXTAREA' ||
            (el.tagName === 'INPUT' && el.getAttribute('type') === 'text')) {
            var offset = __webpack_require__(1)(el, el.selectionEnd);
            bcr = el.getBoundingClientRect();
            return {
                x: offset.left + bcr.left,
                y: offset.top + bcr.top,
                color: getColor(el)
            };
        }
        var selection = window.getSelection();
        if (selection.rangeCount) {
            var range = selection.getRangeAt(0);
            var startNode = range.startContainer;
            if (startNode.nodeType === document.TEXT_NODE) {
                startNode = startNode.parentNode;
            }
            bcr = range.getBoundingClientRect();
            return {
                x: bcr.left,
                y: bcr.top,
                color: getColor(startNode)
            };
        }
        return { x: 0, y: 0, color: 'transparent' };
    }

    function createParticle(x, y, color) {
        return {
x: x,然后在header/footer scripts中的footer scripts里输入:
<script src="js文件所在的路径"></script>
<script>
POWERMODE.colorful = true; /* make power mode colorful*/
POWERMODE.shake = false; /* turn off shake*/
document.body.addEventListener('input', POWERMODE);
</script>
效果:
2.5、巧用菜单栏
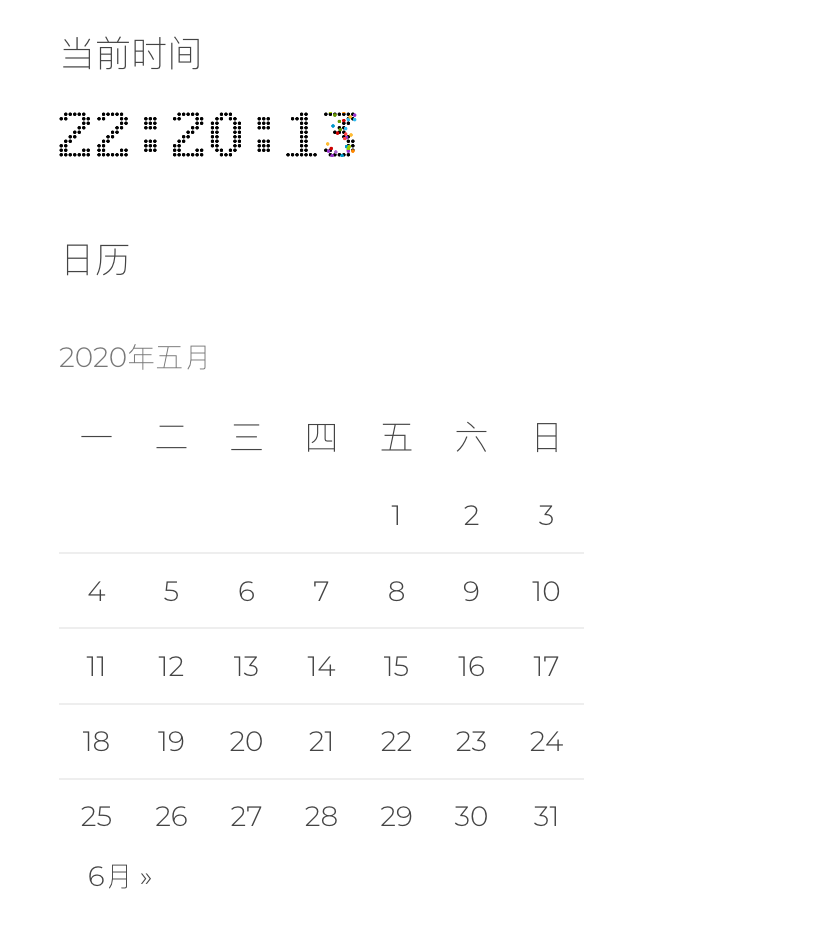
2.5.1、添加日历
添加日历其实很简单,在 小工具 → 边栏 → 添加小工具 里面,见图:

2.5.2、炫酷的时钟效果
在边栏添加html代码:
输入:
<div style="">
    <canvas id="canvas" style="width:60%;">当前浏览器不支持canvas,请更换浏览器后再试</canvas>
</div>
<script>
(function(){

   var digit=
    [
        [
            [0,0,1,1,1,0,0],
            [0,1,1,0,1,1,0],
            [1,1,0,0,0,1,1],
            [1,1,0,0,0,1,1],
            [1,1,0,0,0,1,1],
            [1,1,0,0,0,1,1],
            [1,1,0,0,0,1,1],
            [1,1,0,0,0,1,1],
            [0,1,1,0,1,1,0],
            [0,0,1,1,1,0,0]
        ],//0
        [
            [0,0,0,1,1,0,0],
            [0,1,1,1,1,0,0],
            [0,0,0,1,1,0,0],
            [0,0,0,1,1,0,0],
            [0,0,0,1,1,0,0],
            [0,0,0,1,1,0,0],
            [0,0,0,1,1,0,0],
            [0,0,0,1,1,0,0],
            [0,0,0,1,1,0,0],
            [1,1,1,1,1,1,1]
        ],//1
        [
            [0,1,1,1,1,1,0],
            [1,1,0,0,0,1,1],
            [0,0,0,0,0,1,1],
            [0,0,0,0,1,1,0],
            [0,0,0,1,1,0,0],
            [0,0,1,1,0,0,0],
            [0,1,1,0,0,0,0],
            [1,1,0,0,0,0,0],
            [1,1,0,0,0,1,1],
            [1,1,1,1,1,1,1]
        ],//2
        [
            [1,1,1,1,1,1,1],
            [0,0,0,0,0,1,1],
            [0,0,0,0,1,1,0],
            [0,0,0,1,1,0,0],
            [0,0,1,1,1,0,0],
            [0,0,0,0,1,1,0],
            [0,0,0,0,0,1,1],
            [0,0,0,0,0,1,1],
            [1,1,0,0,0,1,1],
            [0,1,1,1,1,1,0]
        ],//3
        [
            [0,0,0,0,1,1,0],
            [0,0,0,1,1,1,0],
            [0,0,1,1,1,1,0],
            [0,1,1,0,1,1,0],
            [1,1,0,0,1,1,0],
            [1,1,1,1,1,1,1],
            [0,0,0,0,1,1,0],
            [0,0,0,0,1,1,0],
            [0,0,0,0,1,1,0],
            [0,0,0,1,1,1,1]
        ],//4
        [
            [1,1,1,1,1,1,1],
            [1,1,0,0,0,0,0],
            [1,1,0,0,0,0,0],
            [1,1,1,1,1,1,0],
            [0,0,0,0,0,1,1],
            [0,0,0,0,0,1,1],
            [0,0,0,0,0,1,1],
            [0,0,0,0,0,1,1],
            [1,1,0,0,0,1,1],
            [0,1,1,1,1,1,0]
        ],//5
        [
            [0,0,0,0,1,1,0],
            [0,0,1,1,0,0,0],
            [0,1,1,0,0,0,0],
            [1,1,0,0,0,0,0],
            [1,1,0,1,1,1,0],
            [1,1,0,0,0,1,1],
            [1,1,0,0,0,1,1],
            [1,1,0,0,0,1,1],
            [1,1,0,0,0,1,1],
            [0,1,1,1,1,1,0]
        ],//6
        [
            [1,1,1,1,1,1,1],
            [1,1,0,0,0,1,1],
            [0,0,0,0,1,1,0],
            [0,0,0,0,1,1,0],
            [0,0,0,1,1,0,0],
            [0,0,0,1,1,0,0],
            [0,0,1,1,0,0,0],
            [0,0,1,1,0,0,0],
            [0,0,1,1,0,0,0],
            [0,0,1,1,0,0,0]
        ],//7
        [
            [0,1,1,1,1,1,0],
            [1,1,0,0,0,1,1],
            [1,1,0,0,0,1,1],
            [1,1,0,0,0,1,1],
            [0,1,1,1,1,1,0],
            [1,1,0,0,0,1,1],
            [1,1,0,0,0,1,1],
            [1,1,0,0,0,1,1],
            [1,1,0,0,0,1,1],
            [0,1,1,1,1,1,0]
        ],//8
        [
            [0,1,1,1,1,1,0],
            [1,1,0,0,0,1,1],
            [1,1,0,0,0,1,1],
            [1,1,0,0,0,1,1],
            [0,1,1,1,0,1,1],
            [0,0,0,0,0,1,1],
            [0,0,0,0,0,1,1],
            [0,0,0,0,1,1,0],
            [0,0,0,1,1,0,0],
            [0,1,1,0,0,0,0]
        ],//9
        [
            [0,0,0,0,0,0,0],
            [0,0,1,1,1,0,0],
            [0,0,1,1,1,0,0],
            [0,0,1,1,1,0,0],
            [0,0,0,0,0,0,0],
            [0,0,0,0,0,0,0],
            [0,0,1,1,1,0,0],
            [0,0,1,1,1,0,0],
            [0,0,1,1,1,0,0],
            [0,0,0,0,0,0,0]
        ]//:
    ];

var canvas = document.getElementById('canvas');

if(canvas.getContext){
    var cxt = canvas.getContext('2d');
    //声明canvas的宽高
    var H = 100,W = 700;
    canvas.height = H;
    canvas.width = W;
    cxt.fillStyle = '#f00';
    cxt.fillRect(10,10,50,50);

    //存储时间数据
    var data = [];
    //存储运动的小球
    var balls = [];
    //设置粒子半径
    var R = canvas.height/20-1;
    (function(){
        var temp = /(\d)(\d):(\d)(\d):(\d)(\d)/.exec(new Date());
        //存储时间数字,由十位小时、个位小时、冒号、十位分钟、个位分钟、冒号、十位秒钟、个位秒钟这7个数字组成
        data.push(temp[1],temp[2],10,temp[3],temp[4],10,temp[5],temp[6]);
    })();

    /*生成点阵数字*/
    function renderDigit(index,num){
        for(var i = 0; i < digit[num].length; i++){
            for(var j = 0; j < digit[num][i].length; j++){
                if(digit[num][i][j] == 1){
                    cxt.beginPath();
                    cxt.arc(14*(R+2)*index + j*2*(R+1)+(R+1),i*2*(R+1)+(R+1),R,0,2*Math.PI);
                    cxt.closePath();
                    cxt.fill();
                }
            }
        }
    }

    /*更新时钟*/
    function updateDigitTime(){
        var changeNumArray = [];
        var temp = /(\d)(\d):(\d)(\d):(\d)(\d)/.exec(new Date());
        var NewData = [];
        NewData.push(temp[1],temp[2],10,temp[3],temp[4],10,temp[5],temp[6]);
        for(var i = data.length-1; i >=0 ; i--){
            //时间发生变化
            if(NewData[i] !== data[i]){
                //将变化的数字值和在data数组中的索引存储在changeNumArray数组中
                changeNumArray.push(i+'_'+(Number(data[i])+1)%10);
            }
        }
        //增加小球
        for(var i = 0; i< changeNumArray.length; i++){
            addBalls.apply(this,changeNumArray[i].split('_'));
        }
        data = NewData.concat();
    }

    /*更新小球状态*/
    function updateBalls(){
        for(var i = 0; i < balls.length; i++){
            balls[i].stepY += balls[i].disY;
            balls[i].x += balls[i].stepX;
            balls[i].y += balls[i].stepY;
            if(balls[i].x > W + R || balls[i].y > H + R){
                balls.splice(i,1);
                i--;
            }
        }
    }

    /*增加要运动的小球*/
    function addBalls(index,num){
        var numArray = [1,2,3];
        var colorArray =  ["#3BE","#09C","#A6C","#93C","#9C0","#690","#FB3","#F80","#F44","#C00"];
        for(var i = 0; i < digit[num].length; i++){
            for(var j = 0; j < digit[num][i].length; j++){
                if(digit[num][i][j] == 1){
                    var ball = {
                        x:14*(R+2)*index + j*2*(R+1)+(R+1),
                        y:i*2*(R+1)+(R+1),
                        stepX:Math.floor(Math.random() * 4 -2),
                        stepY:-2*numArray[Math.floor(Math.random()*numArray.length)],
                        color:colorArray[Math.floor(Math.random()*colorArray.length)],
                        disY:1
                    };
                    balls.push(ball);
                }
            }
        }
    }

    /*渲染*/
    function render(){
        //重置画布宽度,达到清空画布的效果
        canvas.height = 100;
        //渲染时钟
        for(var i = 0; i < data.length; i++){
            renderDigit(i,data[i]);
        }
        //渲染小球
        for(var i = 0; i < balls.length; i++){
            cxt.beginPath();
            cxt.arc(balls[i].x,balls[i].y,R,0,2*Math.PI);
            cxt.fillStyle = balls[i].color;
            cxt.closePath();
            cxt.fill();
        }
    }

    clearInterval(oTimer);
    var oTimer = setInterval(function(){
        //更新时钟
        updateDigitTime();
        //更新小球状态
        updateBalls();
        //渲染
        render();
    },50);
}

})();
</script>
然后,就可以看到效果了:
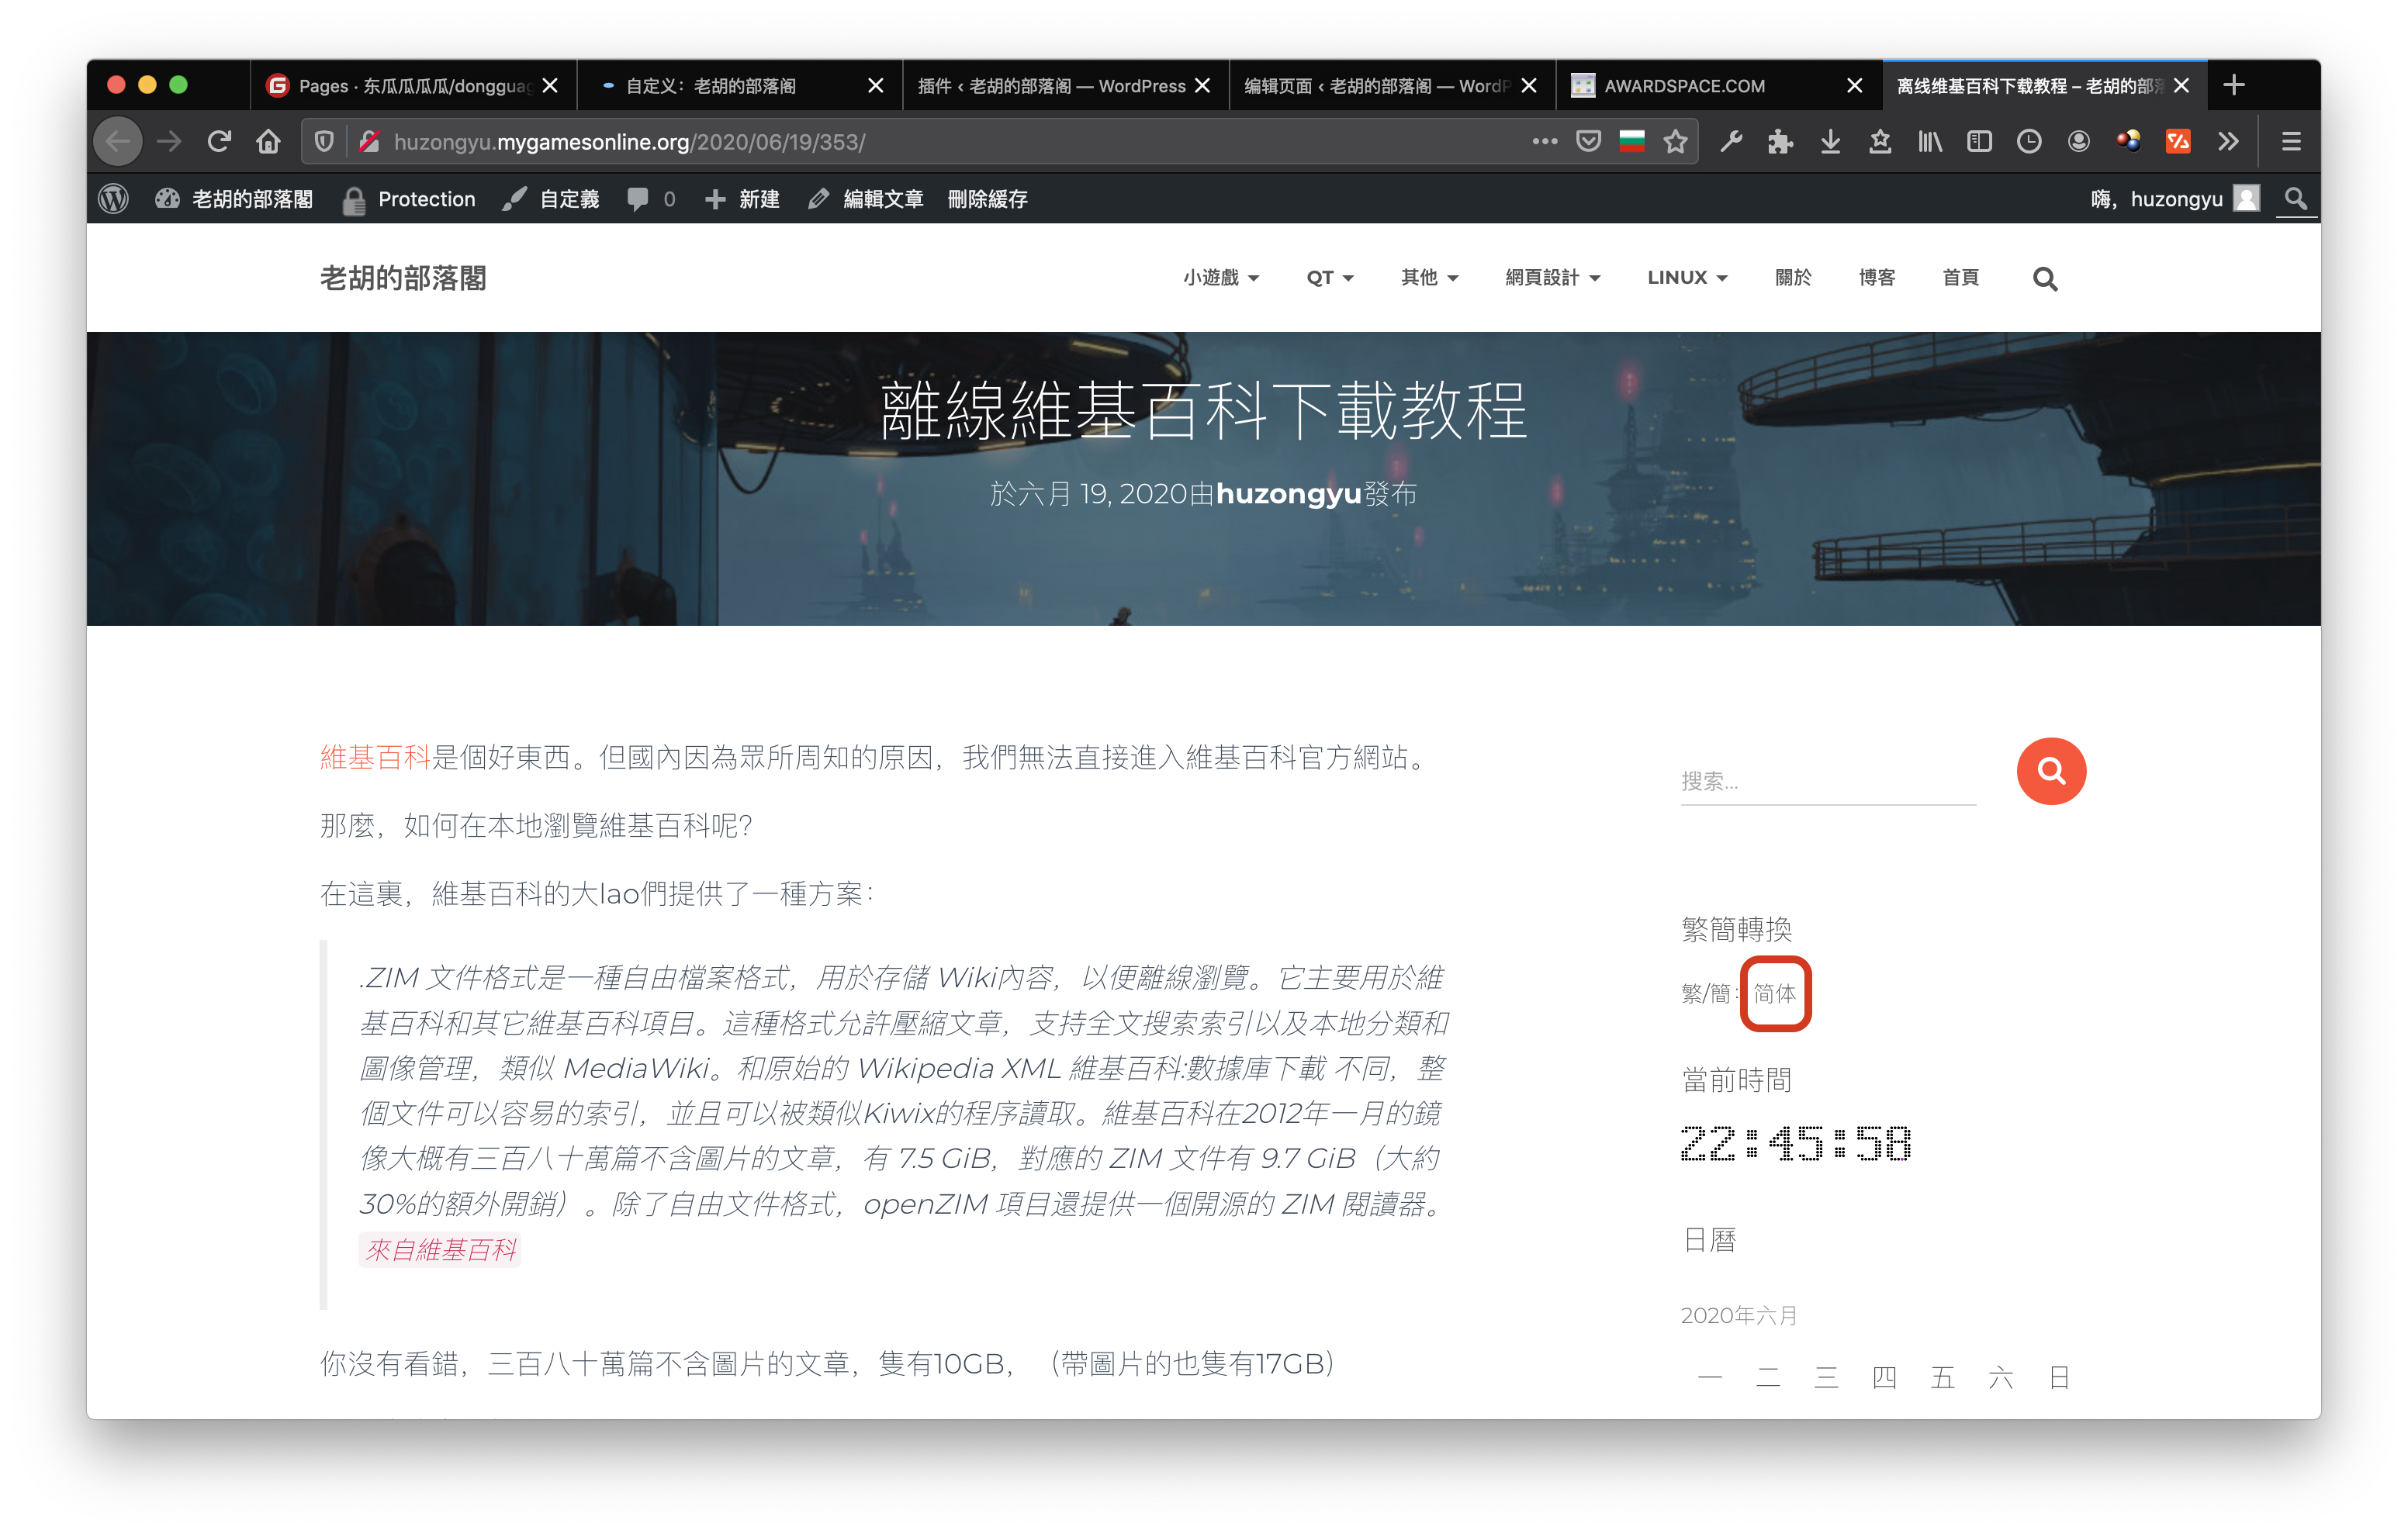
3、添加繁简转换功能
这个较为复杂。
繁简转换是网站的必备技能,下面就教大家添加繁-简功能。
获取js代码可以到这里下载。
把tw_cn.js文件放到网站的一个地方(前面提到过建立一个叫js的文件夹专门存放代码,可以放这里。)
然后呢,就要让js文件生效了。
你可以在页脚里面显示(就在 页脚选项里更改)
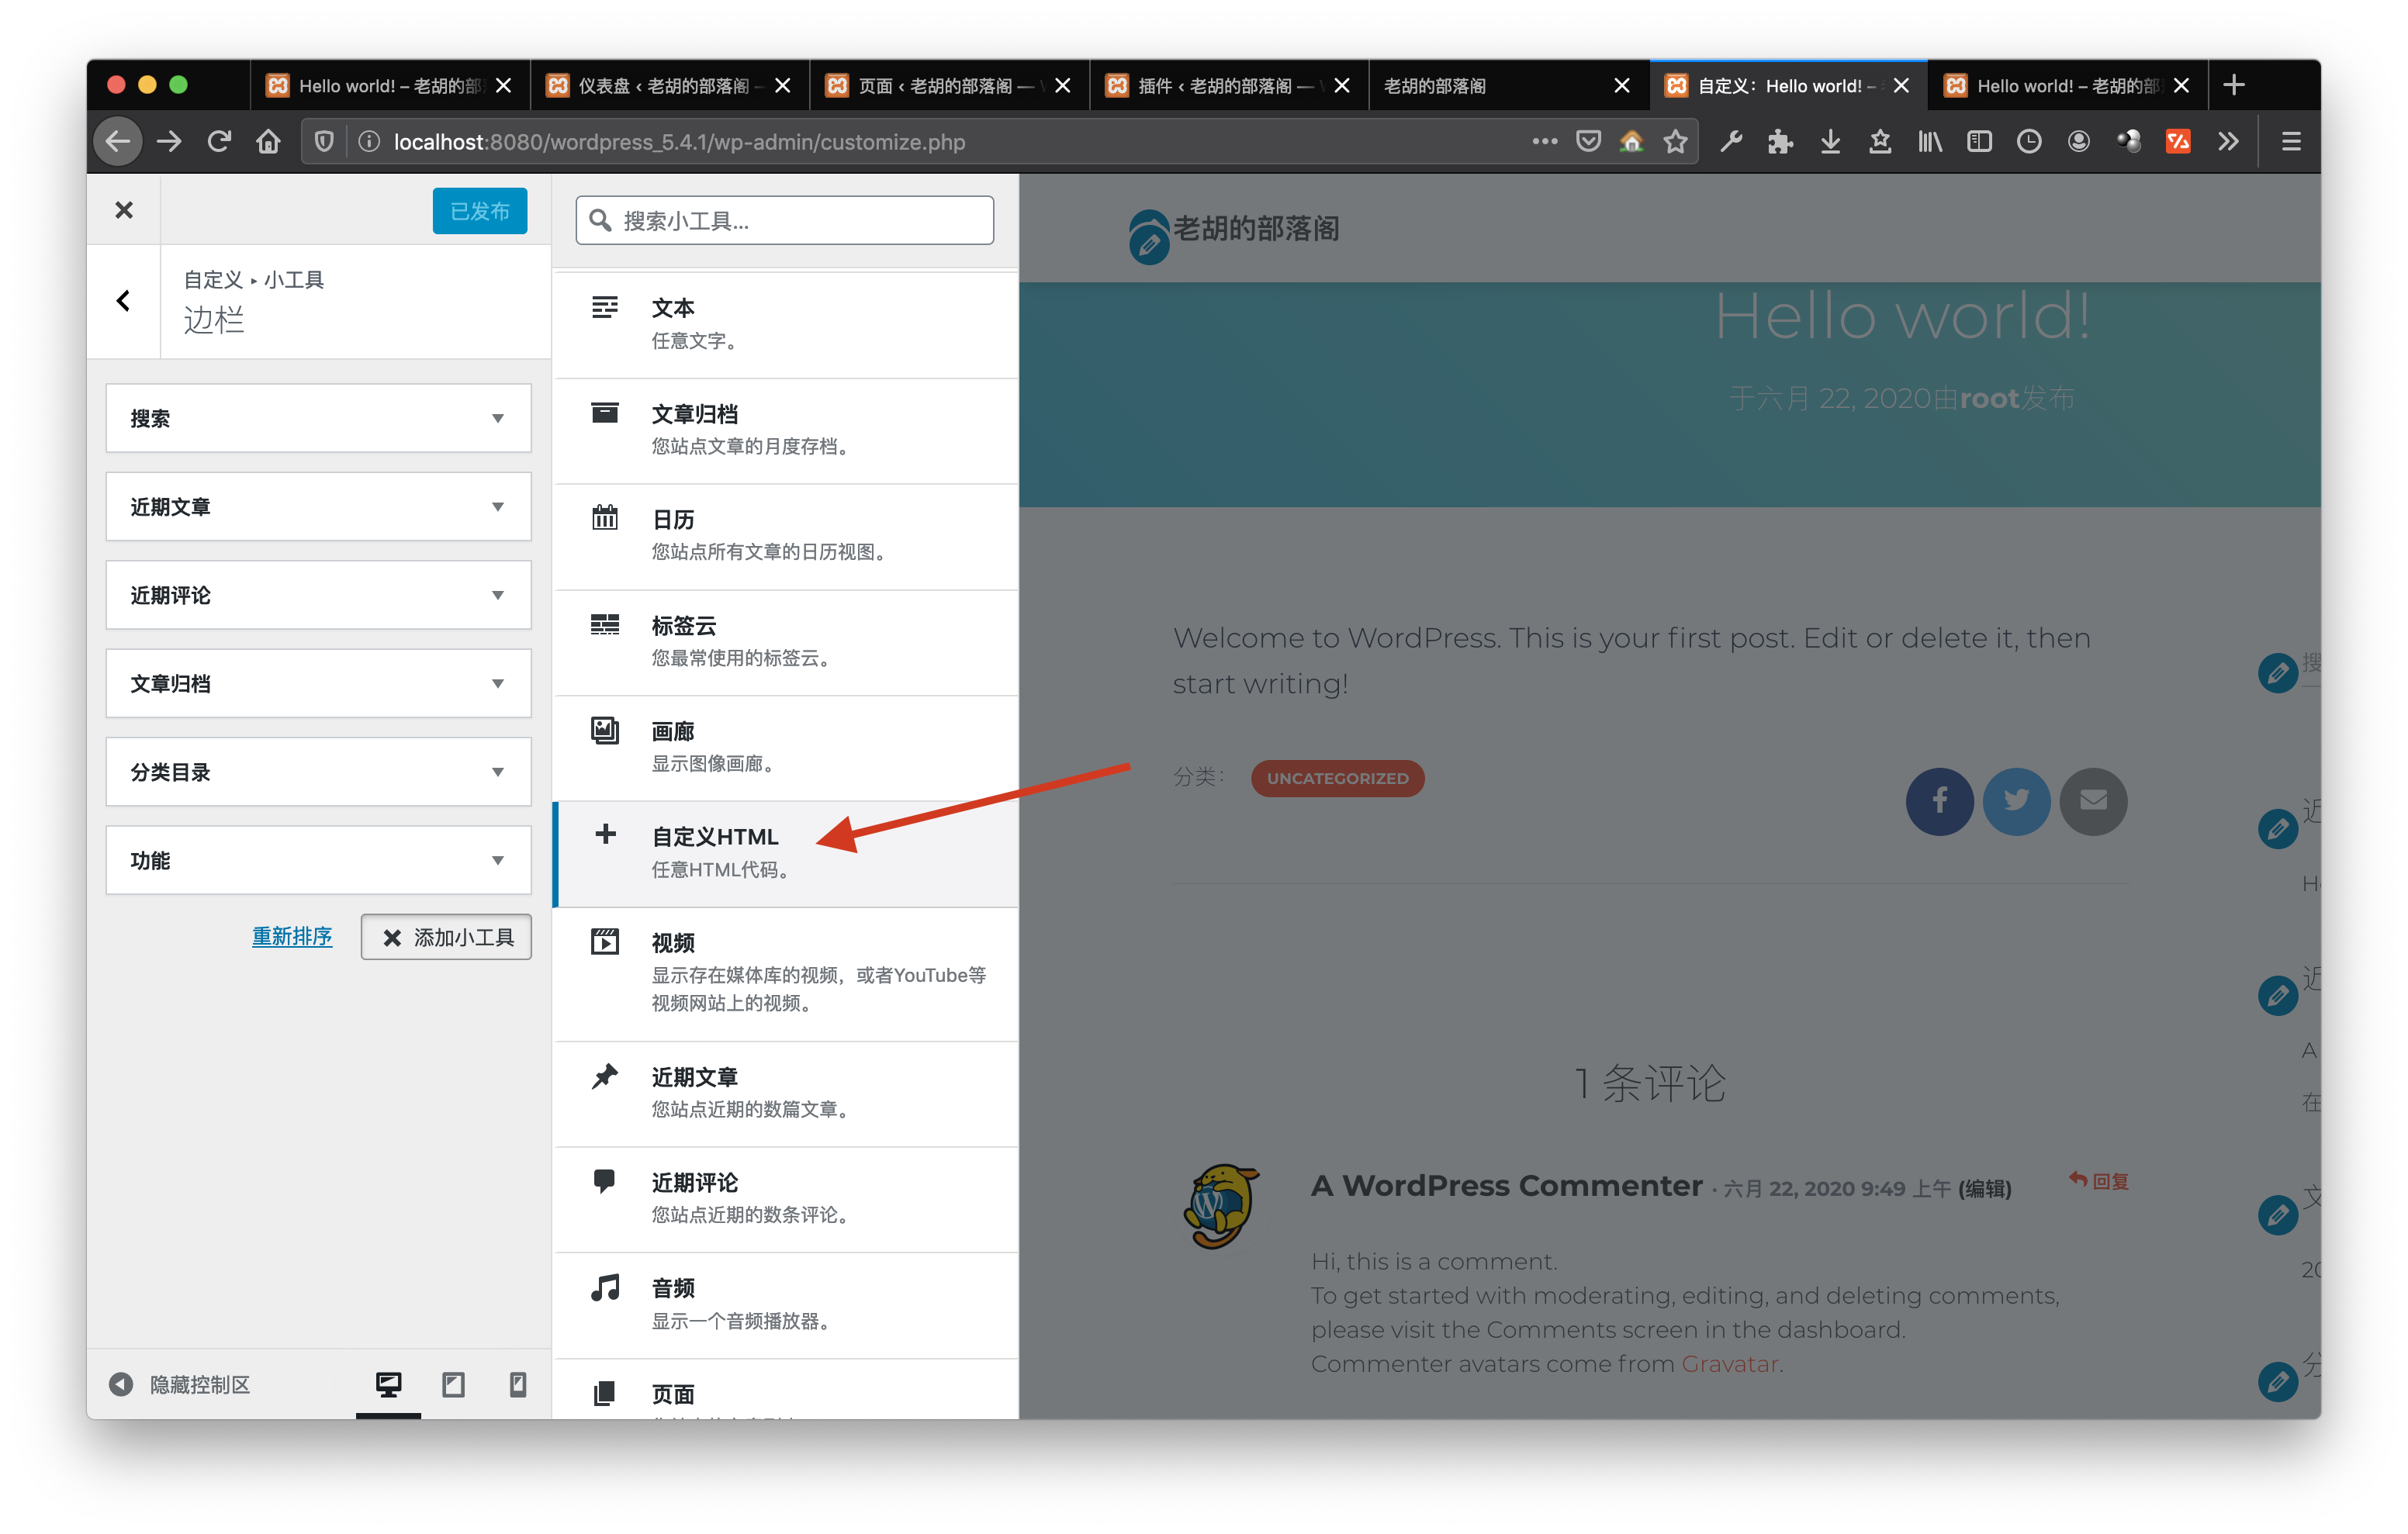
也可以在边栏里添加(小工具 → 边栏 → 添加小工具 → 自定义HTML)
输入:
<div class="translate-style">
繁/简:<a id="translateLink" href="javascript:translatePage();">繁体
</a>
</div>
<script type="text/javascript" src="你的js文件的绝对路径"></script>
<script type="text/javascript">
var defaultEncoding = 2; //网站编写字体是否繁体,1-繁体,2-简体
var translateDelay = 0; //延迟时间,若不在前, 要设定延迟翻译时间, 如100表示100ms,默认为0
var cookieDomain = "http://huzongyu.mygamesonline.org"; //Cookie地址, 一定要设定, 通常为你的网址
var msgToTraditionalChinese = "繁体"; //此处可以更改为你想要显示的文字
var msgToSimplifiedChinese = "简体"; //同上,但两处均不建议更改
var translateButtonId = "translateLink"; //默认互换id
translateInitilization();
</script>
效果显著:
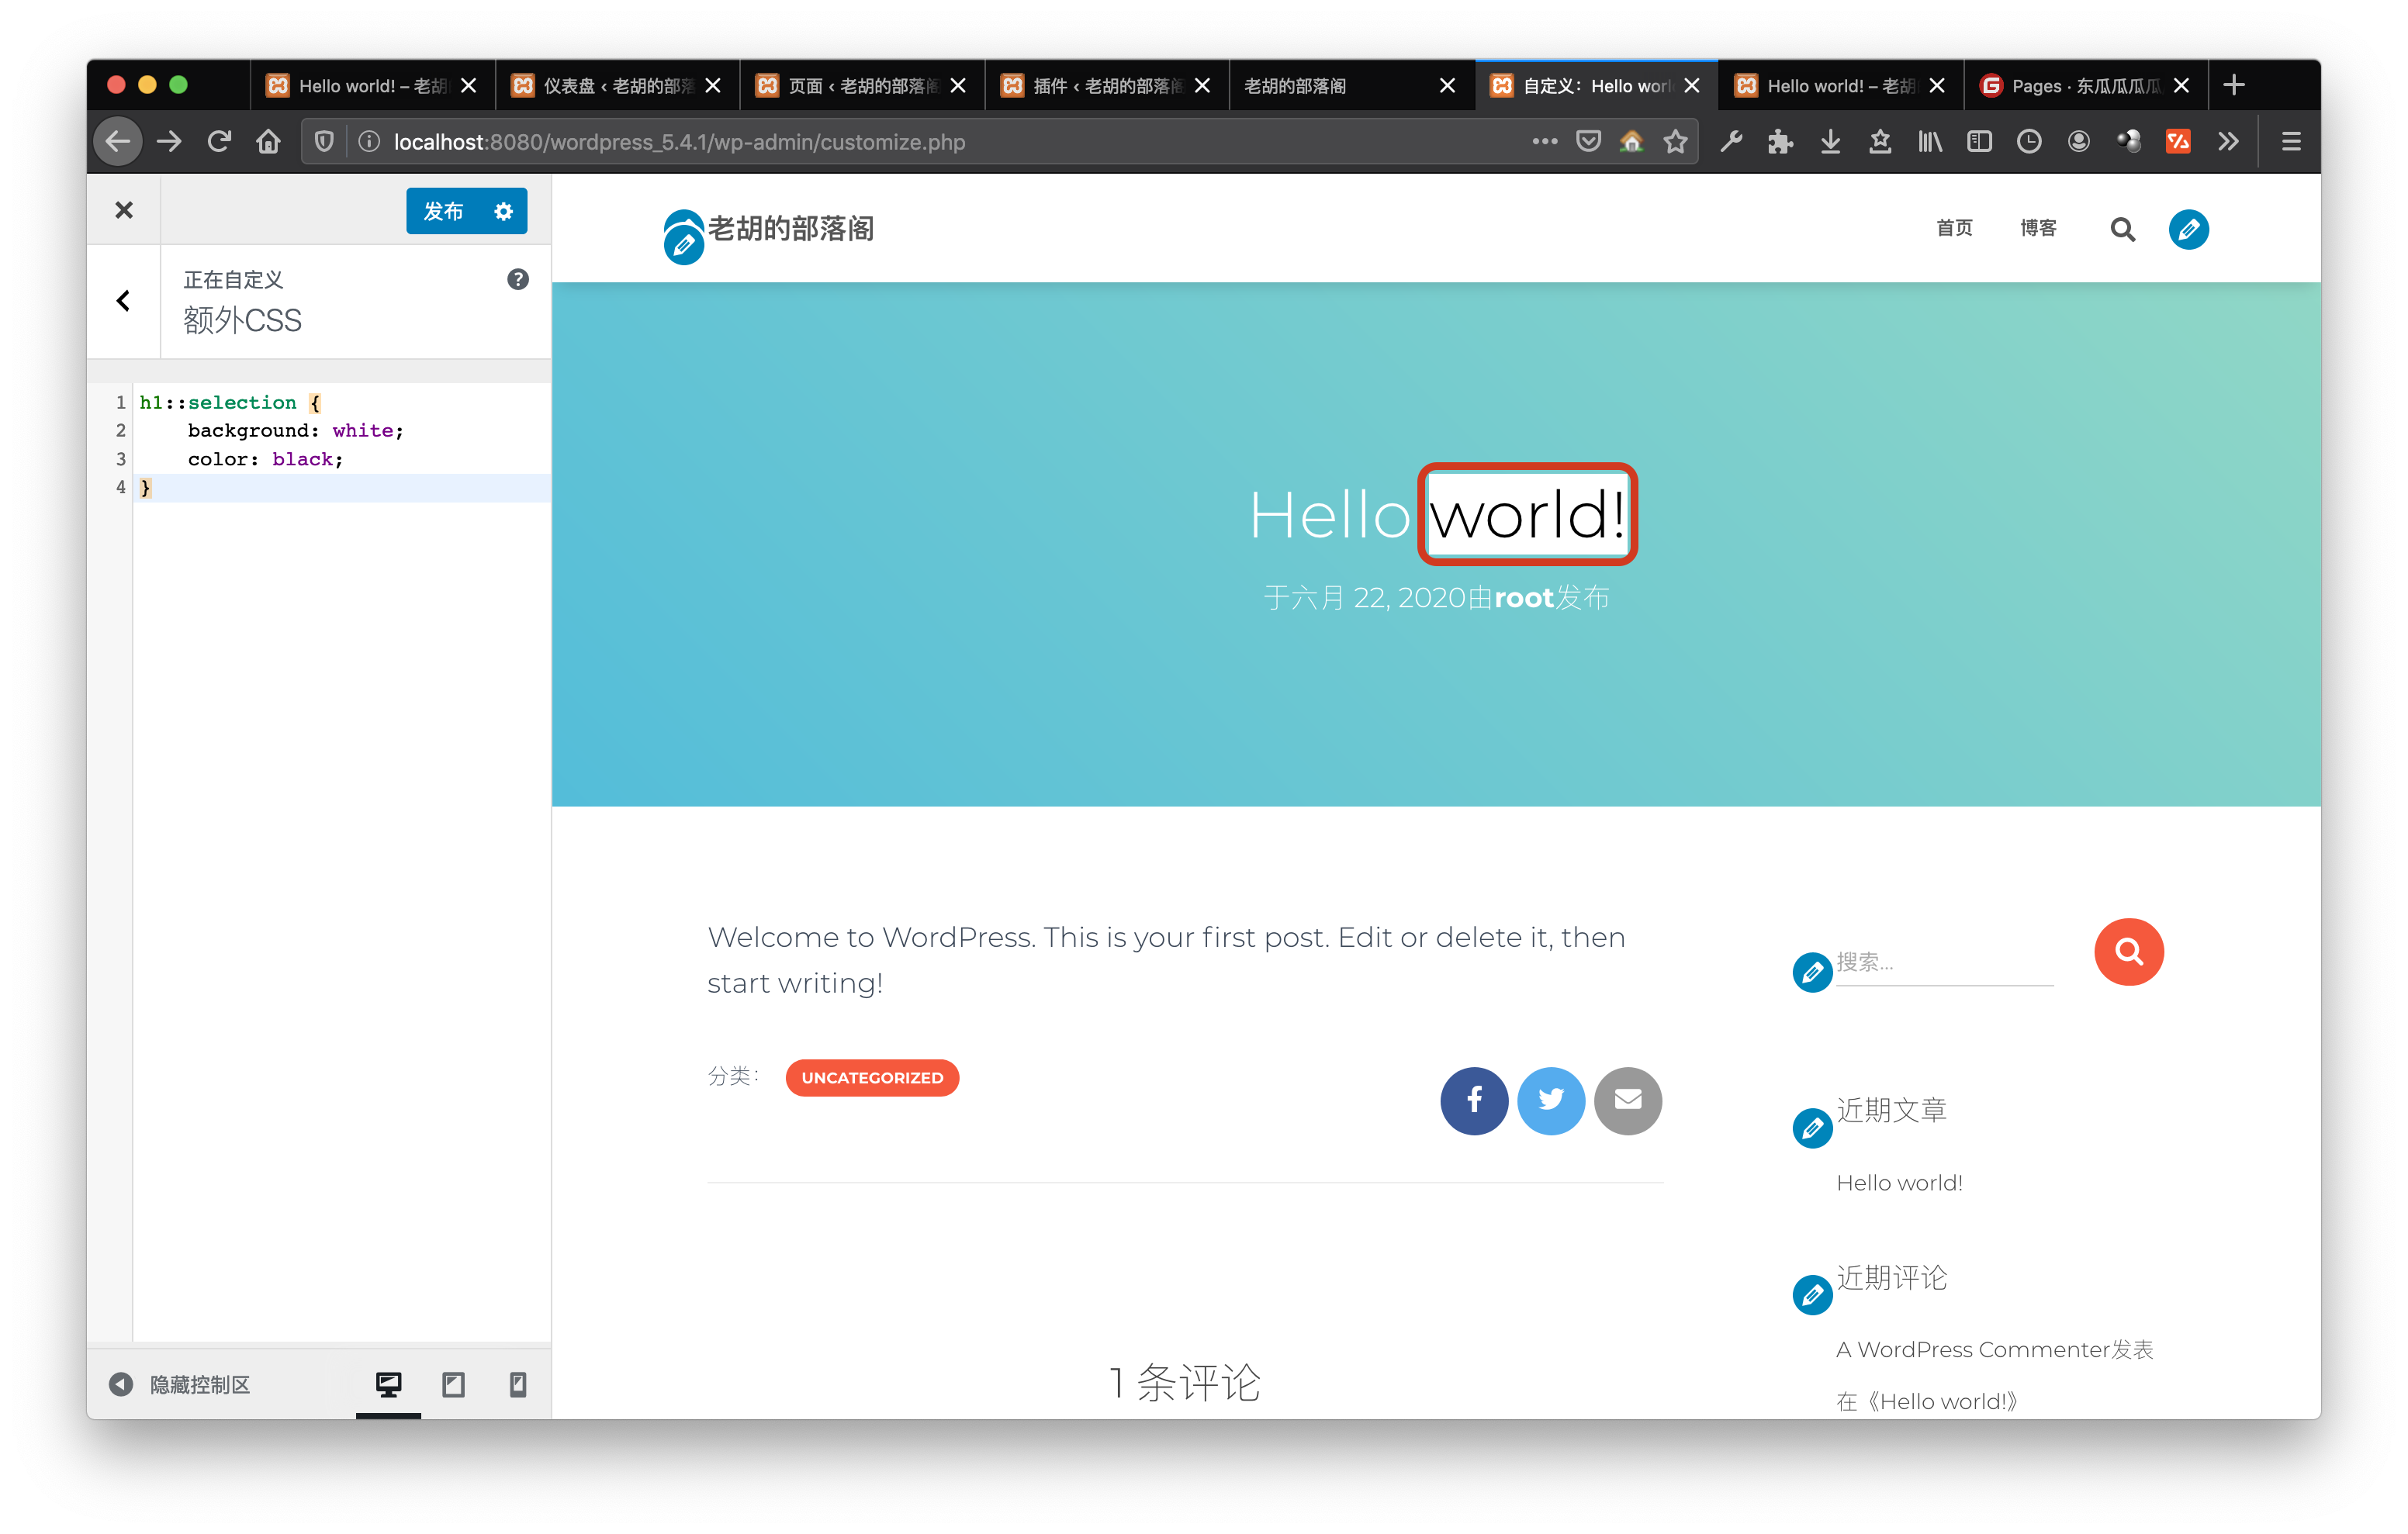
4、CSS美化
4.1、更改选择文本的颜色
我们可以在 额外CSS 中更改:
::selection {
    background: black;
    color: white;
}
但大标题的文字是白的啊!怎么办?
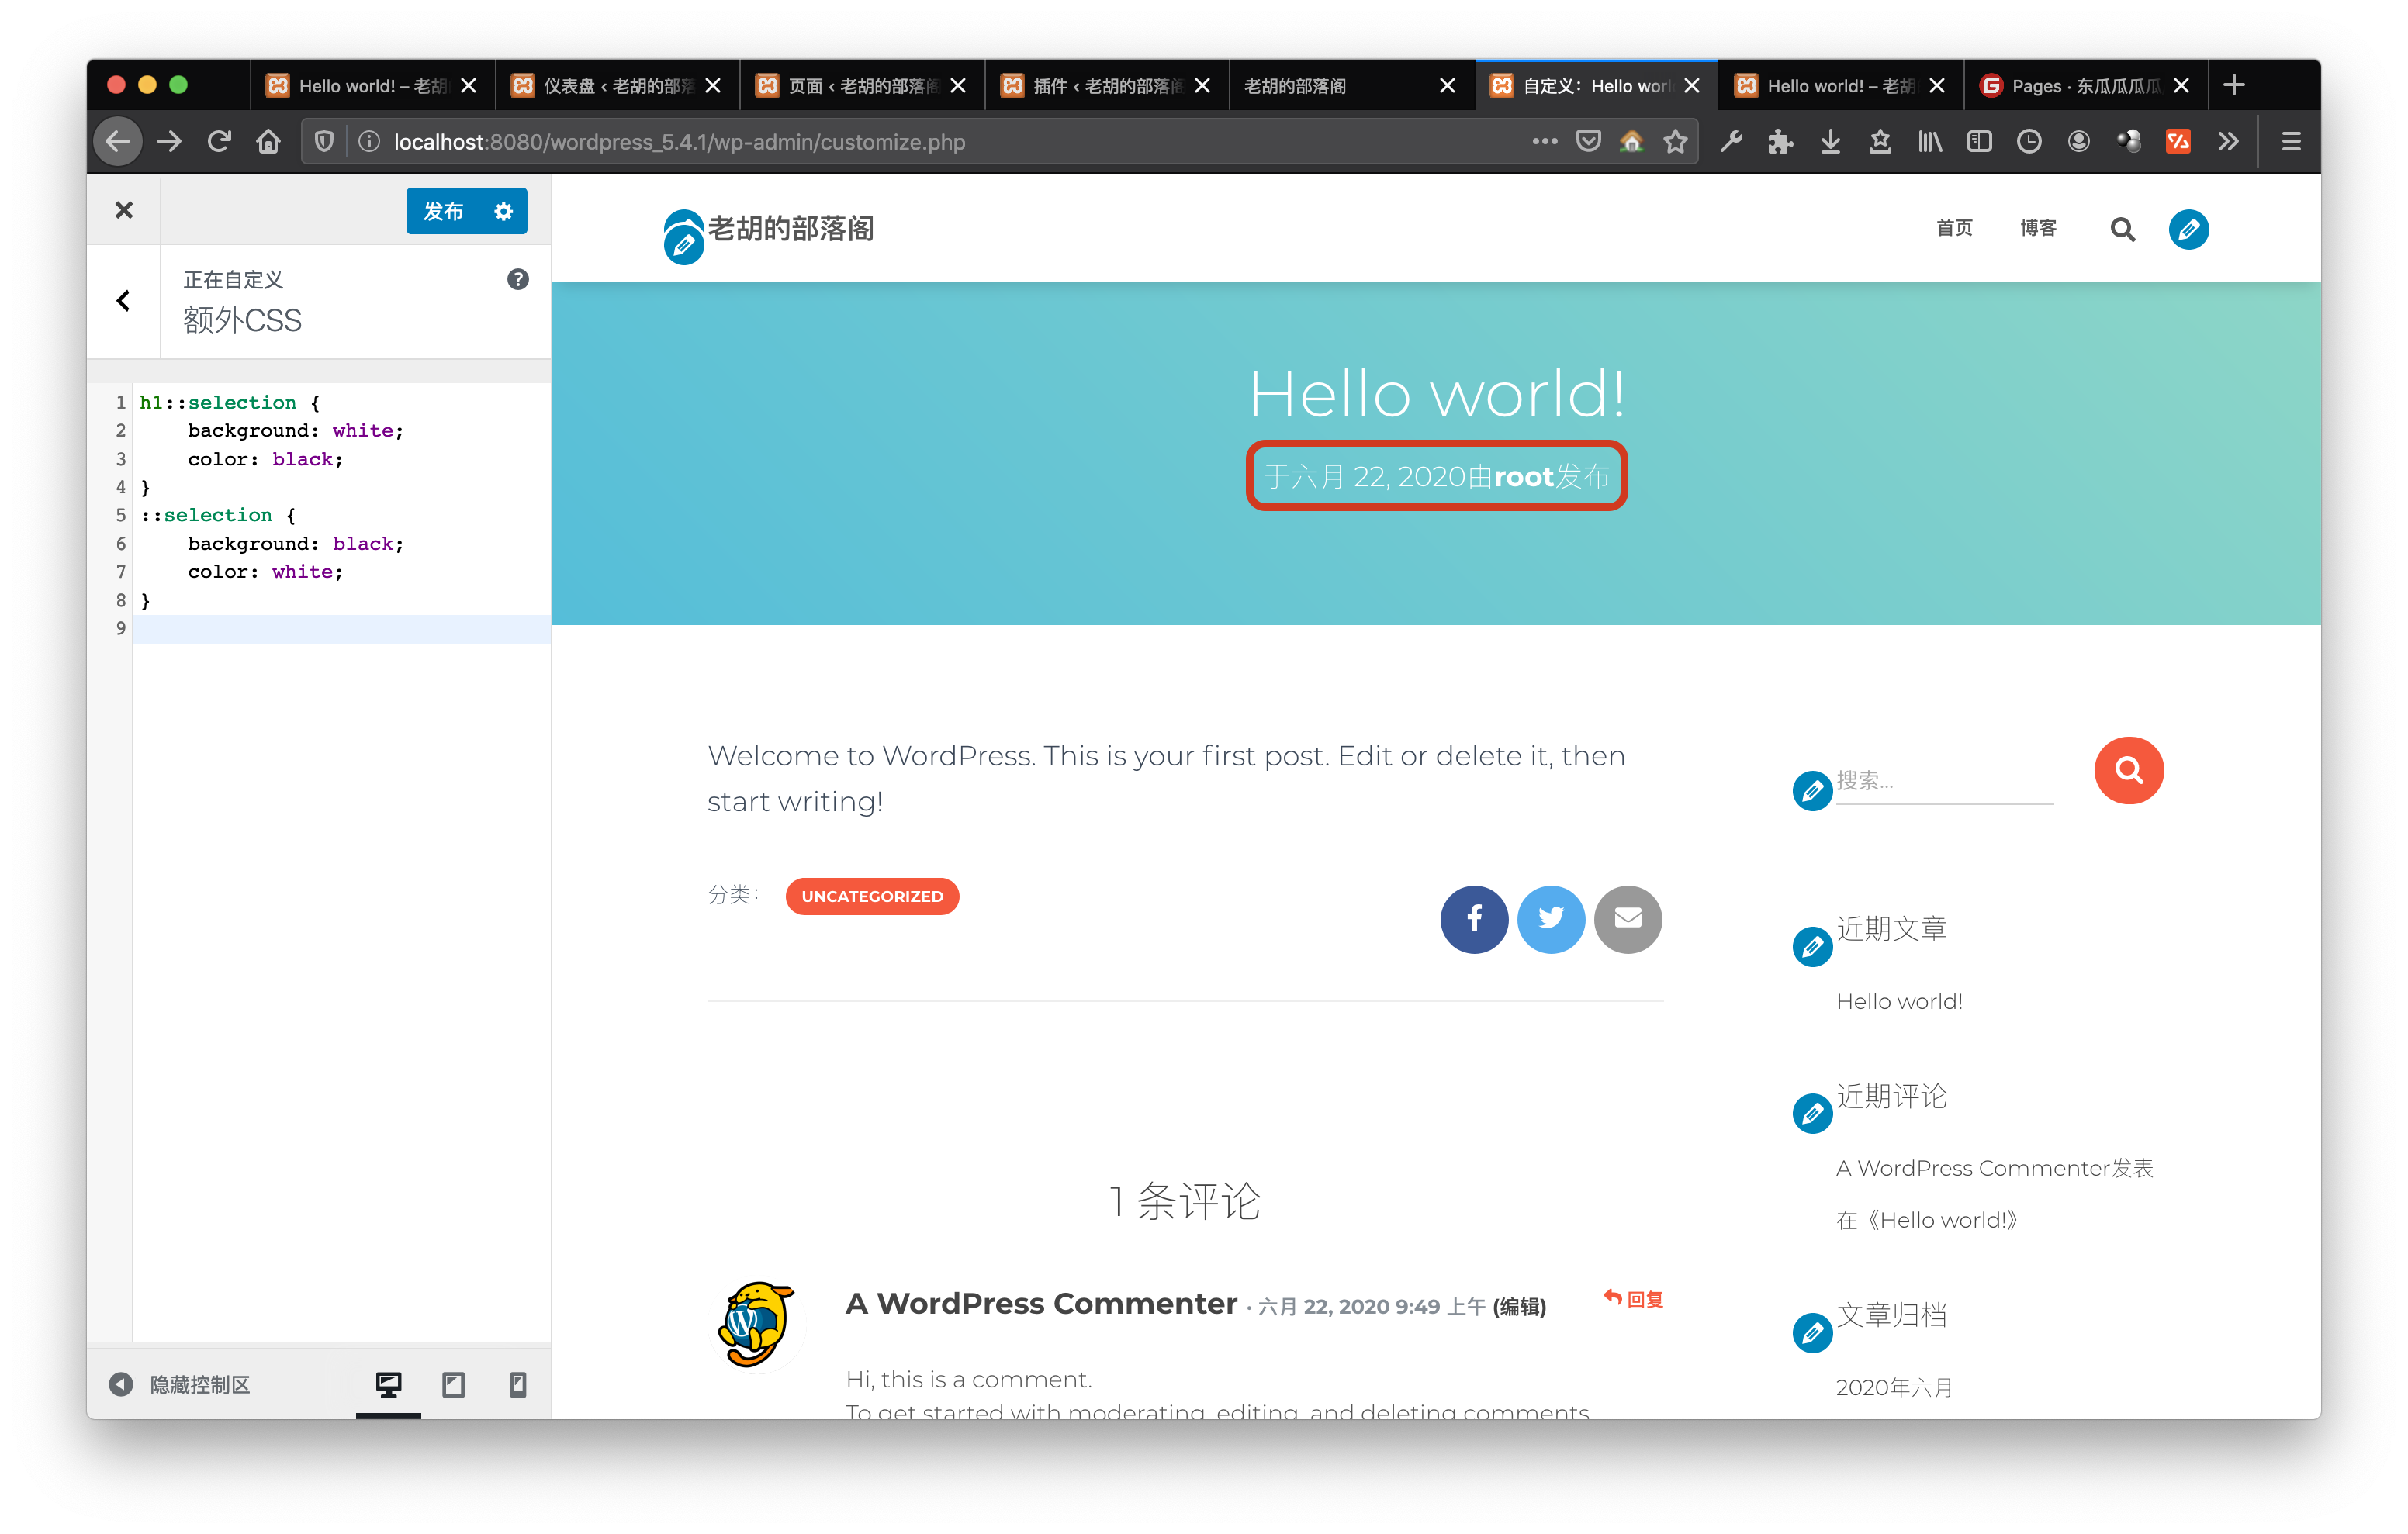
我们可以把所有一级标题选择后改为白底黑字:
h1::selection {
    background: white;
    color: black;
}
效果:
当然,我也可以改2级标题,3级标题等等。
但问题又来了,怎么把这块改为白底黑字呢?
可以这样:
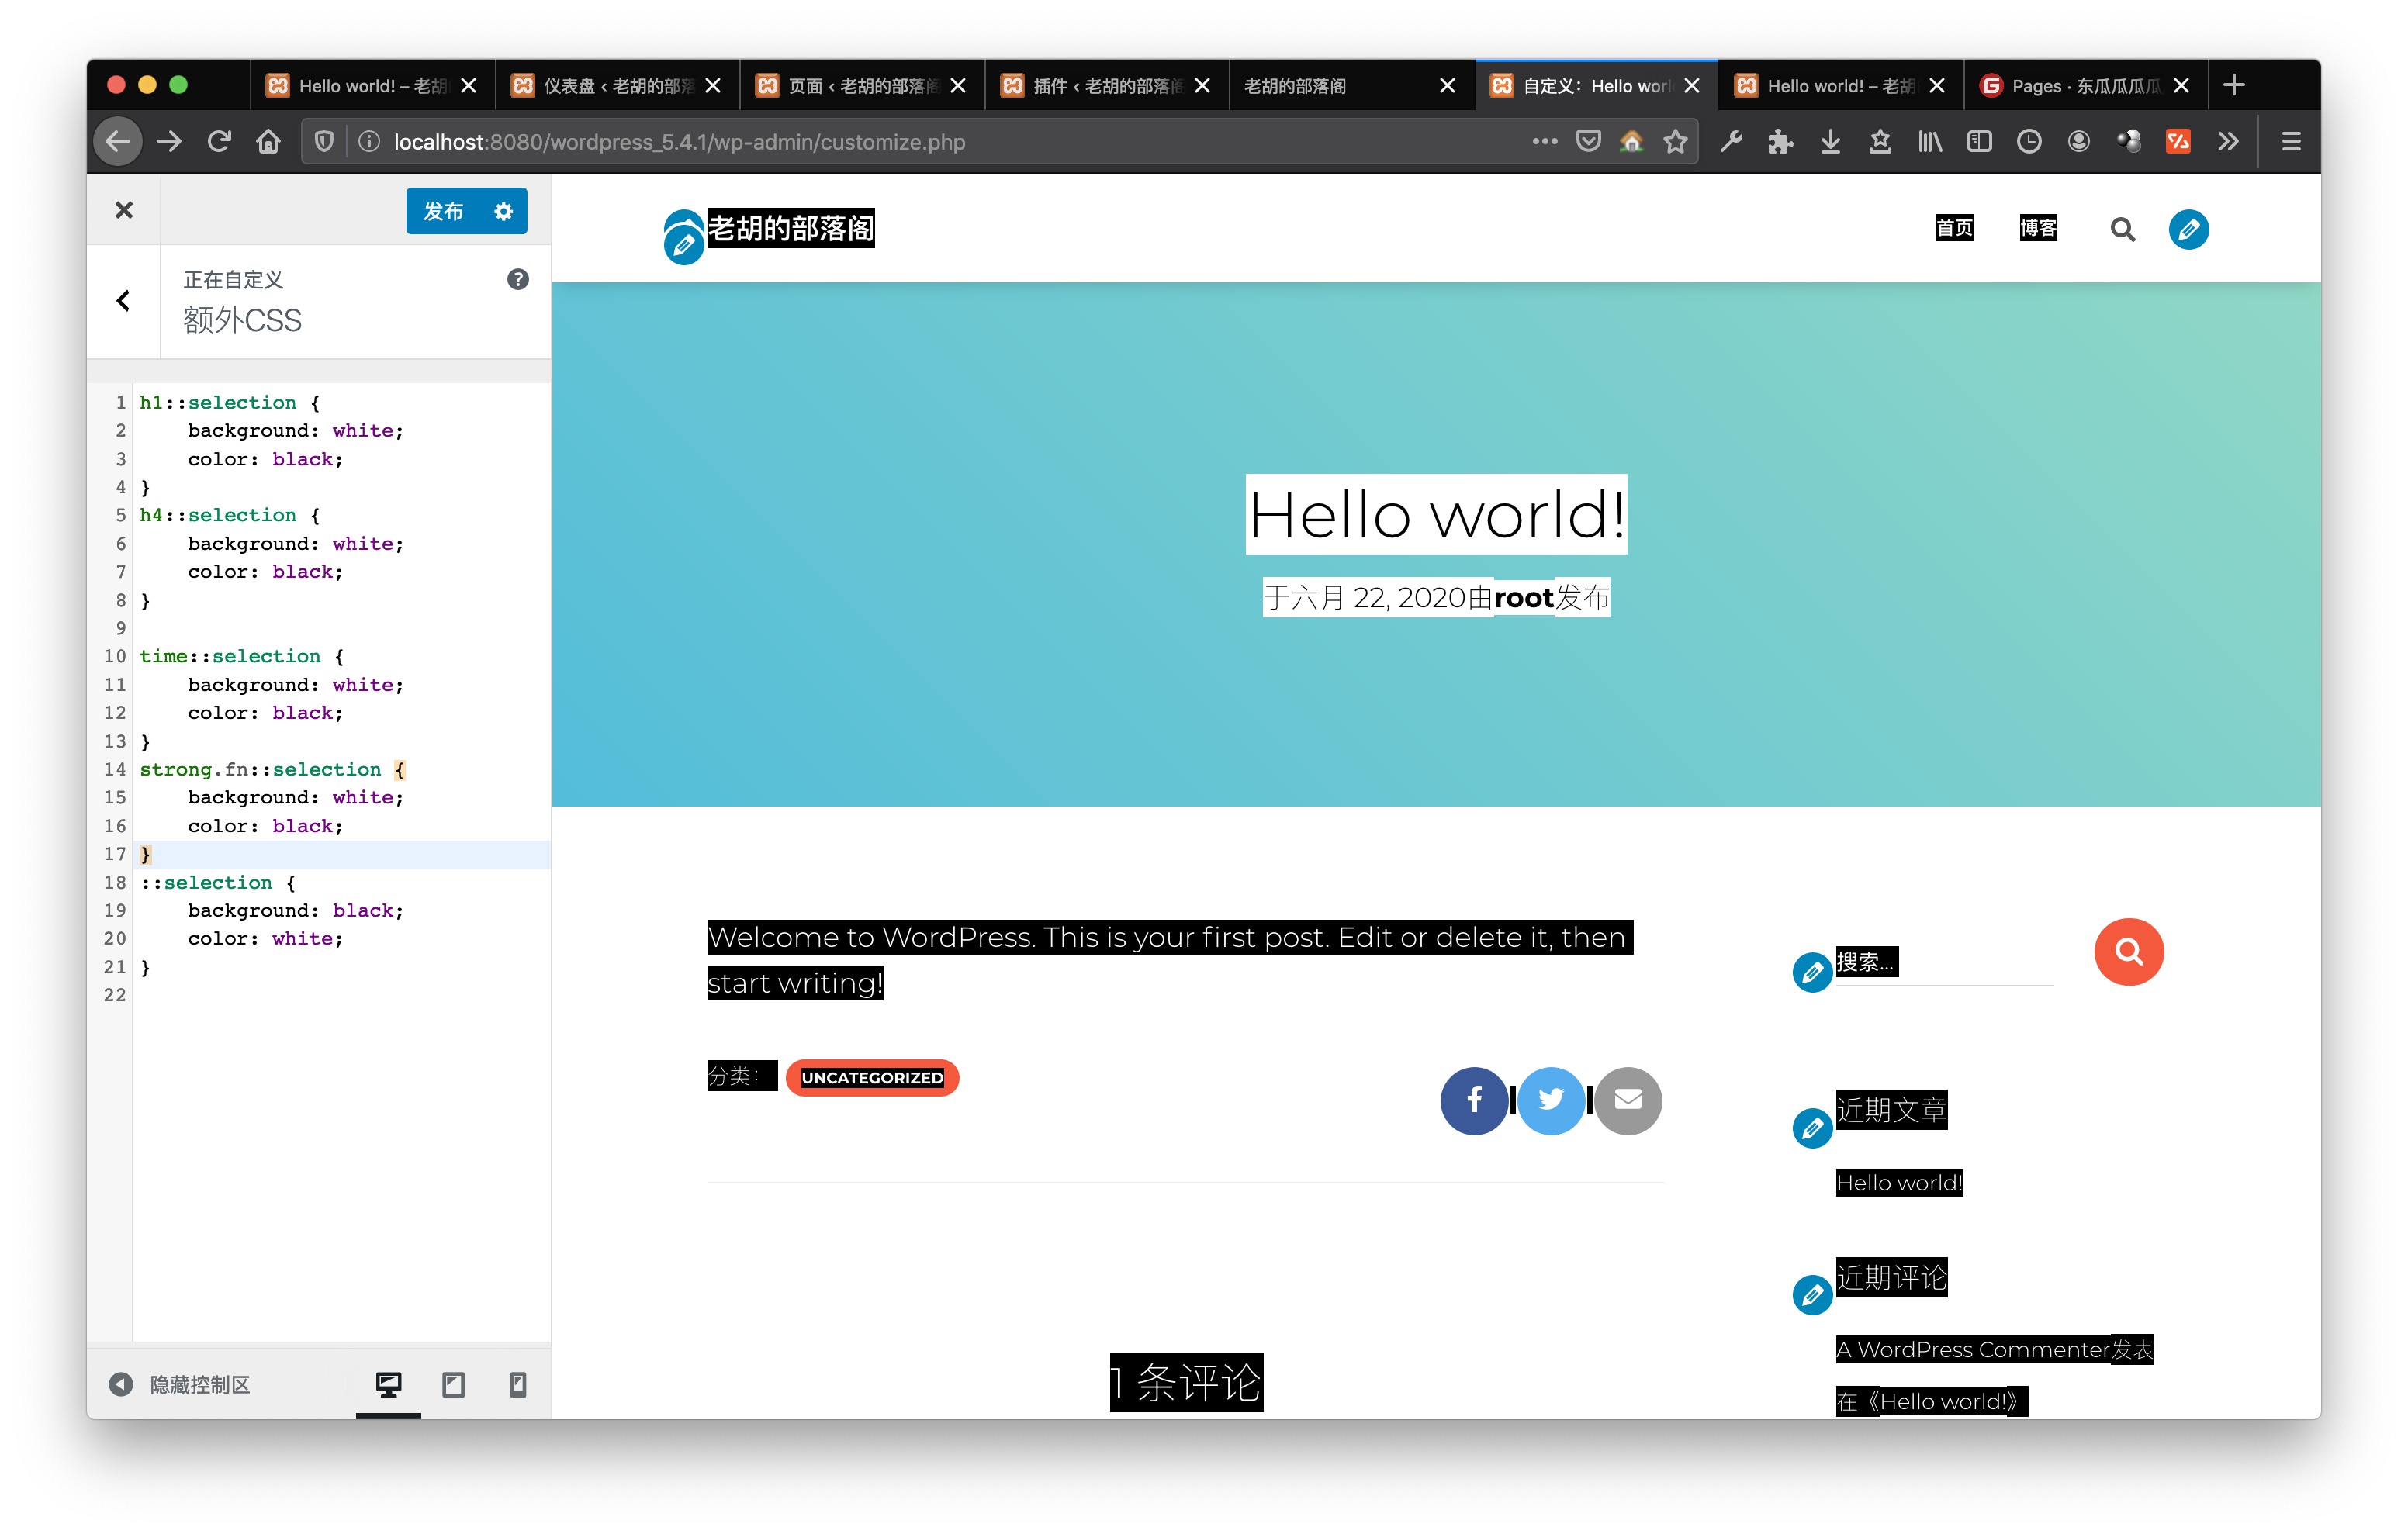
h4::selection {
    background: white;
    color: black;
}

time::selection {
    background: white;
    color: black;
}
strong.fn::selection {
    background: white;
    color: black;
}
效果:
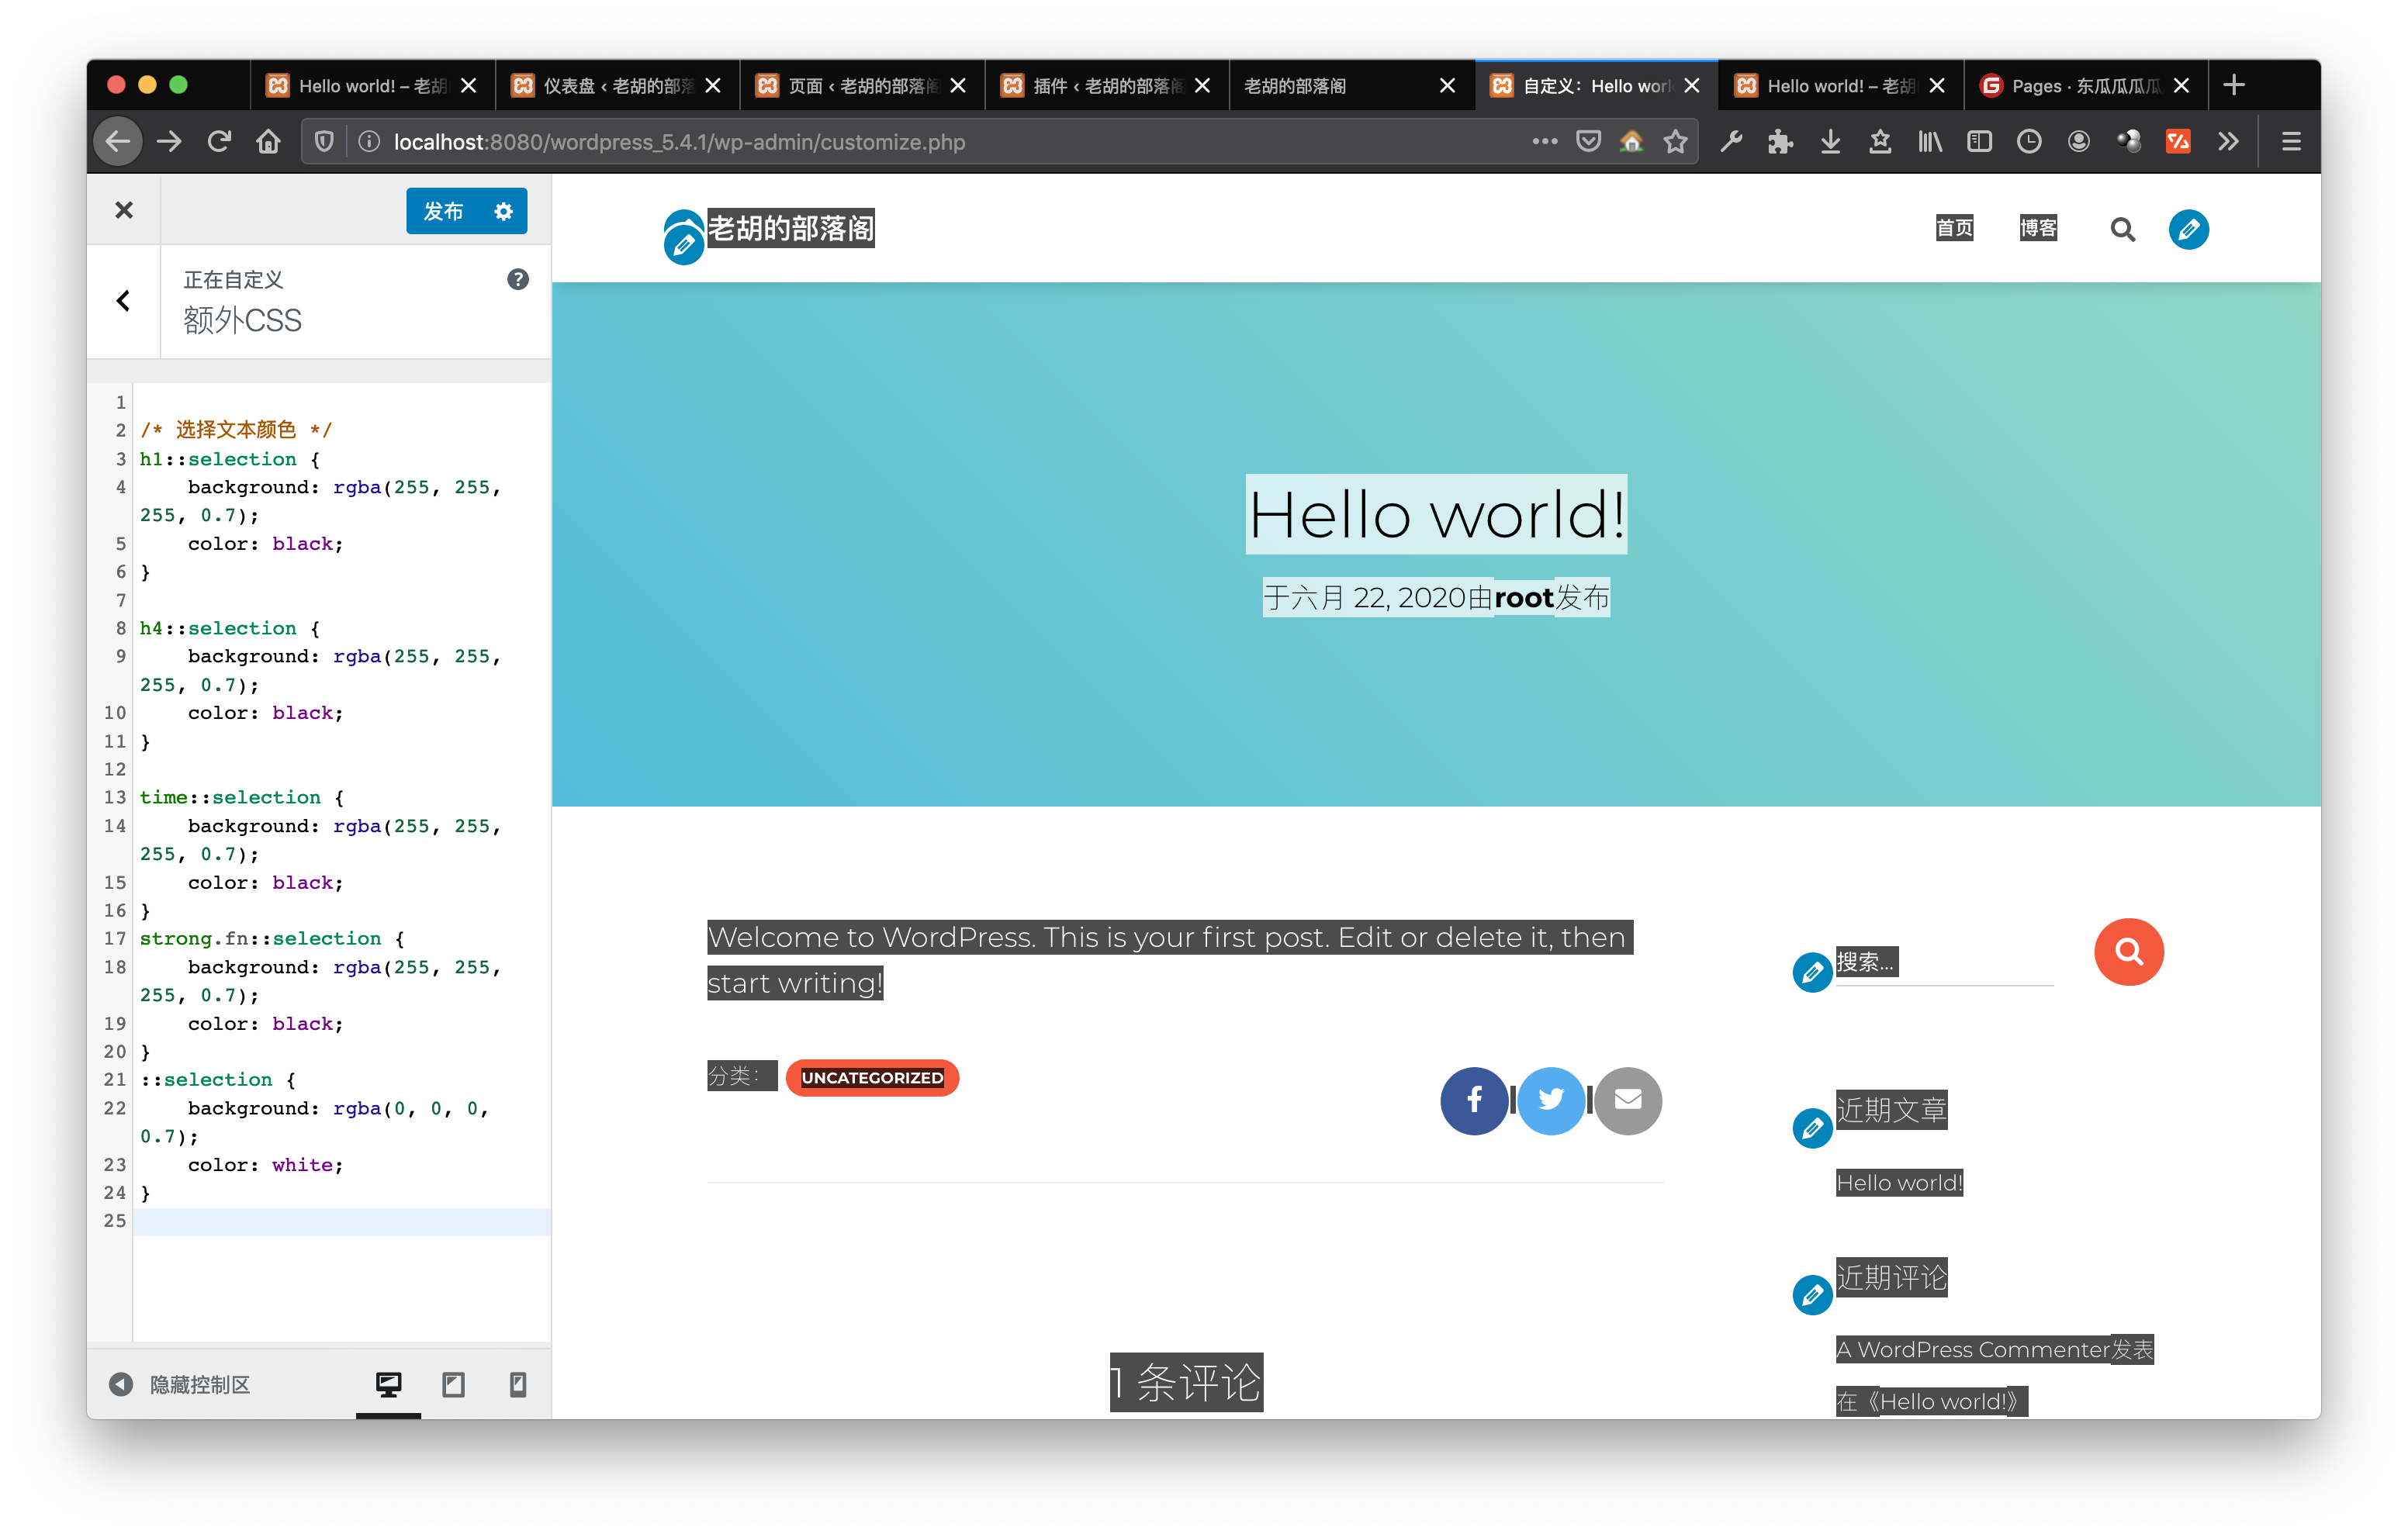
但这样白的太彻底了,如何更改透明度呢?
我们可以使用RGBA,
将透明度调为0.7左右:
h1::selection {
    background: rgba(255, 255, 255, 0.7);
    color: black;
}

h4::selection {
    background: rgba(255, 255, 255, 0.7);
    color: black;
}

time::selection {
    background: rgba(255, 255, 255, 0.7);
    color: black;
}
strong.fn::selection {
    background: rgba(255, 255, 255, 0.7);
    color: black;
}
::selection {
    background: rgba(0, 0, 0, 0.7);
    color: white;
}
效果如图:
4.2、页脚渐变
由于文章页脚是黑色的,而相关文章四个大字仍是黑色的,看起来极不舒服,但我尝试用CSS更改相关文章四个大字是,却失败了,无奈,只好更改页脚了。
如何把纯黑的页脚改为由白到黑渐变?
CSS代码:
div.section.related-posts {
    background: linear-gradient(#ffffff, #323437);
}
4.3、CSS更改鼠标悬停时按钮的颜色
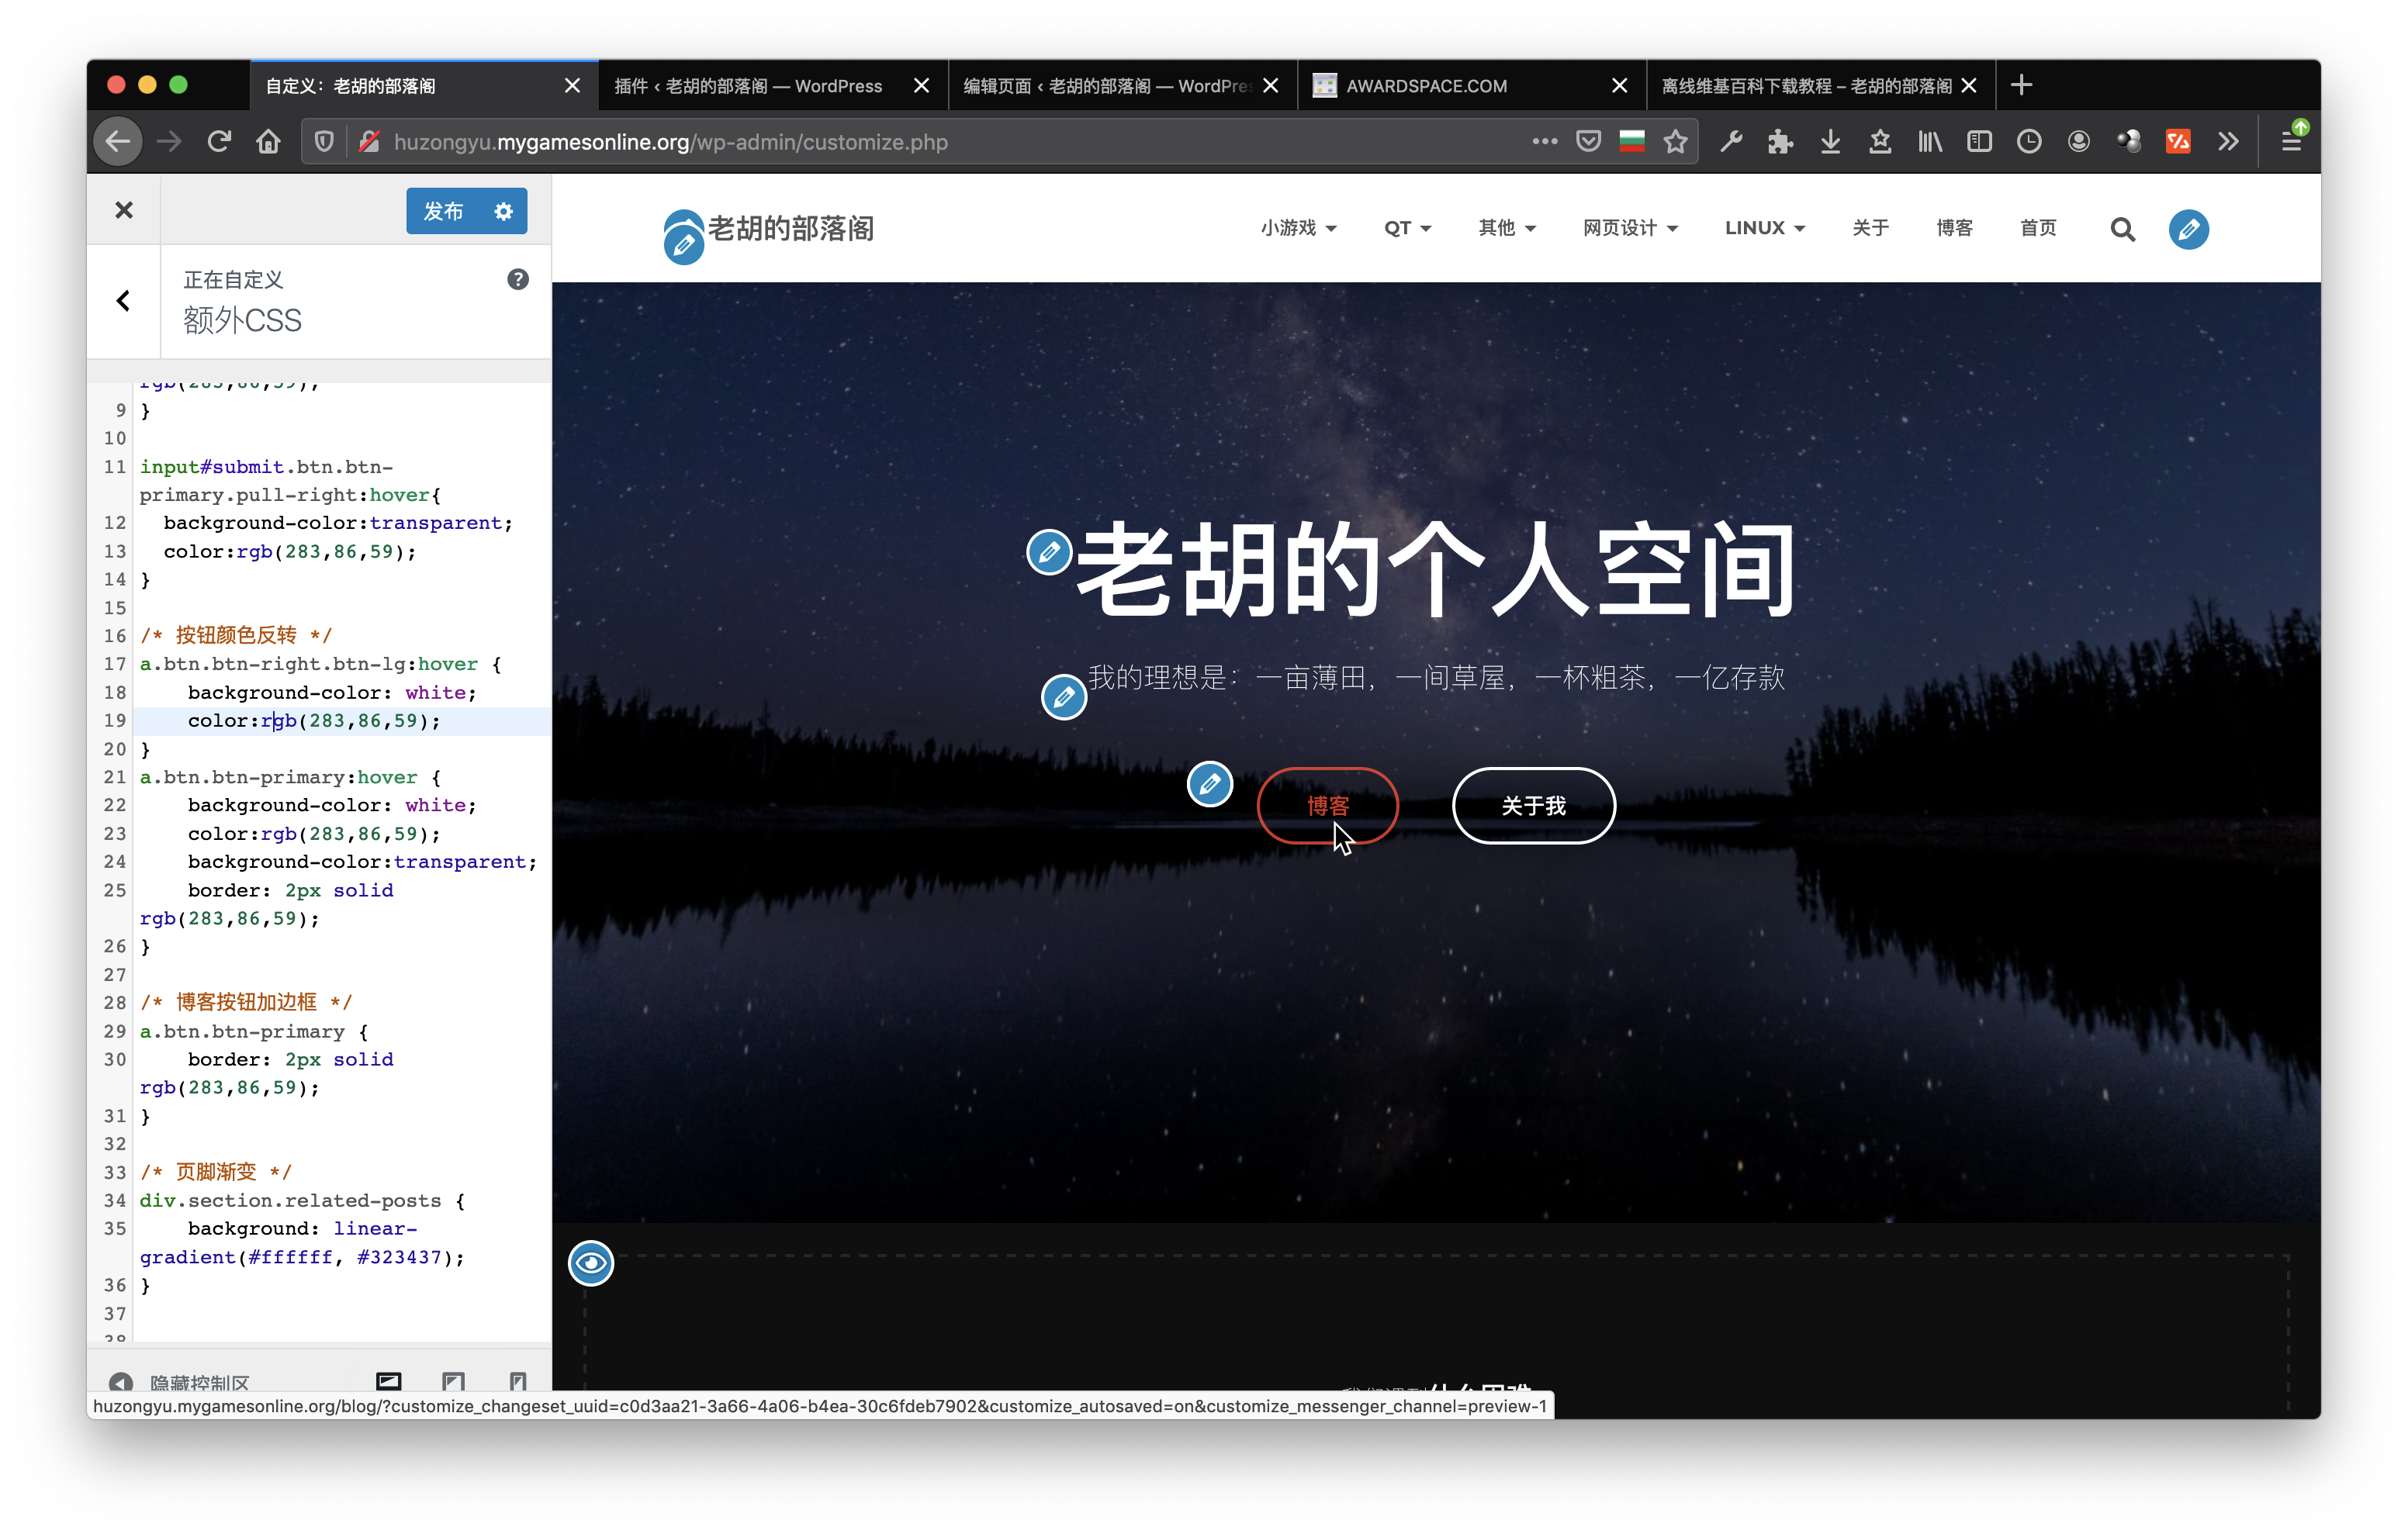
随着我的网站越来越完善,我对按钮的设计也有要求了。
比如大标题区域的那个博客按钮,我想让鼠标悬停时把它改成中间是透明的,字是红色的,该怎么办?(直男审美已无药可救)
可以添CSS:
a.btn.btn-primary:hover {
    background-color: white;
    color:rgb(283,86,59);
    background-color:transparent;
    border: 2px solid rgb(283,86,59);
}
再给按钮加边框:
a.btn.btn-primary {
    border: 2px solid rgb(283,86,59);
}同样的,我可以更改关于按钮悬停时的颜色:
a.btn.btn-right.btn-lg:hover {
    background-color: white;
    color:rgb(283,86,59);
}
效果:
4.4、更改鼠标样式
这其实很简单,只要添加CSS代码:
body{cursor:url(鼠标文件的路径),auto;}但是要注意
更改鼠标样式会让你的网站变得无比骚气,并且很影响用户的体验,更改鼠标样式时要慎重啊!
~~~~完结的分割线~~~~
本文之后还会持续更新。。。
0 条评论